REV 1.0
23
In
itia
l s
ett
in
g
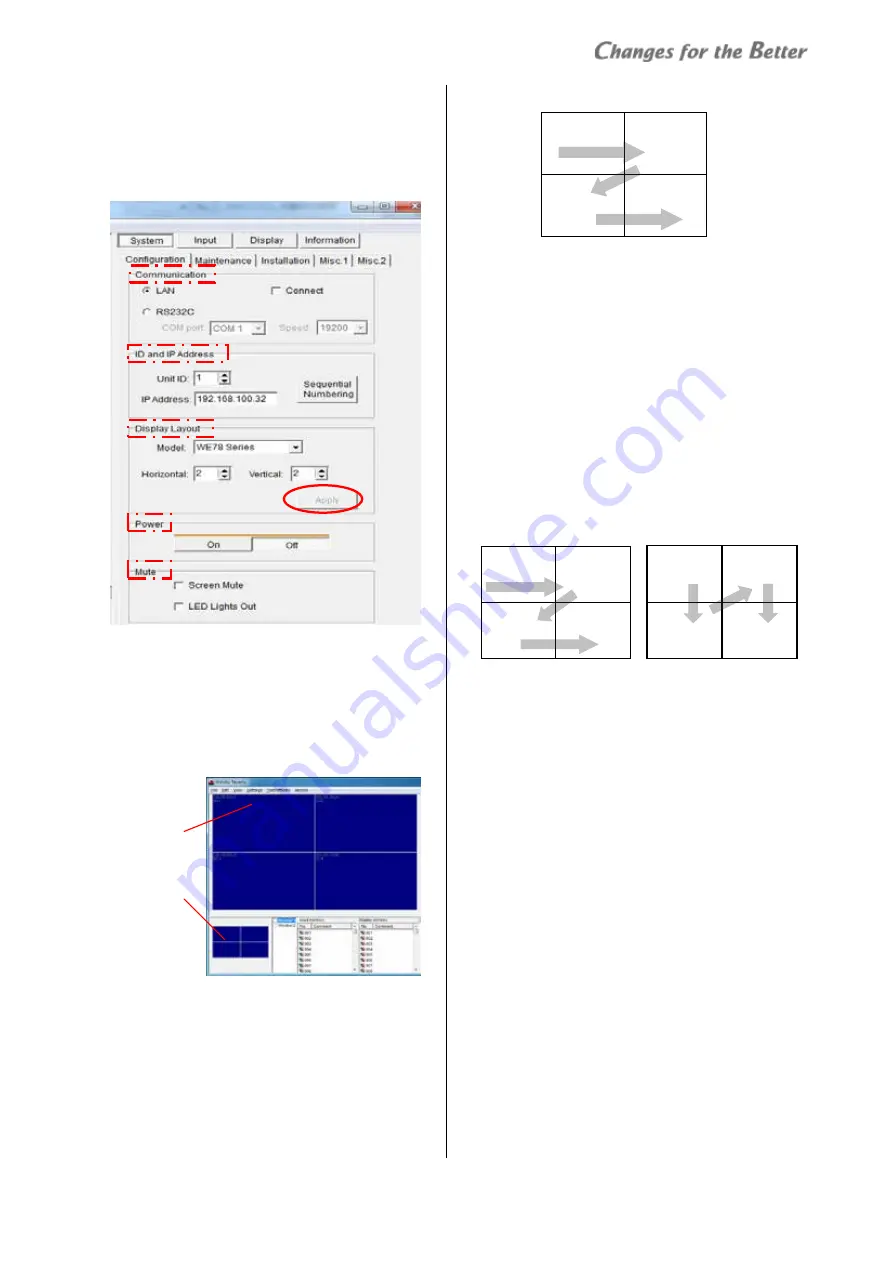
System configuration
System > Configuration
Put the information of the monitor configuration to
Wallaby.
Display Layout
1
Model: select the monitor model to control
2
Horizontal, Vertical: set horizontal and vertical
monitor numbers respectively.
3
Click “Apply” button, which shows designated
number of panels on both panel area and monitor
select area.
ID and IP address
You can assign unit IDs and IP addresses to Wallaby,
which numbers have been set in the monitors.
•
The unit IDs and IP addresses on the monitors need
to be set on-screen menu beforehand (page 23).
•
The numbers are automatically allocated in a
sequential order from the upper left panel as below
when the Display Layout setting is applied. You can
re-assign them to suit the actual monitor setting.
Follow the procedure below if you change such
starting values of the sequential unit IDs and IP
addresses.
1
Select the upper left panel in the display wall
configuration on the panel area or monitor select
area. This panel will be the base point to allocate the
numbers.
2
Enter (or select) the ID number / IP address as the
starting values.
3
Click “Sequential Numbering” button. The unit IDs
and the IP addresses are automatically allocated in a
sequential order from the upper left panel in a
horizontal direction.
•
If you click the “Sequential Numbering” button
with Shift key, it allocates the numbers in a vertical
direction.
When you modify it individually, select the target panel
and enter (or select) a new ID number / IP address.
Communication
1
Choose the communication method out of “LAN” or
“RS232C”. Set COM port and communication speed
adequately when you choose “RS232C”.
2
Make sure that the main power switch on the
monitors has been turned on.
3
Check on “Connect” to connect with the monitors.
When the connection is establishment, the panels
will be blue. Other panels will be gray.
•
When connected, the pixel map setting in Wallaby,
configured in Display Layout setting, overwrites
the pixel map setting in monitors (page 25). You
need to be careful if you assign a different
configuration to Wallaby from the actual one. It
may change the monitor setting.
Power
Switch between power on and standby state.
Mute
•
Screen Mute
Switch between screen mute and un-mute.
•
LED Lights Out
Switch between turning off (LED ready) and on the
LED light source.
ID 1
192.168.100.32
ID 2
192.168.100.33
ID 4
192.168.100.35
ID 3
192.168.100.34
ID 1
10.10.10.101
ID 2
10.10.10.102
ID 4
10.10.10.104
ID 3
10.10.10.103
ID 1
10.10.10.101
ID 3
10.10.10.103
ID 4
10.10.10.104
ID 2
10.10.10.102
Shift key + “Sequential Numbering”
”Sequential Numbering”
Panel area
Monitor select area


