Be sure to forward the manual to the end user.
Before use, you should read this user’s manual carefully toproperly operate this device.
LZ311Z530H04
User’s Manual
MODEL
AUTOMATIC POWER FACTOR CONTROLLER
VAR-6A VAR-12A
Page 1: ... to forward the manual to the end user Before use you should read this user s manual carefully to properly operate this device LZ311Z530H04 User s Manual MODEL AUTOMATIC POWER FACTOR CONTROLLER VAR 6A VAR 12A ...
Page 2: ... that may lead to death or serious injury if ignored or incorrectly handled This symbol indicates matters that may lead to injury or physical damage if ignored or incorrectly handled This symbol indicates precautions to avoid any device failure or to operate this device properly Introduction Besides the main unit the following accessories are packaged User s Manual this document Embedded Mounting ...
Page 3: ...trol Set up Mode 24 5 3 Measure Set up Menu 1 Set up of Phase Wire Type Using VT direct input Primary Voltage Primary Current 26 5 4 Measure Set up Menu 2 Set up of Combination 29 5 5 Control Set up Menu 1 Set up of Target Power Factor 30 5 6 Control Set up Menu 2 Set up of Light Load Power Ratio 31 5 7 Control Set up Menu 3 Set up of Delay Time 33 5 8 Control Set up Menu 4 Set up of Control Metho...
Page 4: ... or systems consult with our sales representative Cautionary Instructions for Installation and Connection Read this User s Manual before using Safety Precautions To secure safety the connecting work should be done by a person qualified in performing electric wiring work Do not perform hot line work It can cause electrification device failure or fire At the time of tightening screws and wiring be c...
Page 5: ...appropriate terminals can cause malfunction device failure burnout or fire After tightening all the screws be sure to confirm that all the screws are tightened enough Leaving any screws loose can cause malfunction fire or electrification Tighten the screws to the appropriate torque Tightening to the excessive torque can cause terminal damage Refer to page 44 In order to prevent the invasion of noi...
Page 6: ...ted Discharges down to 50 V or less in 5 minutes DR Discharging Resistor Has 6 of a capacitor Impress transient phenomenon and limits the fifth harmonic waves 13 series reactors are used when voltage distortion exceeds 5 5 Series Reactor SR Series Reactor When a discharging coil DC Discharging Coil is used residual charge will be discharged down to 5 V or less in 5 seconds when the capacitor is di...
Page 7: ...s Discharge coil over 1 minute when the connection disconnection test with the high voltage circuit is carried out Carry out the test with the delay time set to be shorter than it should can cause capacitor failure accidents Do not dismantle or remodel this device It can cause malfunction electrification or fire WARNING CAUTION ...
Page 8: ...n in service life Do not Place where the ambient temperature exceeds the temperature range 20 to 60 Place where the daily average temperature exceeds 35 Place where the ambient humidity exceeds the humidity range 30 to 85 Place with a lot of dust corrosive gas salt or oily smoke Place with a lot of vibrations or impacts Place where the device may be exposed to rain or drops of water Place exposed ...
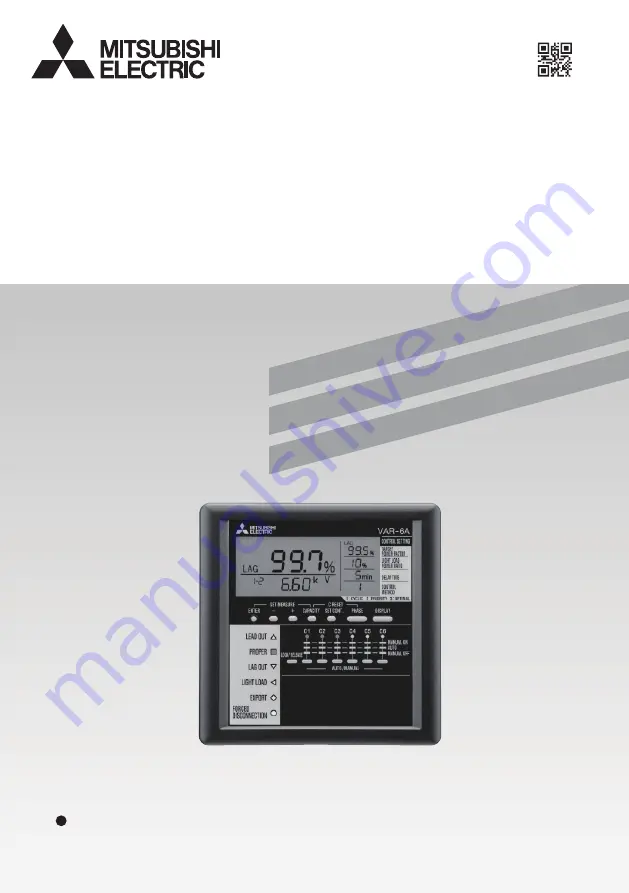
Page 9: ...for operation In addition it can carry out operation tests for connecting disconnecting Control Set up Mode Set up of target power factor control method and capacity are possible Set necessary items for operation Flow of each mode Measurement Display Capacity Display Operation Mode Measure Set up Menu 1 Measure Set up Menu 2 TEST Menu Control Set up Menu 1 Control Set up Menu 2 Control Set up Menu...
Page 10: ... t n e h w p u s t h g i L l o r t n o C N O l a u n a m l o r t n o C c i t a m o t u A r o f D E L 2 o t t e s s i t i u c r i c e h t n e h w p u s t h g i L l o r t n o c c i t a m o t u a l o r t n o C F F O l a u n a M r o f D E L 2 e h t o t t e s s i t i u c r i c e h t n e h w p u s t h g i L l o r t n o c F F O l a u n a M n o i t c e n n o c s i D d e c r o F r o f D E L d n a t n e m e...
Page 11: ... D E L 1 e h t o t t e s s i t i u c r i c e h t n e h w p u s t h g i L l o r t n o c F F O l a u n a M R A V A 2 1 4 C 3 C 2 C 1 C 5 C 6 C 0 1 C 9 C 8 C 7 C 2 1 C 1 1 C D E L 7 t i u c r i C m o r f s t r a t s t f e l e h T l o r t n o C l a u n a M o t u A 3 4 o t r e f e r e s a e l P 1 s l i a t e d r o f s e g a p 5 1 r e v o e g n a h C o t u A f o p u t e S 1 1 5 o t r e f e r e s a e l P...
Page 12: ...d n i s i r e b m u N t i u c r i C y t i c a p a c e h t h t i w s u t a t S r e b m u N t i u c r i C e s a h P s d a e l r o t c a f r e w o p n e h W n o s n r u t n g i s D A E L s g a l r o t c a f r e w o p n e h W n o s n r u t n g i s G A L s u t a t s G A L D A E L p u t e S t a n o s n r u t n g i s T E S e d o M s u t a t s e d o m P U T E S n o i t a r e p o e h t g n i r u d p u s t ...
Page 13: ...ey are not in use Please do not connect Terminals for inputtingthe current CT secondary signal to the measurement circuit Connection disable input terminal CS Disconnection disable input terminal TS Disable signal TA S Terminals for inputting the connection disable signal to disable the connection operation Terminals for disconnection disable signal to disable the disconnection operation Terminals...
Page 14: ...connection Level is defined as Connection Level capacity to be disconnected 1 2 The light load disconnection level is a value calculated as α primary voltage setting value primary current setting value Light Load Power Ratio 3 3W α 3 4W α 3 EXPORT LEAD OUT LEAD LAG Disconnection Level Active Power LAG OUT Light Load Disconnection Level Connection Level PROPER Reactive Power LIGHT LOAD Details of D...
Page 15: ...wer decreases LEAD OUT LED lights up and the control signal of capacitor will open after the Delay Time passes c Manual OFF set up Manual OFF set up LED for Manual OFF control lights up is done by pressing AUTO MANUAL Key and the control signal of capacitor will close for each capacitor immediately regardless of the input conditions 1 The Auto Manual changeover is effective from the instant it is ...
Page 16: ... increase The features of each control is shown below 4 4 Features of each Control Cyclic control Priority control Optimal control Control name Feature The cyclic control is suitable for controlling capacitors with equivalent capacity Since the number of the switching operation of the vacuum electromagnetic contactors are made equally long lifetime can be expected It is necessary to replace all th...
Page 17: ...The priority control is suitable for controlling the different capacity capacitor group in stable load circuit which use the large capacity capacitor on base and adjusts changes of reactive power on the small capacity capacitors But since the switching of certain vacuum electromagnetic contactors will become more frequent than those of others maintenance and inspections must be made frequently and...
Page 18: ...ctuation is frequent But since the switching of vacuum electromagnetic contactors become frequent and not equal the maintenance and inspections must be performed frequently and each contactor must be replaced at the end of their respective lifetime At the time of turning on the power supply the device first operates in the cyclic control mode until all capacitors C1 to C6 It is C1 to C12 at the ti...
Page 19: ...ads out further than 95 Changing Area in this status changing control takes place where large capacity capacitor opens and small capacity capacitor closes 4 8 Capacitor Changing Control at Optimal Control Operation Setting value of Target Power Factor is not 100 Changing Area EXPORT LEAD OUT PROPER LAG OUT Light Load Disconnection Level Disconnection Level LEAD 95 Level Active Power Connection Lev...
Page 20: ...ghts up When EXPORT LED lights up the same operation as the case when LIGHT LOAD LED lights up is carried out The order of disconnecting capacitor is as follow In cyclic control capacitor circuits are turned OFF This starts from the first capacitor circuit where the connection signal is outputted Disconnection proceeds in the same order as connection In priority control capacitor circuits are turn...
Page 21: ...citor circuits closed by automatic control When these input terminals are cut all capacitors are cut offsimultaneously When the signal across the input terminals becomes OFF the control begins Please use the applicable for the switching of 5 V 25 mA DC for shorting 4 10 Forced Disconnection Operation T VAR 6A or VAR 12A TA S T Capacitor OFF Capacitor OFF N O N O OFF Automatic 0 8 20 20Time 0 8 20 ...
Page 22: ...ue Confirmation Mode 5 Set up Measure Set up Menu END Measure Set up Menu 1 Measure Set up Menu 2 combination Operation Mode save the settings cancel the setting Auto Manual Control Set up 1 3 1 4 2 4 2 select OFF select ON Manual ON Measurement Display Auto Manual OFF Phase Wire Type using VT direct input Direct Voltage 3 3W 6 2 5 Special Primary Voltage Primary Current Special Primary Currrent D...
Page 23: ...YES display and a CANCEL displays are switched press A YES display and a CANCEL displays are switched The restart of device This Key is effective only on a CANCEL Display ENTER ENTER DISPLAY DISPLAY PHASE LOCK RELEASE AUTO MANUAL Press for 2 seconds It locks or releases an automatic manual change press capacitor circuit is changed LOCK RELEASE AUTO MANUAL Measure Set up Mode The Set Value Confirma...
Page 24: ... memorizing the contents of a setting CANCEL Display It changes to Operation Mode after canceling the contents of a setting Press for 2 seconds It locks or releases an automatic manual change press Control Manual ON AUTO Manual OFF of each capacitor circuit is changed Press for 2 seconds It locks or releases an automatic manual change press Control Manual ON AUTO Manual OFF of each capacitor circu...
Page 25: ...to set up each setting value and complete set up by pressing Key 1 In VAR 6A it is C6 In VAR 12A it is C12 Delay Time Control Method select Auto select HoLd Capacity Auto HoLd Capacity Manual Input of C1 Capacity Manual Input of C6 1 Control Set up Menu 3 Delay Time Control Set up Menu 4 Control Method Control Set up Menu 5 Set up of Capacity Control Set up Mode Press Key Press Key for over 2 seco...
Page 26: ...t Voltage 3 4W Note 1 A setting value is the phase to neutral voltage Note 2 When 3P3 is selected in Phase Wire Type and yES is selected in Using VT direct input skip this set up continues onto the next pages 3P3 3 3W 3P4 3 4W yES using VT no direct input 110 V 220 V 63 5 V 110 V 220 V 240 V 254 V The present setting value is displayed How to set up measurement Measure Set up Menu END is displayed...
Page 27: ...age Key Special Primary Voltage Key Primary Current continues onto the next pages Key From the previous page ENTER DISPLAY ENTER DISPLAY ENTER DISPLAY ENTER DISPLAY ENTER DISPLAY 63 5 V 100 V 110 V 115 V 120 V 220 kV 275 kV 380 kV 500 kV 550 kV 750 kV SP 33 kV 66 kV 77 kV 110 kV 132 kV 154 kV 187 kV 11 kV 13 2 kV 13 8 kV 15 kV 16 5 kV 22 kV 24 kV 220 V 440 V 690 V 1100 V 2 2 kV 3 3 kV 6 6 kV 220 0...
Page 28: ... From the previous page Note 1 When other settings except for SP are selected in skip this set up Note 2 Skipping Set up will have the two digit to one variable ENTER ENTER DISPLAY 5 00 A 99 0 A 100 0 A 110 0 A 30 00 kA A changed setting value is displayed 5 Set up When the Measure Set up is changed all the capacitors which is connecting are cut off and the control starts again Continuation of Mea...
Page 29: ...combination Master Slave How to set up combination When the cyclic control with combination is not used no this setting change is required Combination setting is used to increase the number of controllable capacitor circuits by using two units of this device with the cyclic control For details refer to page 48 Measure Set up Menu END is displayed by pressing ENTER Key and CAPACITY Key for 2 second...
Page 30: ... 25 about how to finish the set up or to continue other set up Choose 1 u n e M p u t e S l o r t n o C m o r f Screen on the right displayed ENTER ENTER DISPLAY The present setting value is displayed A changed setting value is displayed LAG 85 0 to LAG 99 5 to LEAD 95 0 5 5 Control Set up Menu 1 set up of Target Power Factor How to set up target power factor Control Set up Menu End is displayed b...
Page 31: ...nt setting value is displayed A changed setting value is displayed 0 to 10 to 35 5 6 Control Set up Menu 2 Set up of Light Load Power Ratio How to set up light load power ratio Control Set up Menu END is displayed by pressing SET CONT Key for 2 seconds in Operation Mode g n i s s e r p y b d e t c e l e s s i 2 u n e M p u t e S l o r t n o C e r o m r e h t r u F Key or Key Then the following set...
Page 32: ...about 20 to 40 higher than the power at nighttime Please decide the margin taking into account load charge during night time Calculate Light Load Power Ratio b Calculate the following formula based on primary voltage and primary current 5 Set up Continuation of Control Set up Menu 2 Light Load Power Ratio 100 Light Load Disconnetion level α Primary Voltage Primary Current 3 Light Load Power Ratio ...
Page 33: ...ime Note 1 A setting step is 1 minute Note 2 Please set up the Delay Time interval complying with the electric discharge device of the capacitor When the illuminated state of the LED for power factor status display continues for a Delay time a signal for turning on off the capacitor is output Control Set up Menu Choose whether to complete the set up refer to page 24 and 25 about how to finish the ...
Page 34: ...ination ON OFF setup is ON control method serves as only cyclic control Control Set up Menu Choose whether to complete the set up refer to page 24 and 25 about how to finish the set up or to continue other set up Choose 4 from Control Set up Menu Screen on the right is displayed ENTER ENTER DISPLAY The present setting value is displayed A changed setting value is displayed 1 Cyclic 2 Priority 3 Op...
Page 35: ...ive power before and after capacitor connecting is stored as Capacity Can be turned on either automatically or manually Note 1 This set up is skipped when Auto is selected in Capacity Auto HoLd Note 2 VAR 6A is the circuit 1 to 6 and VAR 12A is the circuit 1 to 12 Note 3 The flickering digit can be changed Control Set up Menu Choose whether to complete the set up refer to page 24 and 25 about how ...
Page 36: ...the test Press Key All the circuits set as automatic control are disconnected at once u n e M T S E T o t n r u t e R Operation tests for the connecting disconnecting Key Note 1 The circuit set as Manual ON and Manual OFF does not connect or disconnect Note 2 Automatic recognition of a capacity cannot be performed in the connection of a test Note 3 1 cycle is circuit 1 to 6 in VAR 6A and circuit 1...
Page 37: ...f release the device is controlling by the previous setting Note 3 The Key lock and release circuit 1 to 6 or circuit 7 to 12 by package LOCK RELEASE LOCK RELEASE LOCK RELEASE AUTO MANUAL AUTO MANUAL Manual control Refer to page 15 Automatic Control Including the Light load disconnection Refer to page 15 20 Closing prohibited Refer to page 46 Opening prohibited Refer to page 46 Forced opening Refe...
Page 38: ... Phase Power Factor Current 3 Phase Power Factor Voltage 12 Phase Example of display change voltage Power Factor Voltage 23 Phase Power Factor Voltage 31 Phase DISPLAY DISPLAY DISPLAY DISPLAY DISPLAY DISPLAY PHASE PHASE PHASE PHASE PHASE PHASE A display of voltage changes by Phase Wire Type The display element of current phase or voltage phase switches by pressing PHASE Key 6 2 Changing of the Pha...
Page 39: ...display of each circuit is displayed by pressing Key or Key Then the following set ups are possible g n i s s e r p y b t e s e r e b n a c o t u A s a t e s y t i c a p a c o t u A s i p u t e s d L o H o t u A y t i c a p a C n e h W CAPACITY Key and PHASE Key for 2 seconds simultaneously in Display of Capacity t e s e r e b t o n n a c F F O l a u n a M r o N O l a u n a M s a t e s s t i u c r...
Page 40: ... voltage is 0 V or when the display of current is 0 A The display of current becomes 0 A when Input current is less than 0 4 of rated current The display of voltage becomes 0 V when input voltage is less than 6 V The display of active power becomes 0 W when the display of voltage is 0 V or when the display of current is 0 A The display of reactive power becomes 0 var when the display of voltage is...
Page 41: ...es not light up immediately LCD display becomes black END display is kept on the display Capacitor Connection Signal is output although load becomes leading power Capacitor Disconnection Signal is output although load becomes leading power Capacitor is not disconnected although LEAD OUT LED lights up Capacitor is not connected although LAG OUT LED lights up LAG OUT LED does not light up and capaci...
Page 42: ...TO MANUAL LOCK RELEASE MANUAL OFF AUTO MANUAL ON 1 CYCLIC 2 PRIORITY 3 OPTIMAL CONTROL METHOD LIGHT LOAD POWER RATIO TARGET POWER FACTOR EXPORT LEAD OUT PROPER LAG OUT LIGHT LOAD FORCED DISCONNECTION 3S 2L 2S 1S 1L NC NC M M 3L B A 3P3W P1 P3 P2 TA S E TE CE TB TS CS P1 P0 P3 P2 3P4W C2 C4 C6 COM1 COM1 C8 C10 C12 COM2 COM2 C11 C9 C7 C3 C5 COM1 COM1 COM2 COM2 C1 3S 2L 2S 1S 1L NC NC M M 3L B A 3P3W...
Page 43: ...Attach the device to the panel with the optimal angle side view top view 40 light 40 60 60 3 Attachment Method Put the device onto the panel surface from the front side and fix it by using embedded mounting fittings and fixing screws 2 places Tighten the fitting screw to the torque from 0 61 to 0 82 N m Embedded Mounting Fittings Panel Embedded Fixing Screws M3 mm 14 mm At the time of attaching th...
Page 44: ...lose the terminal cover till it makes clicking sound Outer diameter Terminal Screw Installation 3 Wiring M4 screw For M4 screw of outer diameter below 8 5 0 98 N m to 1 47 N m M3 5 screw For M3 5 screw of outer diameter below 7 1 0 61 N m to 0 82 N m Connecting Completion Output terminal Disconnecting Completion Output terminal Connection Disable Input terminal Disconnection Disable Input terminal...
Page 45: ... breakdown of the primary winding and inter phase short circuiting in the end Do not use unsuitable electric wire Electric wire size should be suitable for rated current and rated voltage Use of unsuitable electric wire can cause a fire Attach a terminal cover Attach a terminal cover If it is not attached it can cause electrification Do not strongly pull the wire If terminal wire is pulled strongl...
Page 46: ...ut on the forced disconnection signal terminal TB and terminal TA S all the connecting capacitors in automatic control are disconnected When OFF signal is input on terminal TB and TA S the control operation restarts Use input contacts suited for the switching of 5 V 25 mA DC This signal can be used for the following applications To disconnect the capacitor by an external time switch for purpose of...
Page 47: ... 1 5 A on a common terminals Note 4 In case of using by balanced load connect at the diagram the same as c1 the same as c1 the same as c1 the same as c1 the same as c1 Note1 In VAR 6A C X in the figure shows C1X to C6X Note2 In VAR 12A C X in the figure shows C1X to C12X Note3 This diagrams are schematic diagrams Prepare protected circuits etc if needed CC 4 3 1 2 VMC VZ E E P 52a Manual Auto ON C...
Page 48: ...OM1 C8 C10 C12 COM2 COM2 C1 C3 C5 COM1 COM1 C7 C9 C11 COM2 COM2 K k L K k L U u V v U u V v CT CT 1 2 3 VAR 6A Load MA MB NC NC 1S 1L 2S 2L 3S 3L CS TS TA S TB CE TE E P1 P2 P3 C2 C4 C6 COM1 COM1 C1 C3 C5 COM1 COM1 K k L K k L CT CT CT 1 2 3 N VAR 6A Load MA MB NC NC 1S 1L 2S 2L 3S 3L CS TS TA S TB CE TE E P1 P0 P3 P2 C2 C4 C6 COM1 COM1 C1 C3 C5 COM1 COM1 K k L K k L K k L CT CT 1 2 3 VAR 6A Load ...
Page 49: ...a 250 V 1 A AC 110 V 0 1 A DC LAG OUT LED stays lit past Delay Time LEAD OUT LED stays lit past Delay Time OFF across terminals CE and E OFF across terminals TE and E Form A contact capacity 24 V 0 1 A DC ON across terminals CS and TA S ON across terminals TS and TA S ON across terminals TB and TA S Connection Disable Disconnection Disable Form A contact capacity 5 V 15 mA DC Forced Disconnection ...
Page 50: ...r Factor Light Load Power Ratio Delay Time Control Method Capacity Auto HoLd Capacity Manual Input of C1 Capacity Manual Input of C2 Capacity Manual Input of C3 Capacity Manual Input of C4 Capacity Manual Input of C5 Capacity Manual Input of C6 Capacity Manual Input of C7 Capacity Manual Input of C8 Capacity Manual Input of C9 Capacity Manual Input of C10 Capacity Manual Input of C11 Capacity Manu...
Page 51: ...51 MEMO ...
Page 52: ...b Cairo Egypt FR 92741 Nanterre Cedex Mitsubishi Electric Platz 1 40882 Ratingen Germany IONIAS NEROMILOU STR CHAMOMILOS ACHARNES ATHENS 13678 Greece 5 MAVROGENOUS STR 18542 PIRAEUS Greece Fertö utca 14 HU 1107 Budapest Hungary 2nd Floor Tower A B Cyber Greens DLF Cyber City DLF Phase III Gurgaon 122 022 Haryana India ICC Devi Gaurav Technology Park Unit no 402 Fourth Floor Survey no 191 192 P Opp...