background image

EN-20

Advanced feature

Still 

To stop the motion in the image temporarily (or to display a still 
image):

Press the STILL button on the remote control.

The image will freeze temporarily. 

To resume the motion in the image: 

Press any button on the remote control.

Important: 

Do not display a still picture for a long time because the afterim-
ages may persist on the screen. 

Page-up and page-down 

You can control the computer to page-up and page-down the presen-
tation data using the remote control. Switch the pages using the PAGE 
UP or DOWN button on the remote control. 
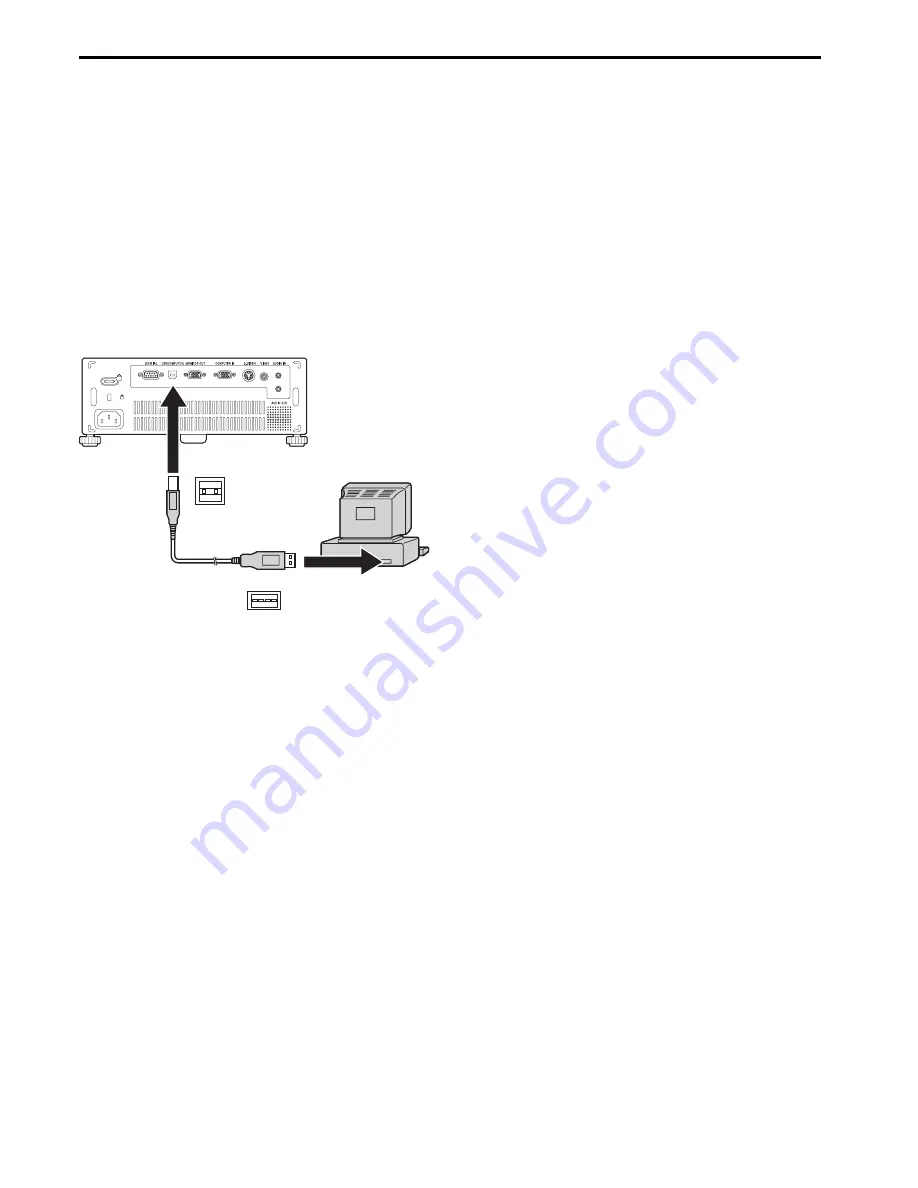
Connection 

To control the computer using the remote control, connect the projec-
tor with the computer as shown below.  

When it is connected via USB, the "Page up/down" function works 
on the computer which supports USB connection as a standard 
function. (But this function may not work via USB connection on 
any computer.)

Wait for the lamp to light up before connecting the USB cable. 

USB

USB 4-pin
(type B)

USB 4-pin
(type A)

to USB port

USB cable
(option)

Summary of Contents for SD206U

Page 1: ...DATA PROJECTOR MODEL SD206U User Manual This User Manual is important to you Please read it before using your projector EN ENGLISH ...

Page 2: ... light industrial premises and on small scale enterprises inside as well as outside of the buildings All places of operation are characterized by their connection to the public low voltage power supply system WARNING Use the attached RGB cable with this equipment so as to keep inter ference within the limits of an EN55022 Class B device Please follow WARNING instructions WARNING TO PREVENT FIRE OR...

Page 3: ... trademarks of Texas Instruments Other brand or product names are trademarks or registered trademarks of their respective holders Declaration of Conformity Model Number SD206U Trade Name MITSUBISHI ELECTRIC Responsible party Mitsubishi Digital Electronics America Inc 9351 Jeronimo Road Irvine CA 92618 U S A Telephone number 1 949 465 6000 This device complies with Part 15 of the FCC Rules Operatio...

Page 4: ...f you are not sure of the type of power please consult your appliance dealer or local power company 11 Power cord protection Power supply cords should be routed so that they are not likely to be walked on or pinched by items placed upon or against them Pay particular attention to cords at plugs convenience receptacles and points where they exit from the appliance Do not put the power cord under a ...

Page 5: ... the lamp is illuminating Place of installation For safety s sake do not use the projector at any place subjected to high temperature and high humidity Please maintain an operating temperature humidity and altitude as specified below Operating temperature between 41 F 5 C and 95 F 35 C Operating humidity between 30 and 90 Never put any heat producing device under the projector to pre vent the proj...

Page 6: ...screen for the keystone adjust ment or password entry is being displayed the COM PUTER VIDEO and AUTO POSITION buttons function as the W X and S buttons respectively While the menu is on the screen the KEYSTONE button functions as the ENTER button Terminal board 1 Power jack 2 COMPUTER IN terminal Mini D SUB 15 pin 3 MONITOR OUT terminal Mini D SUB 15 pin 4 Air inlet grille 5 USB COMPUTER terminal...

Page 7: ...ON button 2 STILL button 3 AUTO POSITION button 4 ENTER button 5 MENU button 6 KEYSTONE button 7 VOLUME buttons 8 VIDEO S VIDEO button 9 COMPUTER button 10 16 9 button 11 Direction buttons 12 PAGE UP DOWN button 13 OFF button 14 MUTE button Audio Video The and buttons are used in the KEYSTONE adjust ment in addition to the volume control 1 2 1 2 3 5 This model does not have this function 12 13 14 ...

Page 8: ...an old one If the solution of batteries comes in contact with your skin or clothes rinse with water If the solution comes in contact with your eyes rinse them with water and then consult your doctor Operation range of the remote control The maximum operation distance of the remote control is about 10 m or about 32 feet when the remote control is pointed at the remote control sensor of the projecto...

Page 9: ... cm or 20 inch away from the wall to prevent the air inlet grille and the air outlet grilles that emit hot air from being blocked Do not use the projector in the following locations and manners which may cause fire or electric shock In a dusty or humid place In a sideways or upside down position Near a heater In an oily smoky or damp place such as a kitchen In direct sunlight Where the temperature...

Page 10: ...jector DVD player or HDTV decoder Some DVD players have an output connector for 3 line fitting Y Cb Cr When connecting such DVD player with this projector use the COMPUTER IN terminal Important The terminal s names Y PB and PR are given as examples of when a HDTV decoder is connected The terminal s names vary depending on the connected devices Use a Mini D SUB 15 pin BNC conversion cable for conne...

Page 11: ...the audio output terminal Speaker output is mono When the audio cable is connected to the AUDIO OUT terminal the speaker output is muted MONITOR OUT terminal is not available for SYNC on G Green signal For Macintosh If your Macintosh has no video port a monitor output adapter is required Contact your dealer for further information Some Macintoshes require a MAC adapter for the RGB cable for connec...

Page 12: ... appropriate angle 2 Press the foot adjustment buttons next to the adjustment feet and the adjustment feet will come out 3 Release the buttons to lock the adjustment feet to that position 4 Rotate the adjustment feet for fine adjustment After using the projector 5 Put the adjustment feet back into the projector by pressing the foot adjustment buttons Important If necessary rotate the adjustment fe...

Page 13: ...ds after the lamp is turned on By blinking red the STATUS indicator indicates that the lamp should be replaced soon Replace the lamp when the STATUS indicator blinks red See page 23 and 26 Images may not be projected with good quality in an extremely hot or cold environment This is not a product malfunction 4 Adjust the focus by turning the focus ring 5 Choose your desired external input source us...

Page 14: ...tor using the network function the application software may fail AUTO POSITION button When the image isn t projected in the right position with COMPUTER selected as the input source follow the procedure below 1 Project a bright image such as the Recycle Bin window on the full screen 2 If the screen saver is running turn it off 3 Press the AUTO POSITION button If the image is still not in the right...

Page 15: ...AUTO DYNAMIC STANDARD THEATER CONTRAST G CONTRAST R CONTRAST B 0 100 50 0 100 50 0 100 51 0 31 15 INSTALLATION OFF MIRROR INVERT MIRROR INV AUTO POWER ON ON OFF AUTO POWER OFF ON OFF IMAGE REVERSE SPLASH SCREEN BLUE BLACK BACK COLOR STANDARD LOW LAMP MODE OFF 5min 10min 15min 30min 60min 0 100 50 0 100 50 RESET ALL OK FEA TURE MENU POSITION 1 UPPER LEFT 2 LOWER RIGHT MENU ACCESS PASSWORD LANGUAGE ...

Page 16: ...hoose ON when using the projector mounted on the ceiling The projector is in the stand by mode when the lamp is off Use the remote control to turn on the lamp AUTO POWER OFF Use to set the time elapsed before the projector enters the stand by mode when there is no signal input from the source SPLASH SCREEN Choose ON to display the splash screen when the power is turned on BACK COLOR Use to select ...

Page 17: ...layed 4 SIGNAL HORIZ POSITION Use to adjust the horizontal position of the image VERT POSITION Use to adjust the vertical position of the image FINE SYNC Use to synchronize the projector with the PC input signal or YCbCr YPbPr so that the image is not blurred or not jittered TRACKING Use to eliminate image noise such as wide stripes COMPUTER INPUT The projector adjusts its settings automatically w...

Page 18: ...T in the IMAGE menu Press the X button to increase the amount of purple in the image and the W button to increase the amount of green in the image To adjust the detail and clarity of the image Adjust SHARPNESS in the IMAGE menu Press the X button to sharpen the image and the W button to soften the image Color temperature 1 Select COLOR TEMP in the IMAGE menu 2 Press the W or X button to select USE...

Page 19: ... X button to move the image to the left Press the W button to move the image to the right To move the image vertically Adjust VERT POSITION in the SIGNAL menu Press the X button to move the image upward Press the W button to move the image downward When the image flickers or the image is out of focus Adjust FINE SYNC in the SIGNAL menu Simple adjustment method 1 Select HORIZ POSITION in the SIGNAL...

Page 20: ... the computer to page up and page down the presen tation data using the remote control Switch the pages using the PAGE UP or DOWN button on the remote control Connection To control the computer using the remote control connect the projec tor with the computer as shown below When it is connected via USB the Page up down function works on the computer which supports USB connection as a standard func...

Page 21: ...n the last digit has been entered the password set up is complete and the password menu will be off If the entered passwords don t match it will jump to the INPUT PASSWORD field to start over again To cancel the procedure select Exit and press the ENTER button You can cancel the procedure by pressing the MENU button alternatively To cancel the password function 1 Display the FEATURE menu 2 Press t...

Page 22: ...s pulled out quickly the lamp may break scattering glass fragments Do not spill liquid on the removed lamp box or do not place it near any flammable object or where children can reach to prevent injury or fire 6 Load a new lamp box securely into the projector in the right orientation 7 Put the handle back to the original posi tion Make sure that the handle is locked 8 Tighten up the screws c using...

Page 23: ... may be blocked In such cases the STATUS indicator lights red J Remove the objects blocking the air inlet or outlet grille and carry out the following 1 Wait for the air inlet or outlet fan to stop or wait for the STATUS indicator to go out 2 Unplug the power cord from the wall outlet 3 Wait about 10 minutes 4 Plug the power cord into the wall outlet 5 Press the POWER button When the STATUS indica...

Page 24: ...ence with the screen and isn t a product malfunction Change the screen or read just the focus of the projector Projected images and or audio appear wavy and distorted Connect the cable s plug with the external device s connector firmly Keep the projector away from equipment generating interfering radio waves When the keystone adjustment is carried out the image may not be displayed correctly becau...

Page 25: ... projector This isn t a product malfunction No audio is output Check that the volume isn t set to low Sound cannot be heard from the external audio out put Only applicable to the models which have the external audio output Check whether or not the volume is turned down The menu can t be used The microcomputers inside the projector may be wrongly operating because of noise J Press the POWER button ...

Page 26: ...d with dust or dirt and clean it If the above solution is not effective contact your dealer Abnormal temperature Clean the ventilation grilles Relocate the projector to a cooler place For the directly shut down it will check the temperature first if it s too high it will start cooling for 90 seconds If it s abnormal shut down in the previous time while the temperature is too high it will start the...

Page 27: ...tion lens F 2 5 Wide f 19 9 21 4 mm Light source lamp 205 W Picture size 40 300 inch Wide aspect ratio 4 3 PC compatibility Resolution 640x400 Expand 800x600 Real 1024x768 Compress Sync on Green available Video compatibility NTSC NTSC 4 43 PAL including PAL M N SECAM PAL 60 Component Video DVD HDTV 480l 576l 480P 576P 1080l 720P Speaker 2 W Mono Round type ø2 5 cm x 1 S video input Luminance signa...

Page 28: ...DSUB_ROUT 2 DSUB_GOUT 3 DSUB_BOUT 4 NC 5 GND 6 GND 7 GND 8 GND 9 NC 10 GND 11 GND 12 NC 13 DSUB_HOUT 14 DSUB_VOUT 15 NC MONITOR IN OUT Mini D SUB 15 pin IN OUT AC power cord 1 RGB cable for PC 1 VIDEO cable either for US 02552 0063 01 or for EU 02552 0066 01 or for UK 02552 0065 01 02552 0072 00 02552 0068 00 1 Remote control 1 Safety manual Quick start up 1 CD ROM 2 Battery 1 Lens cap 1 Soft case...

Page 29: ... Hz SD206U H x V TV60 480I 15 73 59 94 1024 x 768 TV50 576I 15 63 50 00 1024 x 768 1080I 60 1080I 33 75 60 00 1024 x 576 1080I 50 1080I 28 13 50 00 1024 x 576 480P 31 47 59 94 1024 x 768 576P 31 25 50 00 1024 x 768 720P 60 720P 45 00 60 00 1024 x 576 720P 50 720P 37 50 50 00 1024 x 576 PC98 VGA56 640 x 400 24 82 56 42 1024 x 640 CGA84 VGA85 640 x 400 37 86 84 13 1024 x 640 CGA85 VGA85 640 x 400 37...

Page 30: ... Visual Information Systems Shanghai Ltd 26 F Oriental Center 699 Nanjing Rd W Shanghai 200041 China Sales Inquiries Phone 86 21 5211 0882 3002 Fax 86 21 5211 0576 Technical Inquiries Phone 86 21 5211 0882 3020 Fax 86 21 5211 0576 HONG KONG Mitsubishi Electric Ryoden Air Conditioning Visual Information Systems HongKong Ltd 7th Floor Manulife Tower 169 Electric Road North Point Hong Kong Sales Inqu...

Reviews: