background image

Eng-9

Fan speed setting appears here.

Fan speed 

Page 13 

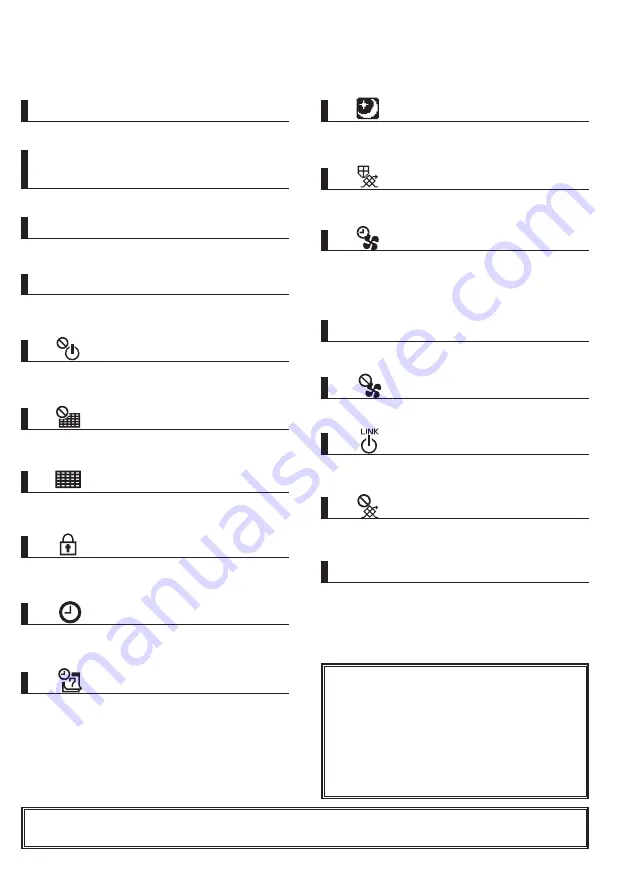
Appears when the night-purge function is 

available.

Appears when performing operation to protect 

the equipment.

Appears when the ON/OFF operation is centrally 

controlled.

Current time appears here.

Appears when the buttons are locked and/or a 

fan speed is skipped.

Lossnay is always displayed.

a


Page 30

b

5

8


Page 41 

Remote controller name 

Indicates the ventilation mode setting.

Ventilation mode 

Page 13 

Appears when external fan speed operation.

Appears when operation interlocked with external 

unit.

Appears when the On/Off timer (Page 24), or 

Auto-off timer (Page 26) function is enabled. 

e


f

9


Page 24, 26

Indicates when filter and/or Lossnay core needs 

maintenance.

Appears when the filter reset function is centrally 

controlled.

7


Page 50

6

Appears when the Weekly timer is enabled.

0


Page 28 

Appears when external ventilation mode 

operation.

The indicated values are detected value by the 

sensor installed in the Lossnay unit.

It could be different from the actual indoor or 

outdoor temperature.

Set the display in Display details.

g

h

 Temperature or CO

2

 concentration

Functions of the corresponding buttons appear 

here.

Button function guide

Appears when performing the power supply/

exhaust function, the delay operation at the start 

of operation, or fan speed timer.

c

Most settings (EXCEPT ON/OFF, fan speed, ventilation mode) can be made from the Menu 

screen. (Refer to page 16)

Sensor value indicates in the following 

display ranges.

- Outdoor temperature: 2 to 36 ºC

- Return temperature: 9 to 37 ºC

-  Supply temperature (calculated value): 

9 to 37 ºC

- CO

2

 concentration:400 to 2000 ppm

“LO” or “HI” indicates when other than 

these conditions.

Clock 

Page 18


(

See the Installation Manual.)

Summary of Contents for PZ-62DR-E

Page 1: ...rrectly Retain for future reference Make sure to hand this manual to any future users To ensure safety and proper operation of the remote controller the remote controller should only be installed by qualified personnel Lossnay Remote Controller MODEL PZ 62DR E Instruction Book 2105875H16901 ...

Page 2: ... with large characters for easy viewing Feature 2 Simple button arrangement Feature 3 Large easy to press buttons Buttons are arranged according to usage to allow for intuitive navigation Frequently used buttons are larger than other buttons to prevent unintended pressing of other buttons ...

Page 3: ...re operating the controller 10 Menu structure 10 Icon explanations 11 Main menu list 14 Restrictions for the sub remote controller 15 Navigating through the Main menu 16 Clock 18 Contrast 19 Language selection 20 Fan speed timer 22 Timer 24 Weekly timer 28 Night purge setting 30 Airflow 32 Auto bypass 35 External input 36 Function setting 37 Initializing 39 Restriction 41 Maintenance interval 43 N...

Page 4: ...nit to corrode which can result in electric shock malfunctions smoke or fire When disinfecting the unit using alcohol ventilate the room adequately The fumes of the alcohol around the unit may cause a fire or explosion when the unit is turned on To reduce the risk of injury or electric shock before spraying a chemical around the controller stop the operation and cover the controller To reduce the ...

Page 5: ... your hands and do not allow dust to accumulate on the circuit board Additional precautions To avoid damage to the controller use appropriate tools to install inspect or repair the controller Do not pull or twist the communication cables Pulling or twisting a cable may result in fire or equipment failure To avoid discoloration do not use benzene thinner ethanol hypochlorous acid or chemical rag to...

Page 6: ...Eng 6 Names and functions of controller components Controller interface Function buttons 5 6 1 2 3 4 7 8 9 0 ...

Page 7: ...on the screen Main menu Press to go to the next page 6 ON OFF lamp 2 SELECT button 7 Function button F1 3 RETURN button 8 Function button F2 4 MENU button Page 16 9 Function button F3 5 Backlit LCD 0 Function button F4 When the backlight is off pressing any button turns the backlight on and does not perform its function except for the ON OFF button Main Main display Cursor Main menu User options C...

Page 8: ...Eng 8 Lossnay 12 Sun Outdoor 2 C Return 2 C Supply 15 C Fan Mode Auto 1 5 6 9b a 0 e f 7 8 c 3 d g 4 2 h Names and functions of controller components Display All icons are displayed for explanation ...

Page 9: ...is centrally controlled 7 Page 50 6 Appears when the Weekly timer is enabled 0 Page 28 Appears when external ventilation mode operation The indicated values are detected value by the sensor installed in the Lossnay unit It could be different from the actual indoor or outdoor temperature Set the display in Display details g h Temperature or CO2 concentration Functions of the corresponding buttons a...

Page 10: ...splay details Administrator password Language selection Airflow Initial setting CO2 control Operation locked Page 22 Page 24 Page 26 Page 28 Page 30 Refer to the Installation Manual Page 18 Page 19 Refer to the Installation Manual Refer to the Installation Manual Page 20 Page 32 Page 35 Page 36 Refer to the Installation Manual Page 37 Page 39 Page 41 Page 45 Page 48 Page 49 Page 43 Page 50 Press t...

Page 11: ...se the value by 1 Press to increase the value by 1 Changes cannot be made unless the correct password is entered Indicates settings that can be changed only while the units are in operation Indicates setting that can be changed only while the units are not in operation Indicates settings that can be changed while the units are in night purge operation Indicates functions that are not available whe...

Page 12: ...d the operation will stop Press the button during the night purge operation The night purge operation screen changes to the normal operation screen If you want to stop the operation press the button again The ON OFF lamp will go out and the operation will stop ON OFF The night purge operation starts automatically when the set condition is met For details refer to the Installation Manual for the Lo...

Page 13: ...ration is not possible during external fan speed operation A fan speed that is skipped because of a fan skip setting is not displayed refer to page 41 When external fan speed input setting is used Auto fan speed Auto appears between fan speed 4 and 1 Press the button to go through the Ventilation mode in the following order Operation is not possible during night purge operation and external ventil...

Page 14: ...oom at night 30 Commissioning Initial setting Main sub Use to change the Main sub setting when connecting two remote controllers one of them needs to be designated as a sub controller Refer to the Installation manual Clock Use to set the current time 18 Contrast Use to adjust screen contrast 19 Display details Use to set the remote controller related items as necessary Clock display Temperature un...

Page 15: ...source unit model manufacturing number contact information dealer s phone number can be displayed The unit model manufacturing number and contact information need to be registered in advance to be displayed 45 Error history Use to check the error history of the Lossnay unit 48 Run time Use to check the run time of the Lossnay unit 49 Maintenance interval Use to set the maintenance interval of the ...

Page 16: ...ng through the Main menu F1 F2 F3 F4 Main Main display Cursor Main menu User options Commissioning Maintenance Press the button The Main menu will appear F1 F2 F3 F4 Main Main display Cursor Main menu User options Commissioning Maintenance Press to move the cursor down Press to move the cursor up Button operation Accessing the Main menu Item selection Navigating through the pages Cursor Page ...

Page 17: ... The screen to set the selected item will appear If no buttons are touched for 10 minutes the screen will automatically return to the Main display Any settings that have not been saved will be lost F1 F2 F3 F4 Not available Unsupported function Return The message at left will appear if the user selects a function not supported by the corresponding Lossnay unit model Saving the settings Exiting the...

Page 18: ...r button and press the button Clock setting is required before making the following settings Fan speed timer On Off timer Weekly timer Night purge setting 3 F1 F2 F3 F4 Clock Select Cursor 2 21 1 1 yyyy mm dd hh mm Move the cursor to the desired item with the or button out of year month date hour or minute Increase or decrease the value for the selected item with the or button and press the button...

Page 19: ... Cursor Page Main menu Select Initial setting from the Main menu Commissioning and press the button 2 F1 F2 F3 F4 Initial setting menu 1 2 Main Sub Clock Contrast Display details Administrator password Cursor Page Main menu Move the cursor to the Contrast with the or button and press the button Button operation Navigating through the screens To go back to the Main menu button To return to the prev...

Page 20: ...in menu Move the cursor to the Language selection with the or button and press the button F1 F2 F3 F4 Commissioning menu 1 2 Initial setting Airflow Auto bypass External input Service Cursor Page Main menu Button operation Select Initial setting from the Main menu Commissioning and press the button P ...

Page 21: ...gh the screens To go back to the Main menu button To return to the previous screen button F1 F2 F3 F4 Main menu Cursor Select English Deutsch Italiano Svenska Français Español Português Русский English Deutsch Italiano Svenska Changes saved Français Español Português Русский Language selection Language selection Cursor 1 2 1 2 Note Selectable language are different by each remote controller model ...

Page 22: ...o change the setting value Press the button to save the changes and the unit starts at set fan speed F1 F2 F3 F4 User options Fan speed timer Timer Weekly timer Night purge setting Cursor Main menu 1 Button operation F1 F2 F3 F4 Time Cursor Select Fan speed timer Stop in 3 min Fan Fan speed timer Stop in 3 min Fan Changes saved Main menu 2 ON Main User options The Fan speed timer will not work in ...

Page 23: ... 23 Lossnay AM Fan Mode 12 Sun will appear on the Main display when the Fan speed timer is enabled After finishing the timer the icon will disappear and fan speed will change back into the previous status ...

Page 24: ...s the button P F1 F2 F3 F4 Timer Select Cursor Cursor On Off timer No Yes On Off Repeat No Yes The screen to set the timer will appear Select the desired item with the or button out of On Off timer On Off or Repeat The On Off timer will not work in the following cases when On Off timer is disabled during an error when the clock is not set when the system is centrally controlled when On Off operati...

Page 25: ...increments Press and hold the button to rapidly advance the numbers Repeat No once Yes repeat Lossnay Fan Mode Auto 12 Sun will appear on the Main display when the On Off timer is enabled 4 F1 F2 F3 F4 Timer Timer Select Cursor Time Main menu On Off timer No Yes On Off Repeat No Yes On Off timer No Yes On Off Repeat No Yes Changes saved Press the button to save the settings A confirmation screen w...

Page 26: ...ursor to the Auto Off or Stop in min with the or button 3 F1 F2 F3 F4 Auto Off timer Select Cursor Time Auto Off No Yes Stop in min Change the setting with the or button Auto Off No disable Yes enable Stop in min Timer setting The settable range is 30 to 240 minutes in 10 minute increments P The Auto Off timer will not work in the following cases when On Off timer is disabled during an error when ...

Page 27: ...Off No Yes Stop in min Changes saved Press the button to save the settings A confirmation screen will appear 4 Navigating through the screens To go back to the Main menu button To return to the previous screen button Lossnay Fan Mode Auto 12 Sun will appear on the Main display when the Auto Off timer is enabled ...

Page 28: ...ton 2 F1 F2 F3 F4 Weekly timer 1 2 Setting display day Page Mon Tue Wed Thu Fri Sat Sun No The current settings will appear Press the or button to see the settings for each day of the week Press the button to see patterns 5 through 8 Press the button to go to the setting screen Weekly timer P The Weekly timer will not work in the following cases when the On Off timer is enabled when the weekly tim...

Page 29: ...rn number Move the cursor to the time On Off or fan speed with the button Change the settings with the or button Time settable in 5 minute increments Press and hold the button to rapidly advance the numbers On Off Fan speed Selectable fan speed of the Lossnay connected Note Lossnay will start the operate at the same ventilation mode before stopping Navigating through the screens To go back to the ...

Page 30: ...00E Selecting Night purge functions Use the button to move the cursor to Night purge and use the button to select No Yes F1 F2 F3 F4 Select Night purge setting Night purge No Yes Mon Tue Wed Thu Fri Sat Sun On Off 1 6 Fan Cursor 1 Button operation F1 F2 F3 F4 User options Fan speed timer Timer Weekly timer Night purge setting Cursor Main menu Select Night purge setting from the Main menu User opti...

Page 31: ...se the button to select Start time Finish time Use the and buttons to change the time Time can be changed in 10 minute increments Setting Night purge fan speed Use the button to move the cursor to Fan and use the button to select the fan speed When configuration is complete press the button to update settings F1 F2 F3 F4 Time Cursor Select Night purge setting Night purge No Yes Mon Tue Wed Thu Fri...

Page 32: ...F1 F2 F3 F4 Address Airflow Select M NET address All Accessing the Airflow screen Select Airflow from the Main menu Commissioning and press the button Select the address of the unit The address selection screen will appear Press the or button to select the M NET address number of the unit When choosing same setting to all Lossnay units connected with the controller select the address to All The pr...

Page 33: ...output can be set in the following range Fan speed 1 25 to Fan speed 2 or less Fan speed 2 Fan speed 1 or more to Fan speed 3 or less Fan speed 3 Fan speed 2 or less to Fan speed 4 or less Fan speed 4 Fan speed 3 or more to 100 F1 F2 F3 F4 Adjust Airflow Confirm Cursor Speed select Supply Exhaust 4 4 5 5 75 75 1 1 Add All F1 F2 F3 F4 Airflow Speed select Cursor Supply Exhaust 25 25 5 5 75 75 1 1 A...

Page 34: ...2 F3 F4 Adjust Airflow Confirm Cursor Speed select Supply Exhaust 4 4 5 5 75 75 1 1 Add All 5 Press the button to return to 2 When the or button is pressed at 2 the setting is saved and the Commissioning menu or Main menu screen is displayed F1 F2 F3 F4 Airflow Speed select Cursor Add All Supply Exhaust 4 4 5 5 75 75 1 1 6 ...

Page 35: ...n will appear Loading is displayed 10 to 60 seconds The Auto bypass settings Press the and button to move the cursor Press the and button to change the setting value Press the button to save the changes 1 Button operation Commissioning menu 1 2 Initial setting Airflow Auto bypass External input Service Cursor Page Main menu Auto bypass Loading F1 F2 F3 F4 2 F1 F2 F3 F4 Temp Auto bypass Select Curs...

Page 36: ... from the Main menu Commissioning and press the button Press the button Fan speed automatically changes from 25 to 100 depending on CO2 concentration to adjust Upper limit and lower limit Move the cursor to the desired item with the or button out of the following items Change the settings with the or button CO2 control No disable Yes enable Upper limit from lower limit 300 to 2000 ppm by 50 ppm pi...

Page 37: ...hen changing the Lossnay unit s function settings record all the changes made to keep track of the settings Button operation F1 F2 F3 F4 Commissioning menu 1 2 Initial setting Airflow Auto bypass External input Service Cursor Page Main menu 1 Select Service on the Main menu Commissioning and press the button 2 F1 F2 F3 F4 Service menu Cursor Input maintenance info Function setting Initializing Mai...

Page 38: ...e been completed press the button A screen will appear that indicates that the settings information is being sent F1 F2 F3 F4 Set Conf Sending data Cursor Select M NET address Function No Data Function 3 32 2 3 32 2 M NET address Function No Data Function setting Function setting Address 4 3 32 2 M NET address Function No Data Return Function setting Setting completed F1 F2 F3 F4 When the settings...

Page 39: ...This cannot be selected while external input is prioritized Select Initializing from the Service menu and press the button P Button operation You can initialize the remote controller to restore it to the factory default state The following are initialized Fan speed timer Timer Weekly timer Operation locked Main Sub Clock Contrast Display details Model name input Serial No input Dealer information ...

Page 40: ...кий Language selection Cursor 1 2 Under initializing Reboot after initializing Initializing Factory reset Reboot after initializing Initializing Cancel OK Select OK with the button After initialization is executed the remote controller reboots automatically Language selection screen will appear again ...

Page 41: ...Page Main menu Select Restriction from the Main menu Commissioning refer to page 16 and press the button P Button operation To enable the operation lock function and or fan speed skip function set the item Operation locked to Yes 2 F1 F2 F3 F4 Restriction Setting display Operation locked No On Off Fan Mode Fan speed 1 2 3 4 Bring up the Restriction setting screen Press the button ...

Page 42: ... Fan speed 1 Fan speed 2 Fan speed 3 Fan speed 4 Change the settings with the or button page 1 2 Operation locked No disable Yes enable On Off On Off operation Fan Fan speed setting Locked Mode Ventilation mode setting page 2 2 Fan speed 1 Skipped or not Fan speed 2 Skipped or not Skipped Fan speed 3 Skipped or not Fan speed 4 Skipped or not Press the button to save the settings A confirmation scr...

Page 43: ...Accessing the Maintenance interval screen Select Maintenance interval from the Main menu Commissioning and press the button The product data is loaded before the screen will appear Loading is displayed 10 to 60 seconds 1 Button operation Lossnay PM12 3 Fri Fan Mode Commissioning menu 2 2 Restriction Error information Error history Run time Maintenance interval Cursor Page Main menu Maintenance int...

Page 44: ...show the maintenance sign on the Main display screen hour Change the maintenance interval between 100 and 9900 hours by 100 hr pitches Note The displayed content is different by the type of the unit The function can be changed during Lossnay operation and the setting will reflect after operation of the unit F1 F2 F3 F4 Maintenance interval Select Cursor Cursor Filter No Yes 3 hour Lossnay core No ...

Page 45: ...ge Error information Contact information Dealer Tel 12 3456 789 Reset Page Reset error Reset button Reset error Reset button 1 2 2 2 Error code error unit M NET address unit model name and serial number will appear The model name and serial number will appear only if the information have been registered Press the or button to go to the next page Contact information dealer s phone number will appea...

Page 46: ... unit LC Lossnay M NET address 1 Model name LGH 5 RVS E Serial No 1234567 Main menu Reset error Reset button 1 2 Press the button or the button to reset the error that is occurring Select OK with the button Errors cannot be reset while the ON OFF operation is prohibited blinks Navigating through the screens To go back to the Main menu button blinks ...

Page 47: ...ry Run time Maintenance interval Cursor Page Main menu While no errors are occurring page 2 2 of the error information refer to page 43 can be viewed by selecting Error information from the Main menu Commissioning Errors cannot be reset from this screen Checking the error information ...

Page 48: ...change the page Up to 4 pages 12 cases can be stored in the error history Press the button to move to the Reset screen Press the button to delete error history F1 F2 F3 F4 F1 F2 F3 F4 Error history Delete error history Cancel OK Error history Main menu Page Delete Error Unt dd mm yy 9 3 4 21 12 34 1 4 blinks Button operation P ...

Page 49: ... appear Loading is displayed 10 to 60 seconds Indication of Run time Press the button to return to the previous screen Total run time Fan operation time Total powered time Product powered time Commissioning menu 2 2 Restriction Error information Error history Run time Maintenance interval Cursor Page Main menu Run time Loading F1 F2 F3 F4 1 Button operation F1 F2 F3 F4 Run time Total run time 8776...

Page 50: ... for details Parts for the maintenance differs from the type of the unit 1 F1 F2 F3 F4 Main Main display Cursor Main menu User options Commissioning Maintenance Select Maintenance from the Main menu and press the button 2 F1 F2 F3 F4 Main menu Maintenance Reset Filter Lossnay core Please clean the parts above Then press reset button Press the button to reset cleaning sign Refer to the Lossnay unit...

Page 51: ...ill appear when the filter and or Lossnay core on the main unit is due for cleaning When the cleaning sign is reset the cumulative operation time of all units will be reset The icon is scheduled to appear after a certain duration of operation based on the premise that the Lossnay units are installed in a space with ordinary air quality Depending on the air quality the filter and or Lossnay core ma...

Page 52: ...d chemical cloth etc There is a risk of discoloration When removing dirt soak a cloth in a neutral detergent diluted with water squeeze it well wipe it off and wipe it off with a dry cloth Do not use the undiluted solution as it is Do not use alcohol or hypochlorous acid for cleaning It may cause a malfunction ...

Page 53: ...ge 12 VDC supplied from Lossnay units Power consumption 0 3 W Usage environment Temperature 0 40ºC 32 104ºF Humidity 30 90 RH with no dew condensation Material Panel PMMA Main body PC ABS Apr 2021 HEAD OFFICE TOKYO BLDG 2 7 3 MARUNOUCHI CHIYODA KU TOKYO 100 8310 JAPAN Manual Download Go to the website below to download manuals select model name then choose language http www mitsubishielectric com ...

Reviews: