


OPTIONAL
PA
R
T
S
E-132
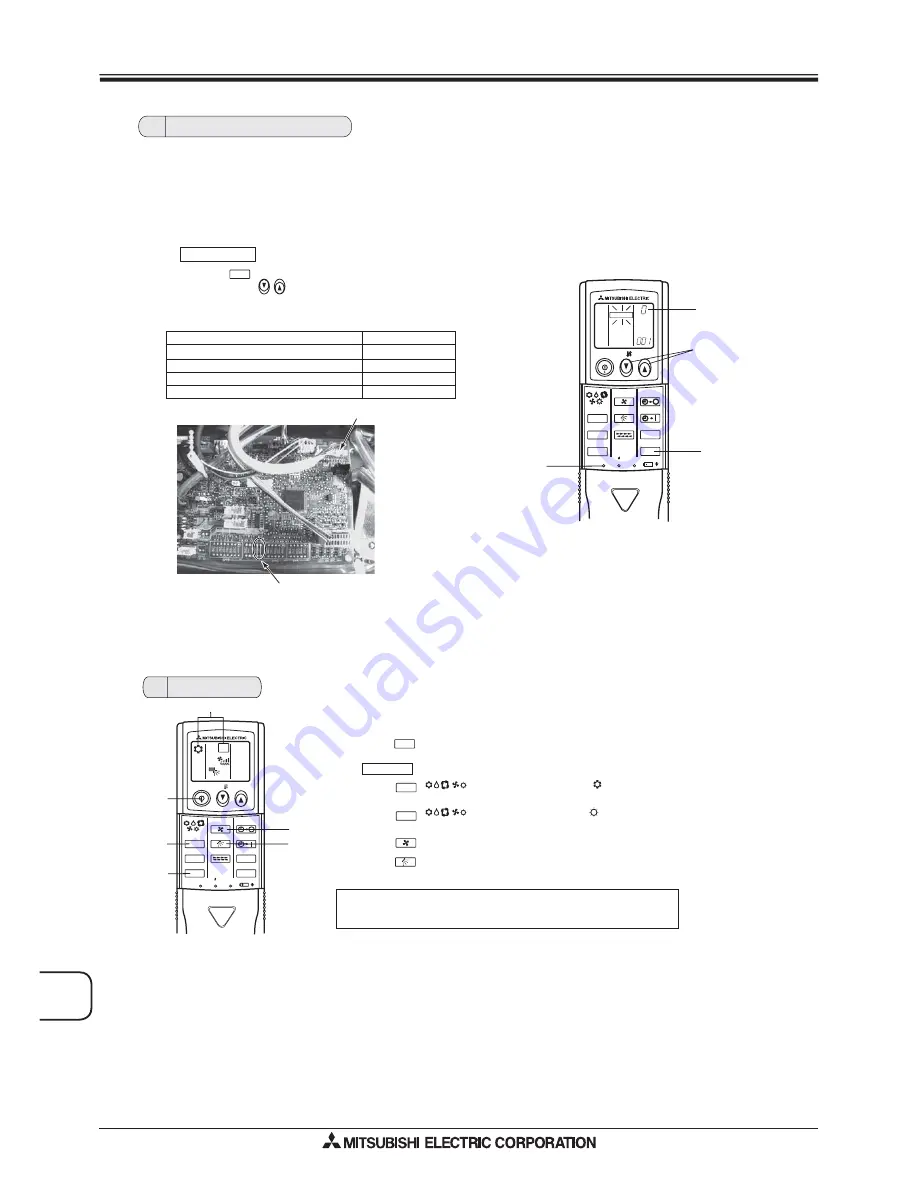
Pair Number Setting
• This is the setting to specify the unit to operate with the wireless remote controller.
• Make setting for J41, J42 (Jumper wire) of indoor controller board and the pair number of wireless remote cotroller.
• The pair number setting is available with the 4 patterns as shown in the following table. Make setting for the pair number
(J41, J42) of indoor controller board and the pair number of wireless remote controller which is used
as shown in the following table. *The initial setting is Pair No. “0”.
Press the SET button with something sharp at the end.
Start this operation from the status of remote controller display turned off.
MODEL SELECT
blinks and Model No. is lighted.
Press the button twice continuously. Pair No. “0” blinks.
Press the temp button to set the pair number you want to set.
Press the SET button with something sharp at the end.
Set pair number is lighted for 3 seconds then turned off.
Pair No. of wireless remote controller Indoor PC board
Initial setting
Cut J41
Cut J42
Cut J41, J42
0
1
2
3 ~ 9
CN90
min
Jumper wire (J41, J42)
ON/OFF
TEMP
FAN
VANE
MODE
CHECK
LOUVER
TEST RUN
AUTO STOP
AUTO START
h
min
RESET
SET
CLOCK
MODEL SELECT
* The positions of the connectors may be
different according to the model.
Please refer to the wiring diagram to
confirm the positions of the connectors.
Test Run
Measure an impedance between the power supply terminal block on the outdoor unit
and the ground with a 500V Megger and check that it is equal to or greater than 1.0 M
.
Turn on the main power to the unit.
Press the button twice continuously.
(Start this operation from the status of remote controller display turned off.)
TEST RUN
and current operation mode are displayed.
Press the ( ) button to activate COOL mode, then check whether
cool air is blown out from the unit.
Press the ( ) button to activate HEAT mode, then check whether
warm air is blown out from the unit.
Press the button and check whether strong air is blown out from the unit.
Press the button and check whether the auto vane operates properly.
Press the ON/OFF button to stop the test run.
TEST RUN
MODE
MODE
FAN
VANE
NOTE : • Point the remote controller towards the indoor unit receiver
while following steps
to
.
• It is not possible to run in FAN, DRY or AUTO mode.
ON/OFF
TEMP
FAN
VANE
TEST RUN
AUTO STOP
AUTO START
h
min
LOUVER
MODE
CHECK
RESET
SET
CLOCK
NOT AVAILABLE
SWING
TEST
RUN
3
4
Wireless Remote Controller Kit
for Ceiling Suspended models
PAR-SL94B-E