background image

68

Function settings

Touch panel cleaning 

P

Button operation

1

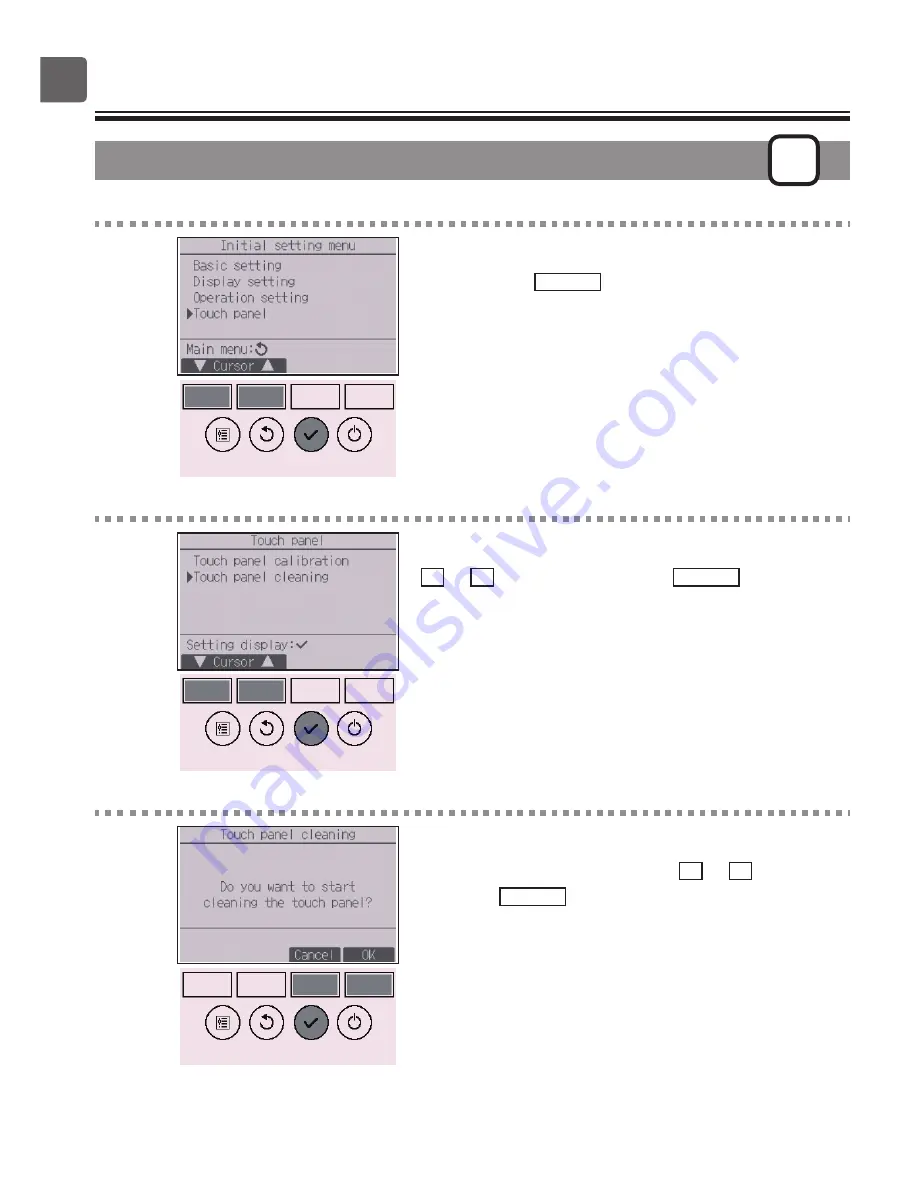
Select “Touch panel” from the Initial setting menu, 

and press the 

SELECT

 button.

2

Move the cursor to “Touch panel cleaning” with the 

F1

 or 

F2

 button, and press the 

SELECT

 button.

3

A confirmation screen will appear.

Select “Cancel” or “OK” with the 

F3

 or 

F4

 button, and 

press the 

SELECT

 button.

Summary of Contents for PAR-CT01MAA-PB

Page 1: ... for future reference Make sure that this CD ROM and the Installation Manual are passed on to any future users To ensure safety and proper operation of the remote controller the remote controller should only be installed by qualified personnel CITY MULTI Control System and Mitsubishi Mr SLIM Air Conditioners MA Touch Remote Controller PAR CT01MAA PB PAR CT01MAA SB PAR CT01MAA S PAR CT01MAR PB PAR ...

Page 2: ......

Page 3: ...tion settings 25 High power 25 Manual vane angle 26 Timer On Off timer 29 Timer Auto Off timer 32 Weekly timer 34 OU silent mode 37 Night setback 40 Restriction 43 Energy saving 49 Clock 54 Daylight saving time 56 Main display 58 Icon explanation 59 Brightness 61 Language selection 62 Design 64 Touch panel calibration 66 Touch panel cleaning 68 Initialize remote controller 70 Remote controller inf...

Page 4: ...te the switches buttons or touch other electrical parts with wet hands When disinfecting the unit using alcohol ventilate the room adequately The fumes of the alcohol around the unit may cause a fire or explosion when the unit is turned on To reduce the risk of injury or electric shock before spraying a chemical around the controller stop the operation and cover the controller To reduce the risk o...

Page 5: ...m by Mitsubishi Electric The use of this controller for with other systems or for other purposes may cause malfunctions This appliance is not intended for use by persons including children with reduced physical sensory or mental capabilities or lack of experience and knowledge unless they have been given supervision or instruction concerning use of the appliance by a person responsible for their s...

Page 6: ...6 Controller components Controller interface Status display Main display Status display Main display ...

Page 7: ...fan speed vane ventilation and louver button Press to change the contents of the setting selected in and above Fan speed shortcut button Press to directly access the fan speed settings screen Vane shortcut button Press to directly access the vane settings screen ON OFF lamp This lamp lights up in green while the unit is in operation unless LED lighting is set to No It blinks while the remote contr...

Page 8: ...8 Controller components Controller interface Menu screen ...

Page 9: ...ith the screen Function button F2 Main menu Press to move the cursor left Menu screen The button function varies with the screen Function button F3 Main menu Press to move the cursor right Menu screen The button function varies with the screen Function button F4 Menu screen The button function varies with the screen The functions of the function buttons change depending on the screen Refer to the ...

Page 10: ...us display and Main display can be displayed in two different modes Full and Basic The factory setting is Full For how to switch the mode refer to page 58 Full mode Status display Main display Basic mode Status display Main display All icons are displayed for explanation ...

Page 11: ... units are operated in the energy save mode Will not appear on some models of indoor units Page 37 Appears while the outdoor units are operated in the silent mode Appears when the ON OFF operation is centrally controlled Appears when the operation mode is centrally controlled Appears when the preset temperature is centrally controlled Appears when the filter reset function is centrally controlled ...

Page 12: ...er Page 29 Auto Off timer Page 32 Weekly timer Page 34 OU silent mode Page 37 Night setback Page 40 Restriction Temp range Page 43 Operation locked Page 46 Energy saving Auto return Page 49 Schedule Page 51 Basic setting Clock Clock Page 54 Daylight saving time Page 56 Administrator password Refer to the Installation Manual Operation Timer menu Energy saving Initial setting menu ...

Page 13: ...ctions Manual that came with the automatic elevating panel Descending adjustment Refer to the Instructions Manual that came with the automatic elevating panel Test run menu Test run Refer to the indoor unit Installation Manual Drain pump test run Refer to the indoor unit Installation Manual Maintenance information Refer to the indoor unit Installation Manual Model name input Refer to the indoor un...

Page 14: ...nosis Self check Refer to the Installation Manual Remote controller check Refer to the Installation Manual Smooth maintenance Mr SLIM only Refer to the indoor unit Installation Manual Request code Mr SLIM only Refer to the indoor unit Installation Manual Other menu Maintenance password Refer to the Installation Manual Initialize remote controller Page 70 Remote controller information Refer to the ...

Page 15: ...ase the value by 1 Changes cannot be made unless the correct password is entered ON Indicates settings that can be changed only while the units are in operation OFF Indicates settings that can be changed only while the units are not in operation Indicates settings that can be changed only while the units are operated in the Cool Heat or Auto mode Indicates functions that are not available when the...

Page 16: ...s the ON OFF button The ON OFF lamp will light up in green and the operation will start When LED lighting is set to No the ON OFF lamp will not light up OFF Press the ON OFF button again The ON OFF lamp will come off and the operation will stop ON OFF button ...

Page 17: ... in a different mode In this case the rest of the unit in the same group can only be operated in the same mode Auto dual set point mode When the operation mode is set to the Auto dual set point mode two preset temperatures one each for cooling and heating can be set Depending on the room temperature indoor unit will automatically operate in either the Cool or Heat mode and keep the room temperatur...

Page 18: ...an Ventilation operation Preset temperature will be displayed either in Centigrade in 0 5 or 1 degree increments or in Fahrenheit depending on the indoor unit model and the display mode setting on the remote controller Auto dual set point mode 1 The current preset temperatures will appear Each pressing of the or button switches the preset temperatures for cooling and heating Room temperature Refer...

Page 19: ...between cooling and heating preset temperatures varies with the models of indoor units connected is met If preset temperatures are set in a way that does not meet the minimum temperature difference requirement both preset temperatures will automatically be changed within the allowable setting ranges Settable preset temperature range Operation mode Preset temperature range Cool Dry 19 30 ºC 67 87 º...

Page 20: ...ings Select the desired setting Auto Auto Step 1 Step 2 Step 3 Step 4 Step 5 Swing Swing Select Swing to move the vanes up and down automatically When set to Step 1 through Step 5 the vane will be fixed at the selected angle at the left of the vane setting icon This icon will appear when the vane is set to Step 2 3 4 or 5 and the fan operates at low speed during cooling or dry operation depends on...

Page 21: ... The ventilation setting can be made even when the units are in operation Sample screen on Mr SLIM Each pressing of the or button cycles through the following ventilation settings Settable only when Lossnay unit is connected Off Low High The fan on some models of indoor units may be interlocked with certain models of ventilation units ...

Page 22: ...in which priority is given to quiet operation of outdoor units over temperature control Set the Start Stop times for each day of the week Select the desired silent level from Normal Middle and Quiet Clock setting is required 37 Night setback Use to make Night setback settings Select Yes to enable the setting and No to disable the setting The temperature range and the start stop times can be set Cl...

Page 23: ...election Use to select the desired language 62 Design Use to change the color of the Status display and Main display 64 Touch panel Touch panel calibration Sets the calibration settings for the touch panel 66 Touch panel cleaning Temporarily makes the touch panel unresponsive to touch to allow for cleaning 68 Service Initialize remote controller Use to initialize the remote controller to the facto...

Page 24: ...Navigating through the Main menu Button operation Accessing the Main menu Press the Setting button on the Main display The Main menu will appear Item selection Press F2 to move the cursor left Press F3 to move the cursor right Cursor ...

Page 25: ...aches the preset temperature whichever is earlier The units will return to the normal operation when the operation mode or fan speed is changed Button operation 1 Select High power from the Operation menu during Cooling Heating or Auto operation and press the SELECT button High power function is available only on the models that support the function 2 Move the cursor to Yes with the F3 or F4 butto...

Page 26: ...Function settings Manual vane angle OFF Button operation 1 Select Comfort from the Operation menu and press the SELECT button 2 Select Manual vane angle with the F1 or F2 button and press the SELECT button ...

Page 27: ...3 button and press the SELECT button Ref address Refrigerant address Unit No 1 2 3 4 Press the F4 button to confirm the unit The screen at left shows a sample display on Mr SLIM On CITY MULTI units M NET address is displayed instead of Ref address and the Unit No will not be displayed 4 Select Vane with the F1 button Select 4 way or 2 way with the F2 or F3 button and press the F4 button ...

Page 28: ...cted outlet The screen will automatically return to the previous screen when the transmission is completed Make the settings for other outlets following the same procedures If all outlets are selected will be displayed the next time the unit goes into operation Navigating through the screens To return to the previous screen RETURN button Draft reduction The Draft reduction mode keeps the vane angl...

Page 29: ... error during check in the service menu during test run during remote controller diagnosis when the clock is not set during function setting when the system is centrally controlled when On Off operation or timer operation from local remote controller is prohibited 2 Move the cursor to Timer and press the SELECT button 3 The current settings will appear Move the cursor to On Off timer and press the...

Page 30: ...r Repeat 5 Change the setting with the F3 or F4 button On Off timer No disable Yes enable On Operation start time settable in 5 minute increments Press and hold the button to rapidly advance the numbers Off Operation stop time settable in 5 minute increments Press and hold the button to rapidly advance the numbers Repeat No once Yes repeat ...

Page 31: ...igating through the screens To go back to the Main menu MENU button To return to the previous screen RETURN button will appear on the Status display and the Main display in the Full mode when the On Off timer is enabled appears when the timer is disabled by the centralized control system ...

Page 32: ... the service menu during test run during remote controller diagnosis during function setting when the system is centrally controlled when On Off operation or timer operation from local controller is prohibited 2 The current settings will appear Move the cursor to Auto Off or Stop in min with the F1 or F2 button 3 Change the setting with the F3 or F4 button Auto Off No disable Yes enable Stop in mi...

Page 33: ...gating through the screens To go back to the Main menu MENU button To return to the previous screen RETURN button will appear on the Status display and the Main display in the Full mode when the Auto Off timer is enabled appears when the timer is disabled by the centralized control system ...

Page 34: ...ing test run during remote controller diagnosis when the clock is not set during function setting when the system is centrally controlled On Off operation temperature setting or timer operation from local remote controller is prohibited 2 The current settings will appear Press the F1 or F2 button to see the settings for each day of the week Press the F3 button to see patterns 5 through 8 Press the...

Page 35: ...ents of the timer setting 1 or 2 move the cursor to Setting with the F1 or F2 button and select 1 or 2 with the F3 or F4 button 4 The weekly timer setting screen will appear and the current settings will be displayed Up to eight operation patterns can be set for each day Move the cursor to the desired day of the week with the F1 or F2 button and press the F3 button to select it Multiple days can b...

Page 36: ...dual set point mode is selected two preset temperatures can be set If an operation pattern with a single preset temperature setting is executed during the Auto dual set point mode its setting will be used as the cooling temperature setting in the Cool mode Press the SELECT button to save the settings A confirmation screen will appear Navigating through the screens To go back to the setting change ...

Page 37: ...y of the week for the quiet operation Select the desired silent level from Middle and Quiet Button operation 1 Select OU silent mode from the Timer menu and press the SELECT button OU silent mode function is available only on the models that support the function 2 The current settings will appear Press the F1 or F2 button to see the settings for each day of the week Press the SELECT button to go t...

Page 38: ...move the cursor to Yes with the F3 or F4 button and press the SELECT button 4 The OU silent mode setting screen will appear To make or change the setting move the cursor to the desired day of the week with the F1 or F2 button and press the F3 button to select it Multiple days can be selected Press the SELECT button ...

Page 39: ...n to rapidly advance the numbers Silent level Normal Middle Quiet Normal Middle Quiet Press the SELECT button to save the settings A confirmation screen will appear Navigating through the screens To go back to the setting change day of the week selection screen SELECT button To go back to the Main menu MENU button To return to the previous screen RETURN button will appear on the Status display and...

Page 40: ...unction is not available if the operation and the temperature setting are performed from the remote controller If the room temperature is measured by the air conditioner s suction temperature sensor the accurate temperature may not be obtained when the air conditioner is inactive or when the air is not clean In this case switch the sensor to a remote sensor PAC SE40TSA PAC SE41TS E or a remote con...

Page 41: ...ration can be set The temperature difference between the lower and upper limits must be 4ºC 8ºF or more The settable temperature range varies depending on the connected indoor units 1ºC increments Start Stop time settable in 5 minute increments Press and hold the button to rapidly advance the numbers Press the SELECT button to save the settings A confirmation screen will appear Navigating through ...

Page 42: ...ight setback will not work in the following cases when the unit is in operation when the Night setback function is disabled during an error during check in the service menu during test run during remote controller diagnosis when the clock is not set during function setting when the system is centrally controlled On Off operation temperature setting or timer operation from local remote controller i...

Page 43: ...g the temperature range restriction Button operation 1 Select Energy saving from the Main menu refer to page 24 and press the SELECT button 2 Move the cursor to Restriction with the F1 or F2 button and press the SELECT button ...

Page 44: ... will appear Move the cursor to Temp range with the F1 or F2 button and press the SELECT button 4 The screen to set the temperature range will appear Move the cursor to the desired item with the F1 button out of Temp range Cool Dry Heat or Auto ...

Page 45: ...es can be set 2 Temperature ranges for the Heat and Auto dual set point modes can be set 3 Temperature ranges for the Heat Cool and Dry modes must meet the conditions below Upper limit for cooling upper limit for heating Minimum temperature difference varies with indoor unit model Lower limit for cooling lower limit for heating Minimum temperature difference varies with indoor unit model 4 Tempera...

Page 46: ...peration lock function Button operation 1 Bring up the Restriction setting screen Refer to page 43 Move the cursor to Operation locked and press the SELECT button To enable the operation lock function set the item Operation locked to Yes ...

Page 47: ... Individual or Hotel On Off On Off operation Mode Operation mode setting Locked Set temp Preset temp setting Vane Vane setting Menu Menu setting Fan Fan speed setting Louver Louver setting When Hotel is selected for the Location setting the following operations will be locked automatically Mode Vane Menu and Louver Press the SELECT button to save the settings A confirmation screen will appear Navi...

Page 48: ...operation lock function setting is enabled Operation guide that corresponds to the locked function will be suppressed To display the main menu while the menu setting is being locked press and hold the Setting button for ten or more seconds Enter the administrator s password on the password input screen ...

Page 49: ...n is performed from this remote controller the set temperature automatically returns to the required temperature regardless of the set time Button operation 1 Select Energy saving from the Energy saving menu and press the SELECT button 2 The current settings will appear Move the cursor to Auto return with the F1 or F2 button and press the SELECT button ...

Page 50: ...rature setting range is 17 to 28ºC 63 to 83ºF 1ºC increments Press the SELECT button to save the settings Cool includes Dry and Auto Cool modes and Heat includes Auto Heat mode The screen to set the selected item will appear Navigating through the screens To go back to the Main menu MENU button To return to the previous screen RETURN button Timer or preset temperature settings will not be effectiv...

Page 51: ...tton 2 The screen to see the schedule will appear Press the F1 or F2 button to see the settings for each day of the week Press the SELECT button to go to the setting screen 3 The screen to enable Yes disable No the energy saving operation schedule will appear Select No or Yes with the F3 or F4 button Press the SELECT button to go to the setting change day of the week selection screen ...

Page 52: ...pear Press the F1 button to move the cursor to the desired pattern number Move the cursor to the desired item with the F2 button out of the start time stop time and energy saving rate arranged in this order from the left Change the settings with the F3 or F4 button Start Stop time settable in 5 minute increments Press and hold the button to rapidly advance the numbers Energy saving rate The settin...

Page 53: ...the Full mode when the unit is operated in the energy saving mode Navigating through the screens To go back to the setting change day of the week selection screen SELECT button To go back to the Main menu MENU button To return to the previous screen RETURN button ...

Page 54: ...lowing settings On Off timer OU silent mode Night setback Weekly timer Energy saving If a given system has no system controllers the clock time will not automatically be corrected In this case periodically correct the clock time 2 Move the cursor to Basic setting with the F1 or F2 button and press the SELECT button 3 Select Clock with the F1 or F2 button and press the SELECT button ...

Page 55: ... with the F1 or F2 button out of year month date hour or minute Increase or decrease the value for the selected item with the F3 or F4 button and press the SELECT button A confirmation screen will appear Navigating through the screens To go back to the Main menu MENU button To return to the previous screen RETURN button ...

Page 56: ...stem has a system controller disable this setting to keep the correct time At the beginning and the end of daylight saving time the timer may go into action twice or not at all This function will not work unless the clock has been set Button operation 1 Select Clock from the Basic setting menu and press the SELECT button 2 Move the cursor to Daylight saving time with the F1 or F2 button and press ...

Page 57: ...on Date End 1 2nd page Set the day of the week week number and month with the F3 or F4 button The default setting is Sun 5th Oct End time 2nd page Set the end time for daylight saving time with the F3 or F4 button Backward to 2nd page Set the time when the clock is to be set backward to at the end time above with the F3 or F4 button 1 If 5th is selected for the week number and the 5th week does no...

Page 58: ...on 2 Move the cursor to Main display with the F1 or F2 button and press the SELECT button 3 Select Full or Basic refer to page 10 with the F3 or F4 button and press the SELECT button A confirmation screen will appear Navigating through the screens To go back to the Main menu MENU button To return to the previous screen RETURN button ...

Page 59: ...ain display with the F1 or F2 button and press the SELECT button 3 Select Icon explan with the F1 or F2 button select the desired setting Yes or No with the F3 or F4 button and press the SELECT button The default setting is Yes Navigating through the screens To go back to the Main menu MENU button To return to the previous screen RETURN button ...

Page 60: ...60 Function settings 4 When Yes is selected the explanation of the icon of the setting item will appear as shown at left ...

Page 61: ...utton and press the SELECT button 3 Adjust the brightness with the F1 or F2 button ON or OFF can be selected for the Stay lit setting with the F4 button When ON is selected the backlight will remain lit dimly even after the specified time has elapsed Navigating through the screens To go back to the Main menu MENU button To return to the previous screen RETURN button ...

Page 62: ...ions are English French German Spanish Italian Portuguese Swedish Russian Greek Turkish Dutch Czech Hungarian and Polish Button operation 1 Select Display setting from the Initial setting menu and press the SELECT button 2 Move the cursor to Language selection with the F1 or F2 button and press the SELECT button ...

Page 63: ...wer is on for the first time the Language selection screen will be displayed Select a desired language The system will not start up without language selection A screen will appear that indicates the setting has been saved Navigating through the screens To go back to the Main menu MENU button To return to the previous screen RETURN button ...

Page 64: ...gn with the F1 or F2 button and press the SELECT button 3 Select Color with the F4 button Color The display color can be selected Refer to the next page White Monochrome display white basis Black Monochrome display black basis When White or Black is selected press the SELECT button When Color is selected select the desired color referring to the next page ...

Page 65: ...ttern Set the color with the F4 button Color set to Select Character or BG Background as a target to which the color is applied with the F4 button The sample color below the function buttons will change according to the setting Set the desired color and press the SELECT button Navigating through the screens To go back to the Main menu MENU button To return to the previous screen RETURN button ...

Page 66: ...ouch panel from the Initial setting menu and press the SELECT button 2 Move the cursor to Touch panel calibration with the F1 or F2 button and press the SELECT button 3 A confirmation screen will appear Select Cancel or OK with the F3 or F4 button and press the SELECT button ...

Page 67: ...the display will return to the touch panel menu If the touch panel is left untouched for one minute the calibration will be canceled and the display will automatically return to the previous screen To properly calibrate the touch panel use a pointy but not sharp object to touch the dots A sharp object may damage or scratch the touch panel ...

Page 68: ...ouch panel from the Initial setting menu and press the SELECT button 2 Move the cursor to Touch panel cleaning with the F1 or F2 button and press the SELECT button 3 A confirmation screen will appear Select Cancel or OK with the F3 or F4 button and press the SELECT button ...

Page 69: ...conds without accidentally changing the settings The display will return to the touch panel menu after the 30 seconds Wipe with a soft dry cloth a cloth soaked in water with mild detergent or a cloth dampened with ethanol Do not use acidic alkaline or organic solvents ...

Page 70: ...t mode setting Energy saving setting Energy saving option setting Clock setting Daylight saving time setting Main display setting Brightness setting Display details setting Design setting Auto mode setting Model name setting Serial No setting Dealer information setting Error information Administrator password Maintenance password Button operation 1 Select Others from the Service menu and press the...

Page 71: ...71 3 Select OK with the F4 button The remote controller will automatically be started up after being initialized ...

Page 72: ... description The information of the remote controller in use can be checked Button operation 1 Select Others from the Service menu and press the SELECT button 2 Move the cursor to Remote controller information with the F1 or F2 button and press the SELECT button ...

Page 73: ...73 3 The model name software version and serial number of the remote controller in use can be checked ...

Page 74: ...ealer Button operation 1 Error code error unit refrigerant address unit model name date and time on which an error occurred and serial number will appear The model name and serial number will appear only if the information have been registered Press the F1 or F2 button to go to the next page Contact information dealer s phone number will appear if the information have been registered ...

Page 75: ...button to reset the error that is occurring Errors cannot be reset while the ON OFF operation is prohibited Select OK with the F4 button A confirmation screen will appear Navigating through the screens To go back to the Main menu MENU button ...

Page 76: ...ing page 2 2 of the error information refer to page 74 can be viewed from the menu operation Select Maintenance menu from the Main menu and press the SELECT button To display the error information screen select Error information from the Maintenance menu Errors cannot be reset ...

Page 77: ...ollowing screen will appear for the 3D i See sensor panel model when the unit is stopped due to the No occupancy Auto OFF function of the energy saving option Refer to the indoor unit Instruction Book for the 3D i See sensor setting ...

Page 78: ...filters Wash clean or replace the filters when this sign appears Refer to the indoor unit Instructions Manual for details Button operation 1 Select Filter information from the Maintenance menu and press the SELECT button 2 Press the F4 button to reset filter sign Refer to the indoor unit Instructions Manual for how to clean the filter ...

Page 79: ...are connected filter cleaning timing for each unit may be different depending on the filter type The icon will appear when the filter on the main unit is due for cleaning When the filter sign is reset the cumulative operation time of all units will be reset The icon is scheduled to appear after a certain duration of operation based on the premise that the indoor units are installed in a space with...

Page 80: ...2 9 16 in not including the protruding part Net weight Standard PAR CT01MAA R SB PAR CT01MAA S 0 09 kg 13 64 lbs Premium PAR CT01MAA R PB 0 10 kg 7 32 lbs Rated power supply voltage 12 VDC supplied from indoor units Power consumption 0 6 W Usage environment Temperature 0 40ºC 32 104ºF Humidity 25 90 RH with no dew condensation Material Standard PAR CT01MAA R SB PAR CT01MAA S Main body ABS Premium ...

Page 81: ...nistrator Initial setting menu Clock administrator Clock display format setting administrator Daylight saving time administrator Main display administrator Icon explanation administrator Brightness administrator Language selection administrator Design administrator Touch panel calibration administrator Touch panel cleaning administrator Password Administrator administrator Service menu Initialize ...

Page 82: ...the high power operation has the higher priority 2 This function cannot be operated if some operation is locked 3 Night setback function cannot be used when the unit is in operation by On Off timer setting 4 Auto off function cannot be used for Night setback operation 5 Night setback function cannot be used when the unit is in operation by Weekly timer setting 6 Temperature range setting cannot be...

Page 83: ...AR CT01MAA S This product is designed and intended for use in the residential commercial and light industrial environment The product at hand is based on the following EU regulations Electromagnetic Compatibility Directive 2014 30 EU HEAD OFFICE TOKYO BLDG 2 7 3 MARUNOUCHI CHIYODA KU TOKYO 100 8310 JAPAN MANUFACTURER MITSUBISHI ELECTRIC CORPORATION Air conditioning Refrigeration Systems Works 5 66...

Reviews: