11
GB
7.1. Power supply wiring
•
Power supply cords of appliances shall not be lighter than design 227 IEC 53.
•
A switch with at least 3 mm contact separation in each pole shall be provided
by the Air conditioner installation.
Power cable size: more than 1.5 mm
2
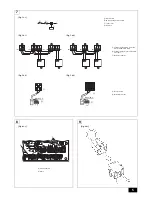
[Fig. 7.1.1] (P.5)
A
Switch 16 A
B
Overcurrent protection 16 A
C
Indoor unit
D
Pull box
[Selecting non-fuse breaker (NF) or earth leakage breaker (NV)]
To select NF or NV instead of a combination of Class B fuse with switch, use the
following:
•
In the case of Class B fuse rated 15 A or 20 A,
NF model name (MITSUBISHI): NF30-CS (15 A) (20 A)
NV model name (MITSUBISHI): NV30-CA (15 A) (20 A)
Use an earth leakage breaker with a sensitivity of less than 30 mA 0.1 s.
Caution:
Do not use anything other than the correct capacity breaker and fuse. Using fuse,
wire or copper wire with too large capacity may cause a risk of malfunction or fire.
7.2. Connecting remote controller, AHU con-
troller and outdoor transmission cables
(Remote contoroller is optionally available.)
A remote controller is required to perform initial setting. No remote controller is
required after the initial setting, as the unit is controlled on site. Initial setting can be
performed using the M-NET remote controllers connected to other indoor units.
•
Connect the “M1”, “M2” and “S” on AHU controller TBY to the TB3 on the out-
door unit. (Non-polarized 2-wire)
The “S” on AHU controller TBY is a shielding wire connection. For specifica-
tions about the connecting cables, refer to the outdoor unit installation man-
ual.
•
Install a remote controller following the manual supplied with the remote con-
troller.
•
Connect the “1” and “2” on AHU controller TBY to a MA remote controller.
(Non-polarized 2-wire)
•
Connect the “M1” and “M2” on AHU controller TBY to a M-NET remote con-
troller. (Non-polarized 2-wire)
•
Connect the remote controller’s transmission cable within 10 m using a
0.75
mm
2
core cable. If the distance is more than 10 m, use a 1.25 mm
2
junc-
tion cable.
[Fig. 7.2.1] (P.5) MA Remote controller
[Fig. 7.2.2] (P.5) M-NET Remote controller
A
Terminal block for AHU controller/indoor transmission cable
B
Terminal block for outdoor transmission cable
C
Remote controller
•
DC 9 to 13 V between 1 and 2 (MA remote controller)
•
DC 24 to 30 V between M1 and M2 (M-NET remote controller)
[Fig. 7.2.3] (P.5) MA Remote controller
[Fig. 7.2.4] (P.5) M-NET Remote controller
A
Non-polarized
B
Remote Controller
•
The MA remote controller and the M-NET remote controller cannot be used at
the same time or interchangeably.
Note:
Ensure that the wiring is not pinched when fitting the terminal box cover.
Pinching the wiring may cut it.
Caution:
Install wiring so that it is not tight and under tension. Wiring under tension
may break, or overheat and burn.
•
Fix power source wiring to control box by using buffer bushing for tensile
force. Connect transmission wiring to transmission terminal block through the
hole of control box using bushing.
•
After wiring is complete, make sure again that there is no slack on the con-
nections, and attach the cover onto the control box in the reverse order
removal.
Caution:
Wire the power supply so that no tension is imparted. Otherwise discon-
nection, heating or fire result.
7.3. Connecting LEV-kit and thermistor
cables
7.3.1 Connecting LEV-kit cables
Connect the lead wire of the linear expansion valve to the controller.
Pull the end of wire (ring terminal) through the bunch of wires (LEV-kit) at the bot-
tom of the controller.
Connect the lead wire of the expansion valve to the same colored terminal.
When the lead wire is too long, cut it to the appropriate length. Do not bind it in
the box.
This time, connect the lead wire to the same colored terminal.
7.3.2 Connecting thermistor cables
Pull the end of the wire through the bunch of wires (Thermistor) at the bottom of
the controller.
Connect the thermistor for the discharge air to T1 and T2 on the terminal block,
the thermistor on the gas side to T11 and T12, the thermistor on the liquid side to
T21 and T22, the thermistor for the suction air to T31 and T32.
When the lead wire is too long, cut it to the appropriate length. Do not bind it in
the box.
Take proper measures not to miswire. E.g. Attach a label before the cutting part,
so that it is obvious whether the wire is for inlet air, for gas side or for liquid side.
Caution:
Do not route the thermistor cables together with power cables.
7.4. Connecting distant signal line
Pull the wires for operation command (pulse maneuvering), for operation signal
and for error signal through the bunch of wires (Distant signal) at the bottom of
the controller.
Connect each wire to operation command: A1 and A2, to operation signal: D1
and D2, to error signal: D11 and D12, to fan signal: D21 and D22, and to defrost
signal: D31 and D32.
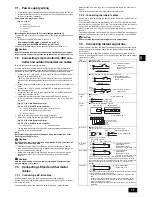
Item
Connection circuit
Operation
■
Operation contact specifications
SW1: Operation command
(field supply)
Minimum applicable load
DC5 V, 1 mA
■
Use a relay when the electrical wire exceeds 10 m.
X: Relay (field supply)
Minimum applicable load
DC5 V, 1 mA
SW2: Operation command
(field supply)
Analog
input
■
Analog input
TBY Wiring: AWG22~26
Contact
input
■
Contact input by using MAC-397IF-E
PAC-AH
·
M-J MAC-397IF-E
TBY Wiring: AWG22~26
Error input
■
External error input
Remove the short circuit wire(*A) when Error input is used.
TBX
TBX
Protector(field supply)
Wiring: AWG22~26
Contact A11-A12 condition
- Short(Initial) :Normal
- Open
:Error (Code 4109)
Operation
signal
L1: Operation display lamp
(field supply)
Display power source:
DC30 V 1 A, AC100 V/200 V 1 A
Error signal
L2: Error display lamp
(field supply)
Display power source:
DC30 V 1 A, AC100 V/200 V 1 A
If error resets (stop operation) and restart operations are repeatedly per-
formed, the compressor may be damaged seriously. Install an error lamp,
and contact the service firm or the dealer when an error occurs. Installation of
the remote controller is recommended so that the error details can be
checked.
Fan signal
X: Relay (field supply)
AC220~240 V 1 A
A fan control signal is output. It is usually the ON output at the time of operat-
ing, but it is the OFF output in defrosting.
- Be careful to miscarriage lines because over AC200 V is impressed in
ON.
- In the case that Dip-switch SW3-4 on the control board is ON, the fan
operates in defrosting also. In this case, be careful of the cold wind of
AHU or to freeze of a humidifier.
- When the switch SWE on the control board is turned on, the fan signal is
always ON.
A1
A2
SW1
Maximum 10 m
SW2
A1
A2
X
X
Maximum 10 m
Relay
power
source
B1
+DC0~10V
-DC0~10V
B2
TBX
C1~C5
CN560
1 2 3 4 5 6
CN591
C1 C2 C3 C4 C5
Receiving signal(RX)
Transmitting signal(TX)
DC5V
GND
DC12V
A11
A12
A11
A12
*A(Initial)
D1
D2
L1
D11
D12
L2
D21
D22
X


