24
Remo
ving and maintaining the accessories
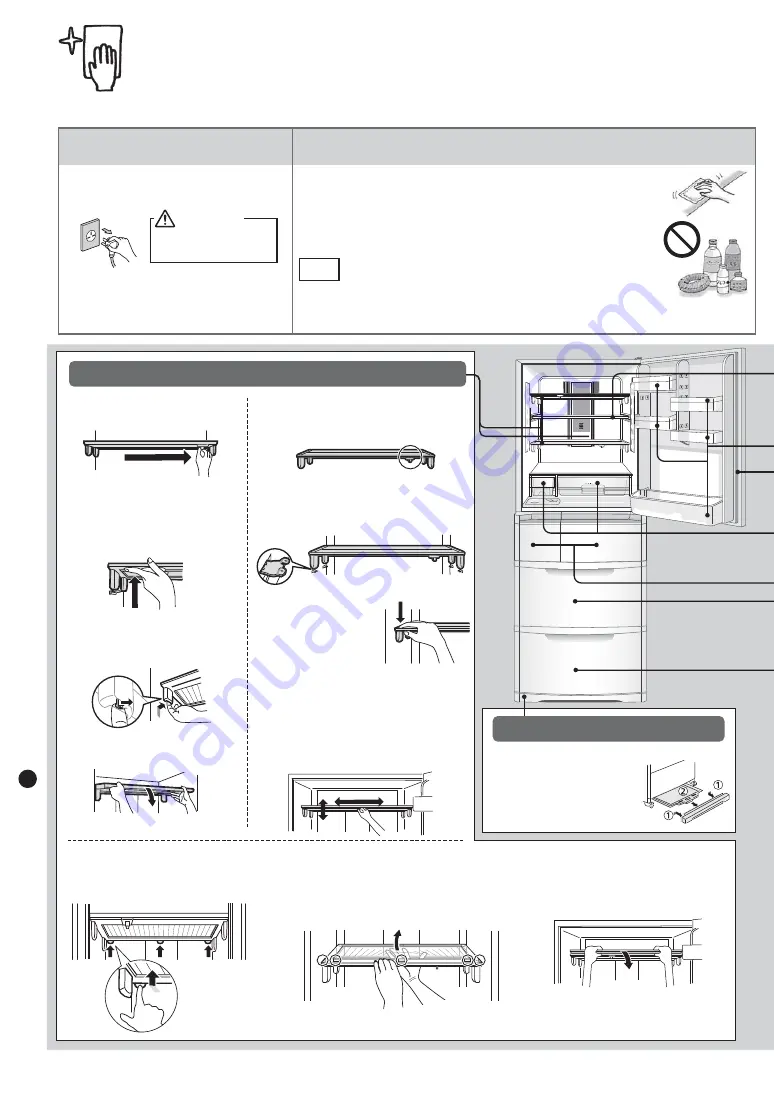
Removing and maintaining
the accessories
Remove the power plug from
the socket.
Before you start
Maintenance and Cleaning
Wait at least 10 minutes before you replace
the power plug.
The refrigerator will not operate if the plug is
replaced immediately after it is removed.
s
Wipe the accessories clean with a soft piece of cloth wet with slightly warm water or
remove them to wash with water.
s
For deposits sticking hard, wet a piece of cloth with dishwashing agent diluted with
water and wipe off the deposits. Then wipe out with a piece of cloth wet with water.
Be sure to wipe off all oily deposits. Oily deposits, if left unattended, can cause
plastic parts to break.
Do not use an alkaline- or alkalescent-base kitchen detergent,
polishing compound, a powder detergent, alcohol, benzene,
paint thinner, petroleum, acid, hard brush or hot or boiled water.
They will cause damage to plastic parts (door handles, cap, cases, etc.) and coating on
the surfaces such as the doors.
Note
Failure to remove the plug
may result in electric shock.
Warning
Evaporating dish
Push in the left and right
sides alternately and pull the
tray towards you to remove it.
Hold the tray with both hands
and pull it out carefully.
s$ISASSEMBLINGORAPPLYINGGREASETOTHE!54/3HELFCANCAUSEITTOMALFUNCTION
Push up the nails at the back side
of tray (3 places) using fingers.
Tray removal
Lift up the back side of tray until the
nails at the front (3 places) and nails on
both sides (2 places) are removed.
*Lift up the tray slowly, otherwise it may fall.
Remove the tray with both
hands.
Finally, move the lever to the left and right and
check that the shelf moves up and down while
remaining level.
(If the shelf does not remain level, the 4 hooks
are not securely caught onto the refrigerator.
Remove the shelf and repeat steps
to
.)
Push each of the 4 supports,
one at a time, downward
from above. (When the
internal hooks catch onto
the refrigerator, a “click”
sound will be heard.)
Make sure that the 4 metal stoppers are
securely fitted into the refrigerator, then lightly
set the shelf into the refrigerator and align the
4 supports with the 4 stoppers.
Make sure that the lever is moved completely to
the right.
Move the lever completely to the right.
Push up each support, one at a time,
with a strong effort. (4 supports)
(When the internal hooks are released
from the refrigerator, a “click” sound
will be heard.)
If the supports are not
released easily, push the
internal hooks inward.
After the 4 supports are released,
pull out the shelf.
AUTO Shelf
Installation
Removal
Summary of Contents for MR-B42R
Page 58: ...MEMO ...
Page 59: ...MEMO ...


