background image


Appendices 

73

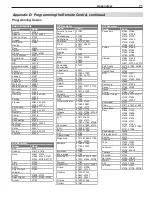
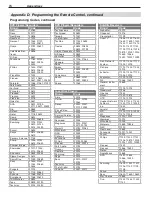
Cable Boxes

Brand

Code

Optimus

10021

Pace

11877, 10237, 10008

Panasonic

10107, 10021, 10000

Panther

10637

Paragon

10000

Philips

11305, 10317, 10153, 
10031, 10027, 10025

Pioneer

11877, 10877, 10533, 
10144, 10023

Popular 
Mechanics

10400

Pulsar

10000

Quasar

10000

RadioShack

10883, 10797, 
10315, 10015

RCA

11256, 10021

Realistic

10207

Recoton

10400

Regal

10279, 10273, 
10259, 10020

Regency

10002

Rembrandt

10011

Runco

10000

Samsung

10144, 10040

Scientific Atlanta 11877, 10877, 10477, 

10017, 10008, 

Seam

10510

Sejin

11602

Signal

10040, 10015

Signature

10011

SL Marx

10040

Sony

11006

Sprucer

10021

Starcom

10015, 10003

Stargate

10797, 10040, 10015

Starquest

10015

StarSight

10422

Supercable

10276

Supermax

10883

Sylvania

10001

Tandy

10258

TeleCaption

10221

Teleview

10040

Texscan

10001

TFC

10310

Thomson

11256

Timeless

10418, 10040

Tocom

10013, 10012

Torx

10003

Toshiba

10000

Tristar

10883

Tusa

10015

TV86

10063

Unika

10207, 10153, 10022

United Artists

10007

Universal

10207, 10191, 10153, 
10056, 10022,

V2

10883

Viewmaster

10883

Viewstar

10258, 10063, 
10027

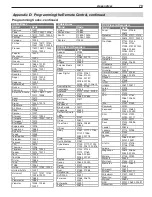
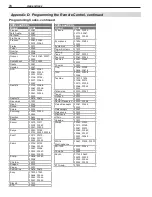
DVD Players/Recorders

Brand

Code

Adcom

21094

Aiwa

20641

Akai

21089, 20770 

Alco

20790

Allegro

20869

Amphion Media 
Works

20872

AMW

20872

Apex Digital

21100, 21061, 
21056, 21020, 
21004, 20797, 
20796, 20794, 
20755, 20717, 20672

Aspire Digital

21407, 21168

Audiologic

20736

Audiovox

21072, 21041, 20790

Axion

21072

B & K

20662, 20655

Bel Canto 
Design

21571

Blaupunkt

20717

Blue Parade

20571

Broksonic

20695

California Audio 
Labs

20490

CAVS

21057

Cinea

20831

CineVision

20876, 20869, 
20833

Citizen

21277

Coby

21351, 21177, 21165, 
21107, 21086, 
20852, 20778

Craig

20831

Curtis Mathes

21087

CyberHome

21129, 21117, 21024, 
21023, 20874, 20816

Daewoo

21242, 21234, 
21172, 21169, 
20869, 20833, 
20784, 20705

Daytek

20872

Denon

20634, 20490

Desay

21407

Disney

21270, 20675

Dual

21085, 21068

Durabrand

21127

DVD2000

20521

Emerson

21268, 20675, 
20591

Enterprise

20591

Fisher

20670

DVD Players/Recorders

Brand

Code

Funai

21334, 21268, 
20675

Gateway

21158, 21077, 21073

GE

20815, 20717, 20522

Go Video

21730, 21304, 
21158, 21144, 
21099, 21075,21044, 
20869, 20833, 
20783, 20744, 
20741, 20715

Go Vision

21072

GoldStar

20741

GPX

20769, 20699

Gradiente

20490

Greenhill

20717

Grundig

20539

Harman/Kardon

20702, 20582

Hitachi

20664, 20573

Hiteker

20672

iLo

21348

Initial

20717

Integra

20627, 20571

Jaton

21078

JBL

20702

JSI

21423

JVC

21275, 21164, 
20867, 20623, 
20558

jWin

21051, 21049

Kawasaki

20790

Kenwood

20737, 20682, 
20534, 20490

KLH

21149, 21020, 
20790, 20717

Konka

20721, 20711

Koss

21423, 20896, 
20651

Landel

20826

Lasonic

21173, 20798

Lecson

21533

Lenoxx

21127

LG

20869, 20801, 
20741, 20591

LiteOn

21440, 21416, 
21158, 21058

Loewe

20511

Magnavox

20675, 20646, 
20539, 20503

Malata

21159, 20782

Marantz

20539

McIntosh

21533, 21273

Memorex

21270, 20831, 
20695

Microsoft

20522

Mintek

20839, 20717

Mitsubishi

21521, 20521

Momitsu

21082

Myryad

20894

NAD

20741, 20692, 20591

Nakamichi

21222

Programming Codes, continued

Appendix D:  Programming the Remote Control, continued

Cable Boxes

Brand

Code

Vision

10883

Vortex View

10883

Zenith

10899, 10525, 
10054, 10000

Zentek

10400

Summary of Contents for LT-40133

Page 1: ...itsubishi tv com E mail us at MDEAservice mdea com Call Consumer Relations at 800 332 2119 For information on System Reset please see the back cover To order replacement additional remote controls or Owner s Guides visit our website at www mitsuparts com or call 800 553 7278 Guidelines for setting up and using your new widescreen TV start on page 13 x v Color D A I LY ...

Page 2: ...the interference by one or more of the following measures Reorient or relocate the receiving antenna Increase the separation between the equip ment and the receiver Connect the equipment into an outlet on a circuit different from that to which the receiver is connected Consult the dealer or an experienced radio TV technician for help Changes or modifications not expressly approved by Mitsubishi co...

Page 3: ...Outlet Cable 23 VCR to a Cable Box Audio Video 24 A V Receiver Sound System 25 Older Cable Box 25 Camcorder 26 4 TV Operation and Features Choosing a Viewing Source 27 Sleep Timer 27 Remote Control 28 ChannelView Channel Listings 29 Status Display 30 Fav Favorite Channels 31 TV Signals and Display Formats 32 Viewing Camera Files 34 JPEG Photos and the USB Photo Port 34 Photos and Moving Video as C...

Page 4: ...Mount Requirements For wall mounting see Stand Removal Instructions Use with other than the authorized accessories may cause the TV to become unstable which can cause damage to the product or possible injury Custom cabinet installation must allow for proper air circulation around the television NOTE TO CATV SYSTEM INSTALLER THIS REMINDER IS PROVIDED TO CALL THE CATV SYSTEM INSTALLER S ATTENTION TO...

Page 5: ...tning For added protection for this TV during a lightning storm or when it is left unattended and unused for long period of time unplug it from the wall outlet and disconnect the antenna or cable system This will prevent damage to the TV due to lightning and power line surges 12 Power Lines An outside antenna system should not be located in the vicinity of overhead power lines or other electric li...

Page 6: ... not long enough damage to cables and TV could occur TV can be swiveled up to 30 degrees left or right see illustration to the left INPUT S VIDEO VIDEO L MONO R R R Y Pb Pr R L L MONO L MONO 1 2 1 2 AVR OUT DVI IN AUDIO COMPONENT INPUTS Cable Clamp w rivet Cable Tie w rivet Note 1 Cable Clamp round and 1 Cable Tie flat are located in the accessories bag Pre installed Cable Tie w rivet attached to ...

Page 7: ...PLE are needed to safely remove the stand One person must hold the TV while the other person removes the stand Failure to follow these recommendations may result in personal injury as well as damage to the product IMPORTANT Before attaching the wall mount kit to the TV be sure to connect all necessary cables to jacks on the back of the TV After wall mounting these jacks will not be accessible If y...

Page 8: ...efinition Video Inputs Component Video Inputs Also called Y Pb Pr inputs these inputs receive standard analog video format 480i and High Definition video formats 480p 720p and 1080i This provides a high level of flexibility when connecting DVD players recorders cable boxes and satellite receivers HDMI 1 3 Inputs These inputs accept digital 480i 480p 720p 1080i and 1080p video signals plus PCM digi...

Page 9: ... Note On models LT 40134 LT 46144 and LT 52144 you can add commands using NetCommand IR emit ters and Learning STATUS Indicator LED Color TV Condition Additional Information None Normal TV on or standby condition Normal operation Red TV may require service Turn off the TV and unplug the set from the AC power source Wait one minute and then plug the set back in See Appendix E If the LED is still on...

Page 10: ...chapter 4 TV Operation and Features Side Panel Input Jacks model LT 40134 only Component 3 All 5 jacks Input 3 Bottom 3 jacks 2 4 3 1 1 COMPONENT 3 Inputs Audio and Video Y Pb Pr 480i 480p 720p 1080i COMPONENT 3 is a third set of component inputs Use these jacks to connect devices with component video outputs such as DVD players external HDTV receivers or compatible video game systems See Appendix...

Page 11: ...ts using a DVI to HDMI cable These jacks allow you to send left and right analog audio from a PC or DVI device to the TV 4 AVR AUDIO OUTPUT Use the AVR AUDIO OUTPUT jacks to send analog audio of the program currently shown on the screen to an A V surround sound receiver or stereo system Digital audio from digital channels and HDMI devices is converted to analog audio by the TV If using an analog A...

Page 12: ...our PC or DVI device The TV s HDMI inputs are compatible with many DVI D and HDMI computer video signals See chapter 2 TV Setup and Appendix A for additional information on PC compatibility These inputs are HDCP High Bandwidth Digital Copy Protection compliant These inputs are certified for proper interop erability with other products certified by Simplay TV Back Panel continued HDMI Cable Categor...

Page 13: ... 8 You can now start watching TV or you can perform additional setup and customization through the TV menus Guidelines for Setting Up and Using Your New Widescreen TV TV Operation 1 Review chapter 4 TV Operation and Features for TV features including Input Selection viewing source Select a connected program source to watch such as a VCR DVD player or antenna Press INPUT on the remote control to se...

Page 14: ...ndix E For warranty information see the TV warranty in the back of this book Installing the Remote Control Batteries 1 Remove the remote control s back cover by gently pressing in the tab and lifting off the cover 2 Load the batteries making sure the polarities and are correct For best results insert the negative end first 3 Snap the cover back in place 2 1 The remote control requires two AA alkal...

Page 15: ...Initial TV Setup continued 5 When memorization is complete you can Press MENU once to return to the top row of icons Press MENU again to return to the Main menu Press EXIT to watch TV After channels have been scanned memorized To tune to memorized channels press CH PAGE while watching TV on the ANT 1 or ANT 2 inputs Use the Setup Edit menu for additional channel options such as adding or deleting ...

Page 16: ... setup You can add more control functions if desired Program the TV s remote control or in the case of an LT 40134 LT 46144 or LT 52144 model perform NetCommand IR learning to add functions 4 Press EXIT to close the Auto Input Sensing screen The TV will then display the Auto Input Sensing screen for the next connection it finds More About Auto Input Sensing Choose a different device type name for ...

Page 17: ... 1654 73 6 0 065165 1 7 6 0 165 57 BDL 1BOFM 57 BDL 1BOFM 7 UP BCMF 4UFSFP VEJP BCMF A DVI connection from a personal computer requires a separate audio connection NPEFM 5 0OMZ Pr Pb 4 1 57 7 UP BCMF 4UFSFP VEJP BCMF 1FSTPOBM PNQVUFS XJUI 7 0VUQVU 1 See the TV specifications in Appendix A to confirm that your computer signal is compatible with the TV 2 Connect the computer s digital graphics signa...

Page 18: ...to the image See the chart on this page showing how different computer reso lutions are displayed on the TV Image Resolution Your Mitsubishi TV can display resolutions from standard VGA 640 x 480 through 1920 x 1080 signals at a refresh rate of 60 Hz The resolution of 1920 x 1080 is sup ported at refresh rates of 24 30 and 60 Hz See Appendix A in this book for more on compatible screen resolutions...

Page 19: ...described later in this chapter Required RCA component video cables left right analog stereo audio cables 1 Connect the cable from the outside cable or satel lite service to CABLE IN or SATELLITE IN on the cable box or satellite receiver See your device s owner s guide for instructions and cable compat ibility 2 Connect RCA type cables from the Y Pb Pr outputs on the HDTV cable box or satellite re...

Page 20: ...ly to your A V receiver See A V receiver and HDMI device Owner s Guides for instructions A V Receiver with HDMI If your A V receiver has an HDMI input use the audio connections described in A V Receiver Sound System instead Standard Cable Box Satellite Receiver or Other Device with S Video Required S Video cable and left right analog stereo audio cables 1 Connect the cable from the outside cable o...

Page 21: ...th coaxial lead Connect the coaxial lead directly to ANT 1 MAIN on the TV back panel 2 Antennas with Separate UHF and VHF Leads Required UHF VHF combiner 1 Connect the UHF and VHF antenna leads to the UHF VHF combiner 2 Push the combiner onto ANT 1 MAIN on the TV back panel 2 165 1 CFMPX MBCFM XJUIJO SFDFTTFE BSFB BU UPQ 065165 5 6 0 3 55 3 5 BDL 7JFX 4JEF 7JFX 6 OUFOOB IBOOFMT 7 OUFOOB IBOOFMT 0I...

Page 22: ...7 065 165 1 CFMPX MBCFM XJUIJO SFDFTTFE BSFB BU UPQ 3 3 0 0 0 0 73 065 7 0 10 5 1654 73 6 0 065165 1 7 6 0 165 0 10 5 1654 J Q Q J 7 FWJDF 57 BDL 1BOFM 57 BDL 1BOFM 7 UP BCMF Figure 8 Connecting a digital DVI device DVD Player with Component Video Component video cables and analog audio cables are required 1 Connect the component video cables from Y Pb Pr VIDEO OUT on the back of the DVD player to...

Page 23: ...connect left white and right red audio cables from AUDIO OUT on the VCR to INPUT AUDIO L MONO and AUDIO R on the TV back panel 1 If your VCR is mono non stereo connect only the white left cable 5 Connect either an S Video or composite video cable from VIDEO OUT on the VCR back panel to INPUT VIDEO or S VIDEO on the TV back panel 1 Connect only one type of video cable S Video is recommended if avai...

Page 24: ...DIO jacks 4 To use the TV speakers with the VCR connect left white and right red audio cables from AUDIO OUT on the VCR to INPUT AUDIO L MONO and AUDIO R on the TV back panel 1 If your VCR is mono non stereo connect only the white left cable 5 Connect either an S Video or composite video cable from VIDEO OUT on the VCR back panel to INPUT VIDEO or INPUT S VIDEO on the TV back pane 1 Connect only o...

Page 25: ...ect left white and right red audio cables from AVR AUDIO OUTPUT L and R on the TV back panel 1 to the TV AUDIO INPUT on the A V receiver To connect a digital A V receiver with Dolby Digital surround sound and PCM audio support Connect one end of the digital audio cable to DIGITAL AUDIO OUTPUT on the back of the TV back panel 2 Connect the other end to the COAXIAL DIGITAL INPUT on the back of the A...

Page 26: ...l 2 4JEF 1BOFM BDL BWBJMBCMF PO NPEFM 5 POMZ 57 4JEF 1BOFM PUUPN Figure 15 HDMI connection for a camcorder Component Y Pb Pr Video Connection Required Analog stereo audio and component video cables supplied with the camcorder 1 Connect component video cables from VIDEO OUT on the camcorder to one of the TV s sets of COMPONENT INPUTS jacks TV Back Panel 1 or TV Side Panel 2 Connect left white and r...

Page 27: ...f inactivity the message box will disappear TV Tips Turning the TV On or Off To turn the TV on or off point the remote control at the front lower right corner of the TV and press the POWER button Alternatively press the POWER button on the side panel of the TV Controlling Sound Volume Press VOL to adjust the sound level See also Controlling A V Receiver Sound Volume in chapter 2 TV Setup Changing ...

Page 28: ...ize of the TV picture 13 INPUT Displays the Input Selection menu from which you can select an input source to view such as an antenna ANT 1 ANT 2 or a connected device 14 Adjust Up Down Left Right Navigate menus and change settings 15 ENTER Selects a channel number or menu item 16 AUDIO Selects individual audio settings to adjust 17 VIDEO Selects individual video settings to adjust 18 GUIDE Displa...

Page 29: ...ause Pauses a VCR DVR or DVD See pre vious page for use during TV viewing 24 Play Plays a VCR DVR or DVD 25 Record Records with a VCR or DVR 26 Stop Stops play of a VCR DVR or DVD 27 Reverse Rewinds a VCR Reverse scans a DVR or DVD 28 Forward Fast forwards a VCR Forward scans a DVR or DVD Remote Control continued Care of the Remote Control Use only alkaline batteries never use old new batteries to...

Page 30: ...om Stretch Stretch Plus Narrow 720p 1080i signals Standard Wide Expand Screen Format in Use Possible SD 4 3 480i or 480p Standard Expand Zoom Stretch Stretch Plus Narrow SD 16 9 or HD 16 9 720p or 1080i Standard Wide Expand 1080p Standard 7 Current Fav bank number of channel antenna sources only Current Fav bank number of channel antenna sources only 8 Program description if supplied by TV Guide D...

Page 31: ...y for about 2 seconds When Fav and the memory bank number appear under the channel number the channel has been successfully added Remove Fav channels This procedure removes the channel only from the selected bank and leaves the other banks unchanged 1 While watching TV press the FAV key 2 While the TV status display is still visible on screen press the number key for the memory bank 3 Press the FA...

Page 32: ... 78 1 or 1 85 1 aspect ratios Anamorphic DVDs that have a 2 35 1 aspect ratio are displayed with black bars at the top and bottom but show the entire image correctly Narrow 4 3 images are stretched evenly from side to side Available for all signals Game Note For inputs named Game with 1080p signals all pixels are displayed Expand This enlarges the picture to fill the screen cropping off some of th...

Page 33: ...GPS 4 PS BOBMPH Q J PPN OPU BWBJMBCMF GPS 4 PS BOBMPH Q J OPU SFDPNNFOEFE EJTUPSUFE YQBOE OPU BWBJMBCMF GPS 4 PS BOBMPH Q J OPU SFDPNNFOEFE EJTUPSUFE PPN OPU BWBJMBCMF GPS 4 PS BOBMPH Q J SFDPNNFOEFE GPS BOBNPSQIJD 4USFUDI OPU BWBJMBCMF GPS 4 PS BOBMPH Q J OPU SFDPNNFOEFE EJTUPSUFE 4USFUDI 1MVT OPU BWBJMBCMF GPS 4 PS BOBMPH Q J OPU SFDPNNFOEFE EJTUPSUFE BSSPX OPU BWBJMBCMF GPS 4 PS BOBMPH Q J OPU ...

Page 34: ...cting from the USB photo port Viewing Camera Files JPEG Photos and the USB Photo Port 1 Connect your digital camera or USB drive to the USB Photo port on the side of the TV If using a camera power it on and set it to playback mode The USB Photo menu displays while files are still being read Wait until you see the completion message on screen before continuing Note Some manufacturers devices may be...

Page 35: ...the next slide Go to the previous slide FORMAT Rotate the slide clockwise in 90 incre ments Stop slide show and display the USB Photo menu INFO Display status for the viewing device and current image INPUT Display the Input Selection menu MENU Display or remove the TV Main menu Note Always press STOP to stop slide show play back before disconnecting from the USB Photo port Photos and Moving Video ...

Page 36: ...y Disable the side panel control buttons Set a pass code Remote Control Keys for the TV Menu System The following keys help you use the menu system Some keys are duplicated on the TV s side panel Key Function 1 MENU Display or close the Main menu or move back one menu level 2 exit Close all menus and return to TV viewing 3 Adjust Left Right Keys Move through screens to select menu options Change s...

Page 37: ...NCEL to restore default settings Press MENU to return to the Main menu Global Video Noise High Medium Low Off Reduce minor noise graininess in the picture Use Low with good quality signals Use High with poor quality signals Use Off to leave the picture unaltered Saved by input Video Mute On Off On displays a blue background when no signal is being received on the current INPUT COMPONENT or HDMI ja...

Page 38: ...ituations medium contrast looks best High contrast shows darker images more uniformly black and makes colors appear more vibrant High contrast is good for brightly lit environments Settings are stored independently for each Picture Mode Brightness Adjust overall picture brightness Settings are stored independently for each Picture Mode Color Adjust overall color intensity Tint Adjust the red to gr...

Page 39: ...d surround effect through the TV speakers when watching a stereo program Listen To analog chan nels from ANT 1 ANT 2 only Stereo Default setting The TV plays stereo broadcasts in stereo and mono broadcasts in mono The word Stereo is displayed when you tune to a channel broadcast ing in stereo SAP Second Audio Program Select an additional monaural sound track not audible during normal TV viewing Th...

Page 40: ...igital Captions On if Mute Caption 1 Caption 6 Off On if Mute Display digital closed caption signal Caption 1 when audio from the TV speakers is muted When watching TV press MUTE to turn closed captions on off Caption 1 Caption 6 Caption signals sent by the broad caster Digital Settings Font Default Font 1 Font 7 Default changes settings to those selected by the caption pro vider or if none to the...

Page 41: ...ar in the Edit menu without repeating channel memorization 1 Look up the physical channel number for the new digital channel www antennaweb org can help you find the physical channel number 2 Tune to any channel on the Ant 1 or Ant 2 input your antenna is connected to 3 Use the number keys and CANCEL to enter the physical channel number followed by 1 and ENTER For example for physical channel 36 p...

Page 42: ...e Fav1 Fav6 Use the six Fav channel banks to store groups of your favorite channels For example you can set up a Fav channel bank for each of your favorite program types e g sports news children s programs or set up a bank for each TV user Use to move the highlight through the Fav area of the screen Press ENTER to insert a check mark to add the highlighted channel to one of the Fav banks The same ...

Page 43: ... to daylight savings time The TV s clock will be reset if you tune to a channel sending incorrect time data To prevent unwanted clock resets first use the Auto method to set the clock from a channel sending the correct time then change the method to Manual Time Manual option only 1 With the hour highlighted press repeatedly to change the hour and the AM PM indicator Press and hold to change the ho...

Page 44: ... Note When the TV is first powered off it remains in Fast Power On mode for 30 seconds before switching to low power mode During that time the TV will turn on without the low power 60 sec delay Keep this setting at Fast Power On if you need to Have faster power on Receive updates to ChannelView channel listings Receive updates to the TV Guide Daily program listings model LT 40134 only Keep the TV ...

Page 45: ...nu until you remove it To remove an unwanted HDMI icon select Off for the HDMI input Order Put frequently used icons at the start of the Input Selection menu 1 Press to highlight the icon to move 2 Press ENTER to confirm the selection 3 Press to drag the icon to the desired position 4 Press ENTER to set the new position Learn LT 40134 LT 46144 and LT 52144 models only Perform initial set up of Net...

Page 46: ...unch the TV Guide Daily system See appendix C for detailed information about the Guide IMPORTANT TV Guide Daily is available on model LT 40134 only Operation of TV Guide Daily requires over the air or direct cable no cable box access to stations carrying TV Guide Daily program listings If listings are not available in your area or become discontinued by the local provider TV Guide Daily will not o...

Page 47: ...nother device To reactivate the parent ratings lock or TV Lock by Time after using the pass code Power the TV off and then on to reactivate both locks Change to a different channel or device to reacti vate only the parent ratings lock Parent Menu The TV comes from the factory with the rating locks turned off and with pre set U S ratings TV PG and movie rating PG Turn on blocking for U S ratings to...

Page 48: ...ic Applies in differing degrees to TV PG TV 14 and TV MA Movie Rating G General Audience Designed for the entire family to view PG Parental Guidance Parental Guidance is recommended may not be suitable for some children PG 13 Parental Guidance 13 and Older Not recommended for children under the age of 13 R Restricted Restricted in theaters to 17 years old and older unless accompanied by an adult N...

Page 49: ...ch alternate rating systems will apply to digital programming only Option Name and Description Lock On Off Enable or disable program blocking System Name The rating system available for the channel Group Rating groups available in the rating system shown on the screen Rating groups are defined by the rating system in effect Rating Rating restrictions available in the selected rating system and gro...

Page 50: ... this is accomplished with the TV s remote control and the slide switch left in the TV position You can choose the level of NetCommand control for your home theater Standard Setup Perform a standard setup if you want NetCommand to control only a few devices such as the TV a playback device like a DVD player and a cable box With this setup you can use the TV s remote control to operate these device...

Page 51: ...the device s remote about one half inch from the front of the device Starting from one end of the display window plastic press the POWER button b If the device does not respond move the remote control one inch toward the center and try again c Repeat this until the device responds d Note this location and then start over from the other end of the display window plastic repeat ing until the device ...

Page 52: ... Power On If the text stops flashing before the check mark appears repeat this step To remove the key from NetCommand control press the CANCEL key while the key name is highlighted 6 Press the keys on the TV s remote control to highlight other keys on the list Repeat steps 4 and 5 for each additional function you wish to control through NetCommand 7 If the device s remote control has keys that are...

Page 53: ...wn Adjust Lt Adjust or arrow left Adjust Rt Adjust or arrow right Enter Enter or Select menus ENTER Cancel Cancel or erase menus CANCEL Play Start playback Stop Stop playback Forward Fast Forward Rewind Rewind Fast Reverse Pause Pause playback Record Start Recording 1 2 3 4 5 6 7 8 9 0 Digit functions 1 2 3 4 5 6 7 8 9 0 Enter digits Use after digits to directly access channels by number ENTER sep...

Page 54: ...end the menu signal to the device The Input Selection menu will auto matically clear from the screen Special Operation Methods Operating NetCommand Controlled Devices To Control an A V Receiver Switching Audio to and from the A V Receiver 1 Press AUDIO 2 Press to show the Speakers option 3 Press to select either AV Receiver or TV Controlling A V Receiver Power 1 Press AUDIO 2 Press to show the Spe...

Page 55: ...ith number keys for direct channel selection NetCommand uses the same ENTER key for both operations When ENTER has a menu or guide function or when the original remote control uses the same key for menus and channel selection Learn the ENTER SELECT or OK key in the NetCommand Enter learning position 1 Press MENU or GUIDE to display the device s menu or guide 2 Press ENTER within the menu and NetCo...

Page 56: ...o open the AVR screen 5 The first function highlighted in the AVR screen is always Power On Aim the TV s remote control at the TV and press ENTER to begin learning for Power On A V Receiver AVR screen Perform NetCommand IR learning for A V receiver power and volume keys 6 When the Power On text starts flashing aim the A V receiver s remote control at the TV and press and hold the POWER or POWER ON...

Page 57: ...V only Use Setup 1 Audio from ANT 1 and ANT 2 must be sent to the A V receiver from the TV s DIGITAL AUDIO OUT or analog AVR AUDIO OUTPUT Use Setup 1 to make the A V receiver switch to its designated TV audio input when viewing these sources HDMI Digital Stereo Audio Use Setup 1 Digital stereo audio from an HDMI connection is available both in digital format from the TV s DIGITAL AUDIO OUT jack an...

Page 58: ...matic A V Receiver Switching for a Surround Sound Device Use this setup to send digital surround sound directly from a device to an A V receiver 1 Under Learn Name navigate to highlight the area next to Input2 In this example the IR code for the A V receiver s DVD Audio input will be learned as Input 2 2 Press ENTER on the TV s remote control 57 7 3FDFJWFS 7 BVEJP JOQVU 57 BVEJP JOQVU 7 1MBZFS XJU...

Page 59: ...e custom name DVD using the guidelines given earlier 6 Press to move the highlight to the second Assign column 7 Use to highlight DVD in the list of devices recognized by the TV The triangular marker always shows the assigned sound source 8 Press EXIT if finished or continue for additional TV sources Setting Up NetCommand Control of an A V Receiver continued ...

Page 60: ...60 6 NetCommand ...

Page 61: ...61 Appendix A Specifications 62 Appendix B Bypassing the Parental Lock 63 Appendix C TV Guide Daily 65 Appendix D Programming the Remote Control 69 Appendix E Troubleshooting 77 Appendices ...

Page 62: ...0 mV rms 200 mV full scale for analog sources 1 5 Vrms 0 5 Vrms full scale for digital sources Digital Audio Output 1 RCA Pin Plug Signal Type Dolby Digital PCM stereo Size and Weight Model Dimensions inches Weight lbs With Stand Without Stand Height Width Depth With Stand Without Stand LT 40133 26 0 23 9 37 0 12 6 5 6 59 51 LT 46133 29 0 26 9 42 3 12 6 5 6 71 7 63 3 LT 52133 33 4 30 4 48 0 14 2 5...

Page 63: ... You can either enter a new pass code to open the Lock menu and make changes or press EXIT to close the menu If any of the locks are turned on and you exit the menus when prompted for a new code the old code and all lock settings are retained If all locks are turned off and you exit the menus when prompted for a new code then the previous code is erased Lock Bypass Instructions Have Been Filed for...

Page 64: ...64 Appendices This page intentionally left blank ...

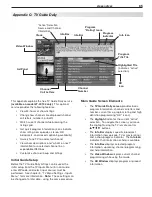
Page 65: ...ore information Note These settings can be changed at a later date using the same procedure Main Guide Screen Elements The TV Guide Daily screen provides basic program information channel call letters and number current time program rating and high definition programming HD icons The Highlight indicates the current active selection To navigate the screen you move the Highlight using the TV remote ...

Page 66: ...ht to the channel just entered Note If channel entered does not exist the highlight will move to the closest channel listing To tune the TV to a program in the listings Highlight the desired program title in the listings then press ENTER Note If the highlighted program airs sometime in the future the TV will be tuned to the channel on which that show will air Appendix C TV Guide Daily To check Gui...

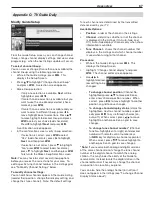
Page 67: ...setting and change their tune channel Note The default settings for each channel are determined by the transmitted data received by your TV Available Options Position order of the channel in the Listings Channel determines whether or not the channel is displayed in the Listings On Auto hide and Off Auto hide displays channels only when show information is available Tune Channel shows the channel n...

Page 68: ...ere watching before entering the Guide is turned OFF in the grid Use the channel editor to change the channel setting to ON see previous page Modify Guide Setup 5 There are repeated or missing time slots in the Listings The Guide is close to the time that a Daylight Savings time adjustment is needed The Guide automatically adjusts accord ingly when the local time is 2 00 a m to account for the aff...

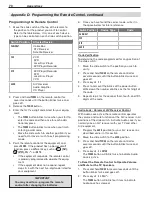
Page 69: ...remote control s slide switch to the type of device you wish to program for or control VCRs and DVRs CH POWER SLEEP FAST Forward Pause Play Record Reverse Stop GUIDE DVR only MENU DVR only 0 9 Number Buttons Mitsubishi VCRs are compatible with some additional buttons Cable Boxes and Satellite Receivers AUDIO PAGE UP Cancel on some models CH ENTER on some models GUIDE on some models POWER on some m...

Page 70: ...git code listed for your equipment 6 Once you have found the correct code write it in the space below for future reference Switch Position Device Type Code CABLE SAT VCR DVD AUDIO Code Verification To determine the code programmed for any position of the slide switch 1 Move the slide switch to the position you wish to verify 2 Press and hold POWER on the remote control for several seconds until th...

Page 71: ...sher 31801 31409 Fosgate 31487 Glory Horse 31263 GPX 31299 Harman Kardon 31306 31304 31289 30891 30189 30110 Hitachi 31801 31273 Integra 31320 31298 30135 JBL 31306 30110 JVC 31811 31643 31495 31374 31282 31263 31058 Kenwood 31570 31569 31313 KLH 31428 31390 Koss 31497 31366 Linn 30189 Liquid Video 31497 Magnavox 31514 31269 31189 30531 30189 Marantz 31289 31269 31189 30200 30189 McIntosh 31289 Mi...

Page 72: ...20 30393 Gemini 30625 Genexxa 30305 30032 GPX 31296 Harman Kardon 31202 30173 30157 30083 Hitachi 30032 Integra 30101 JVC 31294 30072 Kenwood 30826 30681 30626 30190 30037 30028 KLH 31711 31373 31372 31318 Koss 31317 Krell 30157 LG 31208 Linn 30157 LXI 30305 Magnavox 30305 30157 30038 Marantz 30626 30435 30180 30157 30038 30029 Mark Levinson 31484 McIntosh 30660 30290 30256 MCS 30029 MGA 30083 Mir...

Page 73: ... 20571 Broksonic 20695 California Audio Labs 20490 CAVS 21057 Cinea 20831 CineVision 20876 20869 20833 Citizen 21277 Coby 21351 21177 21165 21107 21086 20852 20778 Craig 20831 Curtis Mathes 21087 CyberHome 21129 21117 21024 21023 20874 20816 Daewoo 21242 21234 21172 21169 20869 20833 20784 20705 Daytek 20872 Denon 20634 20490 Desay 21407 Disney 21270 20675 Dual 21085 21068 Durabrand 21127 DVD2000 ...

Page 74: ...sung 20323 Sega 20023 Sony 20270 20201 20193 Technics 20204 Theta Digital 20194 Yamaha 20451 20217 Satellite Receivers Brand Code AlphaStar 10772 Chaparral 10216 Crossdigital 11109 DirecTV 11856 11749 11640 11639 11609 11444 11443 11442 11414 11392 11377 11142 11109 11108 11076 10819 10749 10724 10639 10566 10392 10247 10099 Dish Network System 11775 11505 11170 11005 10775 Dishpro 11775 11505 110...

Page 75: ...21972 Hughes Network Systems 20739 20042 Humax 20739 Hush 21972 iBUYPOWER 21972 Jensen 20041 JVC 21162 20067 20041 20008 KEC 20278 20037 Kenwood 20067 20041 20038 KLH 20072 Kodak 20037 20035 LG 21037 Linksys 21972 Lloyd s 20208 20000 Logik 20072 LXI 20037 Magnasonic 20593 Magnavox 20593 20563 20149 20110 20081 20039 20035 20000 Magnin 20240 Marantz 20081 20035 VCRs and DVRs Brand Code Marta 20037 ...

Page 76: ...0240 Singer 20072 Sonic Blue 20616 20614 Sony 21972 21032 20636 20035 20034 20033 20032 20000 Stack 9 21972 STS 20042 Programming Codes continued Appendix D Programming the Remote Control continued VCRs and DVRs Brand Code Sylvania 21593 20593 20110 20081 20043 20035 20000 Symphonic 21593 20593 20000 Systemax 21972 Tagar Systems 21972 Tatung 20041 Teac 20041 20000 Technics 20162 20035 Teknika 2003...

Page 77: ...et In addition two global settings Video Noise SharpEdge are reset to their original factory settings A V Reset for all inputs To reset audio and video adjustments for ALL inputs back to their original factory settings While viewing the TV press the side panel buttons GUIDE and FORMAT at the same time All Audio and Video settings are returned to their original factory settings Channel Memorization...

Page 78: ...onsumer accessible settings and all memories to the original factory defaults CAUTION All owner performed setups and adjustments will be erased 1 While viewing the TV press MENU to display the TV Main menu 2 With the Main menu displayed press number keys 1 2 3 to display the Reset menu 3 READ THE ON SCREEN WARNING AND INSTRUCTIONS If you do not wish to use this reset press EXIT or MENU to back out...

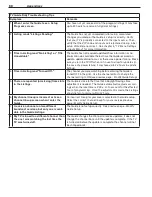
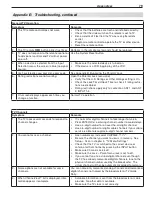
Page 79: ...annelView list is displayed infor mation appears incomplete Available information is sent from the broadcaster or cable provider No other data is available Make sure the TV clock is set correctly General TV Operation Symptom Remarks 1 The TV remote control does not work Check that the batteries are fresh and installed correctly Check that the slide switch on the remote is set to TV Be no more than...

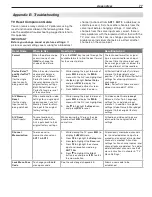
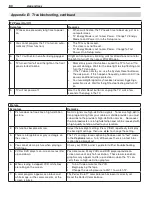
Page 80: ...e viewing source to ANT 1 to watch TV 7 A color program appears as a black and white image or the colors are dim or the screen is black The PerfectColor color balance has been incorrectly set Reset the PerfectColor balance Appendix E Troubleshooting continued TV Power On Off Symptom Remarks 1 TV takes an excessively long time to power on When switched on the TV needs time to boot up just as a comp...

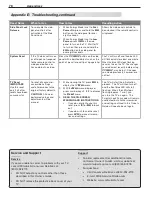
Page 81: ...d or AVR AUDIO OUTPUT on TV s back panel is connected to the A V receiver Indicators Symptom Remarks 1 STATUS indicator light is a steady flash ing red Unplug set from AC power Plug back in and wait one minute for blinking to stop Press SYSTEM RESET button on side panel and wait for blinking to stop If blinking continues service is required Contact your dealer or a Mitsubishi Authorized Service Ce...

Page 82: ...g the Speaker setting in the AV menu even though I have physically connected the TV to the A V receiver and learned IR codes for the receiver inputs Wrong input or no input was assigned in the AV Receiver Learn screen All audio should go to the A V receiver as audio output from the TV unless the device s audio is connected directly to the A V receiver See chapter 6 NetCommand and perform the proce...

Page 83: ... Color and the x v Color logo are trademarks of Sony Corporation Peerless is a registered trademark of Peerless Industries Inc Trademark and License Information Gemstar TV Guide International Inc and or its related affiliates are not in any way liable for the accuracy or availability of the program schedule information or other data in the TV Guide Daily system and cannot guarantee service availab...

Page 84: ...applicable copyright or other intellectual property laws and treaties This License Agreement grants you no rights to use such content except that you own the media on which the Software is recorded but MDEA and its licensors retain ownership of the Software itself All rights not expressly granted are reserved by MDEA 5 EXPORT RESTRICTIONS MDEA is licensing the Software for use within the United St...

Page 85: ...our television to an authorized service location at your own expense or pay for any travel and or transportation costs the service center may charge to and from you home Actual service labor will be provided without charge c Proof of purchase date from an authorized MITSUBISHI dealer is required when requesting warranty service Present your sales receipt or other document which establishes proof a...

Page 86: ...Connecting 22 E Energy Mode 44 F F1 F4 Keys 28 52 Fast Power On 44 Fav Favorite Channels 31 42 FORMAT Key 32 33 Front Panel 9 G Game 1080p 8 Component Inputs 10 11 Inputs Menu 45 Input Name 38 Picture Mode 38 TV Display Format 32 GUIDE Key 28 69 ChannelView 29 TV Guide Daily 66 H HDMI Changing Out an HDMI Device 16 Connecting an HDMI Device 20 Disconnecting and the Input Selection Menu 45 HDMI Cab...

Page 87: ...ep Timer 27 Sound Audio Settings 39 Controlling A V Receiver Volume 16 56 Simulated Stereo 39 Troubleshooting 81 Turn TV Speakers On Off 39 Speakers Option In Audio Menu 39 Specifications TV 62 Standard Definition Signal 32 Stand Removal 7 Status Display 30 STATUS Indicator See LED Indicator Lights Stereo System See A V Receiver Surround Sound 11 12 25 58 Simulated 39 System Reset 10 78 T Time See...

Page 88: ...the remote control side panel controls or will not power on off press the SYSTEM RESET button on the side panel with a pointed object such as the point of a pencil or end tip of a paperclip The blue LED will flash quickly for about one minute When the blue LED stops flashing you may turn on the TV Settings changes you made most recently before using SYSTEM RESET may be lost 2007 Mitsubishi Digital...

Reviews: