background image

7

 © 2019 Mitsubishi Electric US, Inc.             

                                                    Specifications are subject to change without notice. 


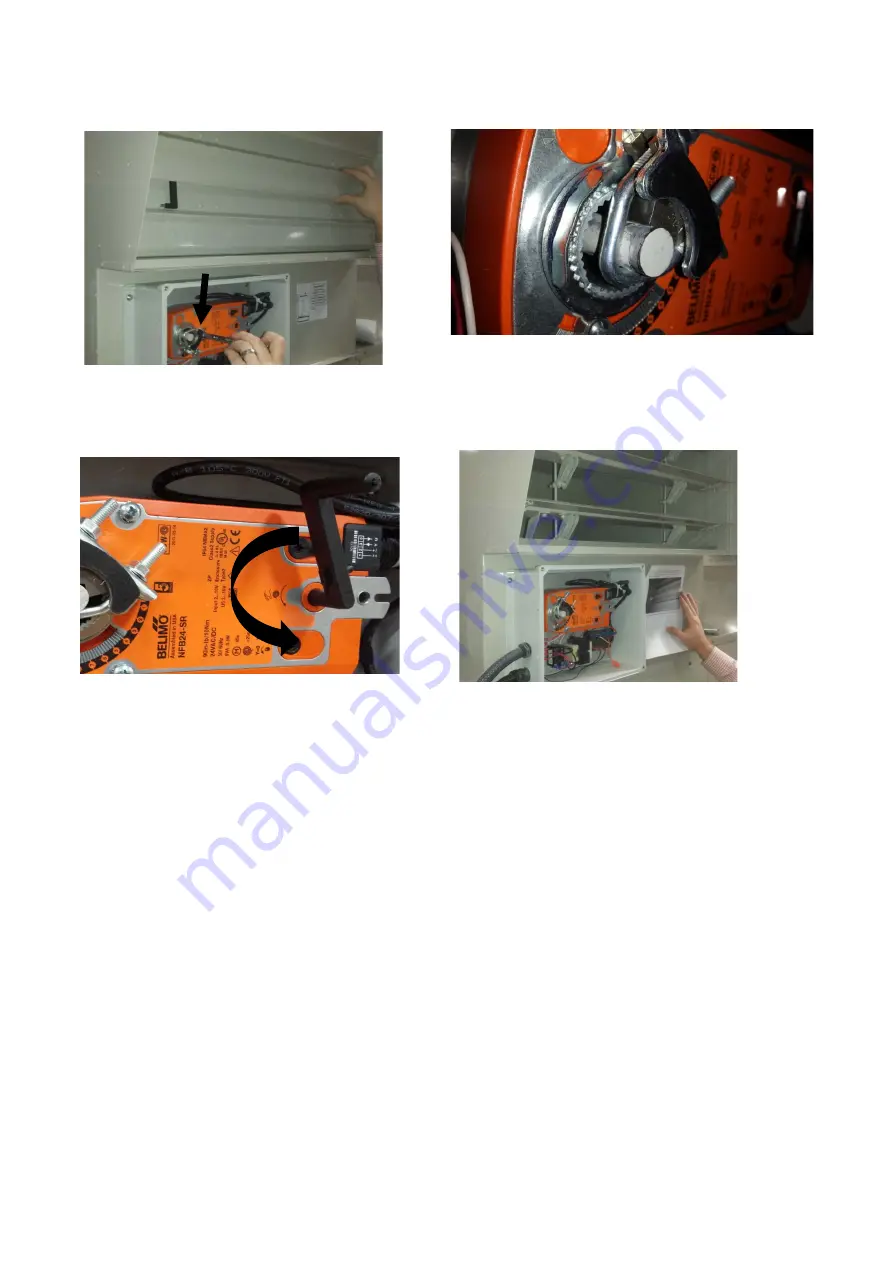
7.  Holding the blades against the handle re-tighten the (2) nuts on 

the damper shaft “U” clamp. 


Slightly crank the handle to release 

the motor. The damper will return 

to  the open position. 

Review and Manual Test 

To ensure the LAHK unit is functioning as designed. Crank the Belimo motor back to 

the 85 degree position and visually check that the damper does not close completely. 

Your goal is approximately  ¼” opening between the blades at the 85 degree position. 


Holding the blades against the 

handle re-tighten the (2) nuts 

on the damper shaft “U” clamp.  

Ensure end of shaft is flush to 

edge of clamp black surface as 

shown. 


Ensure end of shaft is flush to edge of clamp black surface as shown. 


Slightly crank the handle to release 

the motor. The damper will return 

to  the open position. 

Review and Manual Test 

To ensure the LAHK unit is functioning as designed. Crank the Belimo motor back to 

the 85 degree position and visually check that the damper does not close completely. 

Your goal is approximately  ¼” opening between the blades at the 85 degree position. 


Holding the blades against the 

handle re-tighten the (2) nuts 

on the damper shaft “U” clamp.  

Ensure end of shaft is flush to 

edge of clamp black surface as 

shown. 

8.  Slightly crank the handle to release the motor. The damper will 

return to the open position. 


Slightly crank the handle to release 

the motor. The damper will return 

to  the open position. 

Review and Manual Test 

To ensure the LAHK unit is functioning as designed. Crank the Belimo motor back to 

the 85 degree position and visually check that the damper does not close completely. 

Your goal is approximately  ¼” opening between the blades at the 85 degree position. 


Holding the blades against the 

handle re-tighten the (2) nuts 

on the damper shaft “U” clamp.  

Ensure end of shaft is flush to 

edge of clamp black surface as 

shown. 

Review and manual test

To ensure the LAHN unit is functioning as designed, crank the Belimo motor back to the 85 degree position and visually check that the damper 

does not close completely. Your goal is an approximately ¼” opening between the blades at the 85 degree position.

Summary of Contents for LAHN-1

Page 1: ...I ELECTRIC US INC CITY MULTI PUHY P T Y S NU A BS PUHY EP T Y S NU A BS and PUHY HP T Y S NU A Series Outdoor Units for use with 2019 TECHNICAL SERVICE MANUAL Model LAHN 1 LAHN 3 Low Ambient Hood 4000292 2015 TECHNICAL SERVICE MANUAL Model LAHK 1 Low Ambient Hood 4000292 ...

Page 2: ...HN 1 LAHN 3 low ambient hood is designed to reduce the airflow through the outdoor units as the ambient temperature drops This maintains the head pressure at a level that will allow the system to perform at full capacity down to 10 F outdoor temperature A thermistor mounted on the side of the unit senses the outdoor temperature As the outdoor temperature drops the resistance of the thermistor incr...

Page 3: ... take 10 20 seconds for the internal thermistor temperature to drop The damper will start to move toward the closed position after the thermistor drops below 50 F 5 Once the thermistor warms above 50 F it will move back to the full open position indicating the low ambient kit is working as designed eration testing when the outdoor ambient is LOW 50 F 1 Turn on power to the outdoor unit 2 Make sure...

Page 4: ... switches to heating mode the coil of the relay is energized opening this contact This in turn de energizes the transformer disconnecting power to the low ambient kit control circuitry This allows the damper to spring return to the full open position during heating mode To check make sure the contact is closed when the outdoor unit is in cooling mode coil de energized and the contact is open when ...

Page 5: ...on 4 Set the damper to approx open Use the damper crank handle as spacer 5 Re tighten U bolts on damper shaft 6 Release the motor by slightly cranking with the handle Check the operation manually 7 The goal is to have opening on the damper assembly in the 85 degree position 100 The damper should never be 100 closed during operation When working properly the damper will be approximately 95 closed a...

Page 6: ...egree position 5 Close the blades by hand and insert Crank handle under damper blade near the screws as shown to ensure it is open approximately inch at 85 degrees 6 4 Using the crank handle turn the motor counterclockwise until the indicator snugs against the stop at 85 degrees Loosen the Philips head screw for the mechanical stop Slide the mechanical stop to 85 halfway between 8 and 9 and tighte...

Page 7: ... Ensure end of shaft is flush to edge of clamp black surface as shown 8 Slightly crank the handle to release the motor The damper will return to the open position 7 Slightly crank the handle to release the motor The damper will return to the open position 8 Review and Manual Test To ensure the LAHK unit is functioning as designed Crank the Belimo motor back to the 85 degree position and visually c...

Page 8: ...04 60 o 30 34 562 7 90 70 o 25 39 917 8 75 80o 20 46 220 9 16 85 o Below 20 o F N A 9 16 85 o Follow the instructions below for manually positioning and locking the damper in place IMPORTANT Disconnect power to the damper motor before locking in place The damper actuator comes with a crank handle attached to manually move the damper position The crank handle is removable and if it s missing a 3 16...

Page 9: ...ss assy TH LAHK 1 A CN505 Connector HC LAHK 1 1A CNAC2 Connector HC LAHK 1 2A Wire Harness Components CN505 Connector Part Number HC LAHK 1 1A Includes everything shown White CNAC2 Connector Part Number HC LAHK 1 2A Includes everything shown Black Note Damper linkage parts can be purchased locally If damper blades or complete assembly needs replacing order new LAHN 2 LAHN 4 hood and damper assembl...

Page 10: ... wire that corresponds to the outdoor unit supply voltage as shown below CN505 Connection CNAC2 1 amp on the board Connect the white wire male For Use with Modular N Generation Y Series Outdoor Units Only plug with four wires onto the spare connection 208 volt orange wire female connector move and secure cap to unused wire the CN505 connection Connect the white the CN505 connection Plug the white ...

Page 11: ...11 2019 Mitsubishi Electric US Inc Specifications are subject to change without notice ...

Page 12: ...e to put the contact address telephone number on this manual before handing it to the customer This product is designed and intended for use in the commercial environment Manufactured for MITSUBISHI ELECTRIC US INC www mylinkdrive com Toll Free 800 433 4822 MEUS DOC MD 1922 K002 Ver 2 November 2019 ...

Reviews: