background image

– 34 –

EN

1L25

BALANCE

When the volume level differs from each speaker,
adjustment can be made in the unit of dB, from -12 dB
to 0 dB.
Select the speaker to set by pressing 

o

/

p  

buttons, then

press the ENTER button
Select the volume level by pressing 

o

/

buttons, then

press the ENTER button

¡

TEST: The test tone is output in clockwise from

FRONT (L).

¡

Selecting respective speakers outputs the test tone at
the volume presently set.

Note

¡

When TEST is selected and the test tone is being
output, balance adjustment cannot be made.

¡

When TEST is selected, no test tone will be output
from SUBWOOFER.

¡

It is not possible to adjust this item for the speaker
that has been set to OFF in SPEAKER SIZE setting.

5   

Press the SETUP button.

¡

The setup mode will be cancelled and the ordinary
screen will appear.

(R)

(L)

Center

Speaker

Sub-

Woofer

Surround (L)

Surround(R)

The position to which it watches

and listens

The ideal position of the center speaker

Distance A

Distance C

Distance F

Distance S

Distance B

The ideal position of the

surround speaker

Distance A = Distance F - Distance C
Distance B = Distance F - Distance S

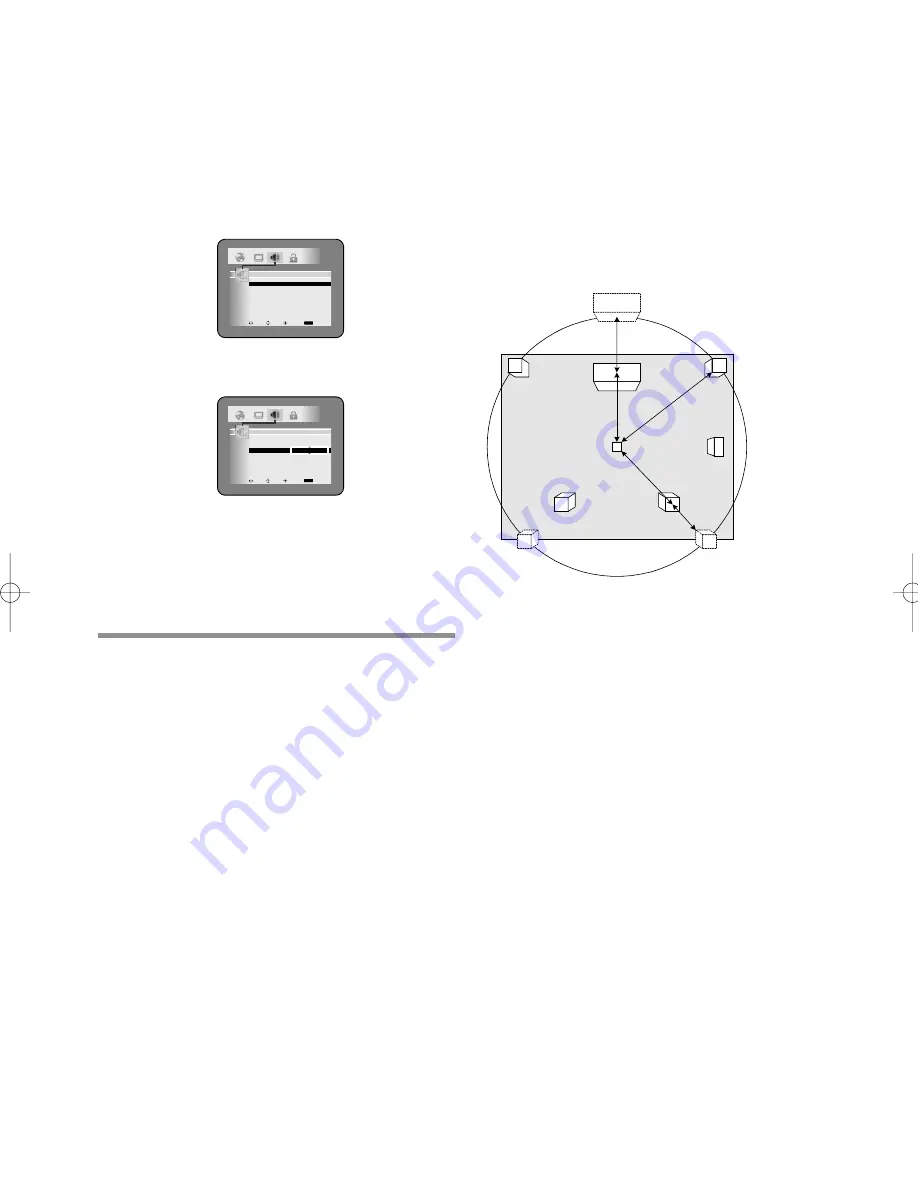
We are making the plan so that a user may set up
Distance A and B.

ABOUT A DELAY TIME

The delay effect is given to a voice output from a
center speaker and a surround speaker, and the ideal
viewing-and-listening position is discovered virtually.
As for a speaker, it is ideal to be arranged on a circle,
as shown in the following figure.
However, such arrangement may not be able to be
performed depending on your place.
It is possible to set up a delay time from the difference
in the position of an ideal speaker and the position of
an actual speaker.

ICON

LINE

ENTER

RETURN

RETURN

AUDIO

TEST

OFF

FRONT(L)

 0 dB

CENTER

 0 dB

FRONT(R)

 0 dB

SUB WOOFER

 0 dB

SURROUND(L)

 0 dB

SURROUND(R)

 0 dB

LANGUAGE

DISPLAY

AUDIO

PARENTAL

ICON

LINE

ENTER

RETURN

RETURN

AUDIO

TEST

OFF

FRONT(L)

 0 dB

CENTER

 0d B

FRONT(R)

 0 dB

SUB WOOFER

 0 dB

SURROUND(L)

 0 dB

SURROUND(R)

 0 dB

 0 dB

LANGUAGE

DISPLAY

AUDIO

PARENTAL

 E5732UD.qxp  03.5.13 20:14  Page 34

Summary of Contents for DD-7040

Page 1: ...DVD Player Owner s Guide DD 7040 VIDEO AUDIO ...

Page 2: ...intended to alert the user to the presence of important operating and maintenance servicing instructions in the literature accompanying the appliance WARNING TO PREVENT FIRE OR SHOCK HAZARD DO NOT EXPOSE THIS APPLIANCE TO RAIN OR MOISTURE For models having a power cord with a polarized plug CAUTION TO PREVENT ELECTRIC SHOCK MATCH THE WIDE BLADE OF THE PLUG TO THE WIDE SLOT FULLY INSERT DANGER VISI...

Page 3: ...nce receptacles and the point where they exit from the appliance 12 Lightning Unplug your DVD Player from the wall outlet if it will not be used for a long time or if there is a lighting storm This will prevent damage to the product due to lightning and power line surges 1 Importance of Instructions All the safety and operating instructions should be read before the appliance is operated The safet...

Page 4: ... a housing which prevents exposure during operation or maintenance This product is classified as a Laser Product by CDRH Center for Devices and Radiological Health a department of the Food and Drug Administration According to their regulations 21 CFR section 1002 30 all manufacturers who sell Laser Products must maintain records of written communications among the manufacturer dealers and customer...

Page 5: ...n technology must be authorized by Macrovision Corporation and is intended for home and other limited viewing uses only unless otherwise authorized by Macrovision Corporation Reverse engineering or disassembly is prohibited Supplied Accessories Remote control Two AA batteries A V cables Owner s Guide Registration Card GUIDE Registration Symbols Used in This Manual The following symbols appear belo...

Page 6: ...6 SLOW MOTION 17 STARTING FROM A DESIRED TRACK 17 PLAYING FROM A DESIRED GROUP 17 TO PLAYBACK THE BONUS GROUP 17 PLAYING FROM A DESIRED TITLE OR CHAPTER 17 STARTING FROM A DESIRED TIME COUNT 18 MARKER SETUP SCREEN 18 RANDOM 18 REPEAT 19 A B REPEAT 19 PROGRAM 20 PLAYBACK OF ALL GROUPS 20 ZOOM PLAYBACK enlargement on screen 20 PLAYING MP3 JPEG IMAGE WMA AND PICTURE CD 21 PLAYING MP3 DISC JPEG DISC W...

Page 7: ...earch You can search the desired title chapter and track with numeric button during playback or in stop mode Marker You can memorize your favorite places on a disc Playing a DVD RW disc You can enjoy playbak compatibility with DVD RW discs recorded in VR mode Video Recording Format On screen display Information about the current operation can be displayed on a TV screen allowing you to confirm the...

Page 8: ...n 8 cm singles Audio CD Sound Sound 74 min 12 cm 20 min 8 cm singles Video CD Sound and Pictures Digital photos DVD Video Data on a DVD is divided into sections called titles and then into subsections called chapters each of which is given a title or chapter number Playback conditions are preset on some DVD Video discs and these playback conditions take priority over user operations on this player...

Page 9: ...utton page 20 Enlarges part of a DVD reproduced image 15 REV Button page 16 Fast reverse playback to a desired point 16 SEARCH MODE Button pages 17 18 Press to locate a desired point 17 REPEAT Button page 19 Repeats playback of the current disc title chapter or track 18 MODE Button page 18 Activates program playback or random playback mode when playing DVD Audio CD or MP3 JPEG Picture CD WMA Also ...

Page 10: ... title number Lights up when playback control is activated Displays how long a current title or track has been played back When a chapter or track has switched the number of a new title chapter or track is displayed Displays a chapter or track number Displays the disc status Power on Power off Tray open and closed LOAD No disc or error During playback During pause Stop Resume ON Stop Resume OFF ER...

Page 11: ...OUT jack To S VIDEO INPUT jack To S VIDEO OUT jack but not both To ANALOG AUDIO INPUT jacks OPTICAL COAXIAL R L VIDEO Y Cr Cb S SCAN MODE VIDEO OUT CENTER SUBWOOFER L R SURROUND R FRONT L ANALOG 5 1 CH AUDIO OUT I P AUDIO OUT DIGITAL AUDIO OUT PCM BITSTREAM To S VIDEO OUT jack To S VIDEO INPUT jack To Right red and Left white AUDIO INPUT jacks To AUDIO OUT jacks Fig 1 Fig 2 Fig 3 Selecting Progres...

Page 12: ...ponents in the system before connecting another component Refer to the Owner s Manuals for the components to be connected to the DVD player If output is Dolby Digital audio connect to a Dolby Digital decoder and set Dolby Digital to ON for audio output in the setup mode If you want to enjoy DTS audio use a DIGITAL AUDIO OUT jack for the connection DTS can only be output through the DIGITAL AUDIO O...

Page 13: ...AUDIO VIDEO INPUT JACKS If your TV does not have RCA type audio and video input jacks it is still possible to connect this DVD player to your TV s 75 ohm coaxial antenna terminal using a commercially available Stereo Audio Video RF Modulator that is not included Connect the audio and video outputs of the DVD player to the audio and video inputs on the RF Modulator and then connect the coaxial outp...

Page 14: ...eration may stop In such cases clean the disc and unplug the power cord and then plug it again before resuming playback Never attempt to play a cracked or broken disc With DVD Videos that use some titles for playback program signals playback may start from the second title or it may skip these titles During the playback of a common two layered disc pictures may stop for a moment This happens when ...

Page 15: ...y list here means titles made for compilation based on the originals DVD RW USING THE TITLE MENU With a DVD containing a title menu you can select desired titles from the menu 1 Press the TITLE button The title menu will appear 2 Select the desired title Press the arrow buttons L K B s to change the setting and then press the ENTER button CALLING UP A MENU SCREEN DURING PLAYBACK For DVDs Press the...

Page 16: ...here To play the beginning press STOP first and then PLAY Resume ON B 1 Press the FWD g or REV h button during playback For DVD Videos pressing the FWD g or REV h button cycles the playback speed in four steps In case of DVD Videos the sound will mute Turning on the double speed sound in SET UP enables output of sound For DVD audios the playback speed is 2 8 50 and 100 In case of DVD Audio discs t...

Page 17: ...located SLOW MOTION 1 Press the FWD g or REV h button while playback is paused Sound remains muted Slow motion mode will be activated Pressing the FWD g or REV h button cycles the playback speed in three steps Select an appropriate speed while referring to the speed indication on the screen 2 Press the PLAY button to return to normal playback speed Notes Slow playback is not available with audio C...

Page 18: ... RW DVD V DVD A Notes Opening the disc tray turning off the power or selecting AC at step 2 and pressing ENTER will erase all Markers To clear a marker using s or B position the cursor on to the marker number to be cleared and press CLEAR You can mark up to 10 points In the case of DVD Audios marker searching may start playback from the head of the marked TR in some discs or groups 5 Press SEARCH ...

Page 19: ...pter or track Repeat playback does not function during A B repeat playback Repeat playback is not available when you play the Video CD with PBC function You can define a section to be played back repeatedly 1 Press the A B REPEAT button during playback The starting point A will then be selected 2 Press the A B REPEAT button again at the end point B of the desired section The selected section will ...

Page 20: ... be zoomed moves The zooming frame can be moved from the center 4 steps to the right 4 steps to the left 4 steps to the top and 4 steps to the bottom when 2 time zooming The frames will move 6 steps when 4 time zooming In the 1 3 time zoom display just one step can be shifted up and down as well as right and left Current position will be displayed on the right bottom of the screen Press the ENTER ...

Page 21: ...ent page number and the number of total pages are shown on the right of the down arrow L The system can recognize up to 255 groups or folders and up to 256 tracks This applies to the case where mixed MP3 JPEG and WMA files are recorded If no MP3 JPEG or WMA files are found in the group the group is not displayed The machine can reproduce data recorded as per ISO 9660 Level 1 Level 2 or Joliet on t...

Page 22: ...etting press ZOOM button to turn it OFF Reset Pause to regenerate the next screen Notes JPEG Picture CD can not be zoomed at 4 magnifications If any screen zoomed at 2 magnifications in JPEG is fully displayed in the screen the indication position can not be moved with the Arrow K L s B button The number of movable steps is different depending on the screen size Maximum 4 steps up downward and lef...

Page 23: ...ROGRAM no indication COLECTION RANDOM 1 Press the SEARCH MODE button The SEARCH menu shows up 2 Using the K L buttons select a track to be played Then press the PLAY or ENTER button to start playing Notes During play a desired track can be directly searched Just type in the TRACK number with the numeric buttons If the typed TRACK number is not available the disable symbol appears and the direct se...

Page 24: ... displayed instead Refer to page 30 The audio language resets to the one which has been selected in the setup mode every time the power is turned on or discs are replaced If that language is not available on a disc a language defined by the disc is selected The screen display will disappear after about 5 seconds DTS CD does not allow the user to switch the sound mode The selected sound number is i...

Page 25: ... Pressing the SUBTITLE button cycles the subtitle language from SUBTITLE 1 SUBTITLE 2 and all the languages recorded Current subtitle mode will be displayed when you press the SUBTITLE button at first Press the SUBTITLE button and then press the cursor s B button to set it to on or off DVD V DVD RW DVD A OFF Subtitle 6 Subtitle 1 OFF 1 ENG 6 6 FRE 6 HELLO Bon jour CHANGING THE SUBTITLE LANGUAGE Th...

Page 26: ...ther press the RETURN key or press the DISPLAY key until the display disappears For Video Recording Format T ORG ORG or PL BIT RATE 3 Repeat setting 3 BIT RATE Repeat Layer Shows the quantity of information which is recorded on DVD The repeat status of the currently played item is displayed Not displayed if repeat has not been selected Layer number ORG Playing the ORIGINAL PL Playing the PLAYLIST ...

Page 27: ...maining time of the current track Current group number the number of total groups Elapsed time of the current group and remaining time of the current group Show the quality of information which is recorded in DVD Audio The repeat state of the currently played item is displayed not displayed if repeat has not been selected Layed number L0 Layer 0 is playing back L1 Layer 1 is playing back 1 12 0 00...

Page 28: ... MODE button during playback The setup screen will appear 2 Select from items Every press on the MODE button switches setting screens in the following order The Image quality setting screen appears only when User has been selected in Image quality adjustment on the Select image quality mode screen NR setting Press the s B buttons to switch the setting items Select image quality mode Press the s B ...

Page 29: ...ANGUAGE DISPLAY AUDIO PARENTAL ICON LINE ENTER RETURN RETURN LANGUAGE AUDIO ORIGINAL SUBTITLE OFF DISC MENU ENGLISH PLAYER MENU ENGLISH LANGUAGE DISPLAY AUDIO PARENTAL ICON LINE ENTER RETURN RETURN LANGUAGE AUDIO ORIGINAL SUBTITLE OFF DISC MENU ENGLISH PLAYER MENU ENGLISH LANGUAGE DISPLAY AUDIO PARENTAL ICON LINE ENTER RETURN RETURN LANGUAGE DISPLAY AUDIO PARENTAL LANGUAGE AUDIO ORIGINAL SUBTITLE ...

Page 30: ...eenlandic Cambodian Kannada Korean KOR Kashmiri Kurdish Kirghiz Latin Lingala Laothian Lithuanian Latvian Lettish Malagasy Maori Macedonian Malayalam Mongolian Moldavian Marathi Malay Maltese Burmese Nauru Nepali Dutch DUT Norwegian NOR Occitan Afan Oromo Oriya Panjabi Polish Pashto Pushto Portuguese POR 5 5 4 7 5 5 5 1 5 5 5 7 5 5 6 0 5 5 6 5 5 5 6 6 5 5 6 9 5 6 4 7 5 6 5 5 5 6 6 9 5 7 4 7 5 7 5 ...

Page 31: ...BLUE LANGUAGE DISPLAY AUDIO PARENTAL ICON LINE ENTER RETURN RETURN DISPLAY TV ASPECT 4 3LETTER BOX PICTURE CONTROL STANDARD NR OFF PANEL DISPLAY BRIGHT ANGLE ICON ON ON SCREEN INFO ON BACKGROUND BLUE LANGUAGE DISPLAY AUDIO PARENTAL ICON LINE ENTER RETURN RETURN DISPLAY TV ASPECT 4 3LETTER BOX PICTURE CONTROL STANDARD NR OFF PANEL DISPLAY BRIGHT ANGLE ICON ON ON SCREEN INFO ON BACKGROUND BLUE 4 3 L...

Page 32: ...the connecting speaker AUDIO SETTINGS ICON LINE ENTER RETURN RETURN AUDIO DRC OFF DOLBY DIGITAL ON DTS OFF DOWN SAMPLING ON D2 AUDIO OFF SPEAKER 2CH LANGUAGE DISPLAY AUDIO PARENTAL ICON LINE ENTER RETURN RETURN AUDIO DRC OFF DOLBY DIGITAL ON DTS OFF DOWN SAMPLING ON D2 AUDIO OFF SPEAKER 2CH LANGUAGE DISPLAY AUDIO PARENTAL ICON LINE ENTER RETURN RETURN AUDIO DRC OFF DOLBY DIGITAL ON DTS OFF DOWN SA...

Page 33: ... SURROUND L R LARGE LANGUAGE DISPLAY AUDIO PARENTAL ICON LINE ENTER RETURN RETURN AUDIO 5 1CH SPEAKER SIZE FRONT L R LARGE CENTER SMALLGE SUB WOOFER ON SURROUND L R LARGE LARGE SMALL LANGUAGE DISPLAY AUDIO PARENTAL ICON LINE ENTER RETURN RETURN AUDIO 5 1CH SPEAKER SIZE FRONT L R LARGE CENTER LARGE SUB WOOFER OFF SURROUND L R LARGE LANGUAGE DISPLAY AUDIO PARENTAL ICON LINE ENTER RETURN RETURN AUDIO...

Page 34: ...ideal position of the center speaker Distance A Distance C Distance F Distance S Distance B The ideal position of the surround speaker Distance A Distance F Distance C Distance B Distance F Distance S We are making the plan so that a user may set up Distance A and B ABOUT A DELAY TIME The delay effect is given to a voice output from a center speaker and a surround speaker and the ideal viewing and...

Page 35: ...and then press the ENTER button 3 Press the s B buttons to select PARENTAL and then press the ENTER button 4 Press the numeric buttons to enter the 4 digit password and then press the ENTER button When doing this for the first time enter any 4 digits except for 4737 That number will be used as the password from the second time onward By entering the password you can then change the control level a...

Page 36: ...d or in reverse The 1st layer is switching to the 2nd layer when playing a two layered disc Connect the audio cables firmly Turn the power of the audio component on Correct the audio output settings Correct the input settings on the audio component The analog output terminal does not supply DTS sound Distorted picture Connect the player directly to the TV There are some cases where pictures may be...

Page 37: ...ed you use a permanent felt tip marker to identify the disc NEVER ATTEMPT TO PLAYBACK A DISC THAT IS CRACKED OR BROKEN Cabinet Cleaning Wipe the front panel and other exterior surfaces of the DVD player with a soft cloth immersed in lukewarm water and wrung dry Never use a solvent or alcohol Do not spray any type of liquid near the D VD player Certain chemicals may cause damage and discoloration t...

Page 38: ... the surfaces of the discs Always store the disc in its protective case when it is not used To clean off use a soft cloth Do not use a hard cloth since this will mar the disc Wipe the disc in a straight line from center to edge Never wipe in a circular motion Do not use detergent or abrasive cleansing agents HANDLING PRECAUTIONS continued ...

Page 39: ...tput Mini DIN 4 pin jack 75 ohm Video output One RCA connector 1 Vpp 75 ohm Coaxial digital audio output One pin jack 500mVpp 75 ohm Analog audio output 2CH surround Two RCA connectors one left channel one right channel 2Vrms 100kilo ohm Analog audio output 5 1CH surround Six pin jacks 2Vrms 100kilo ohm Component video output One pin jack Y 1 Vpp 75 ohm Two pin jacks Pb Cb Pr Cr 700mVpp 75 ohm Opt...

Page 40: ...n the Owner Registration Card so that we can contact you should a question of safety arise which could affect you 2 THIS WARRANTY DOES NOT COVER damage caused by modification alteration repair or service of this product by anyone other than an authorized MITSUBISHI service center physical abuse to or misuse of the product operation in a manner contrary to the instructions which accompany the produ...

Reviews: