


4-80 Handling the T/B
4.2.2 Functions of each key
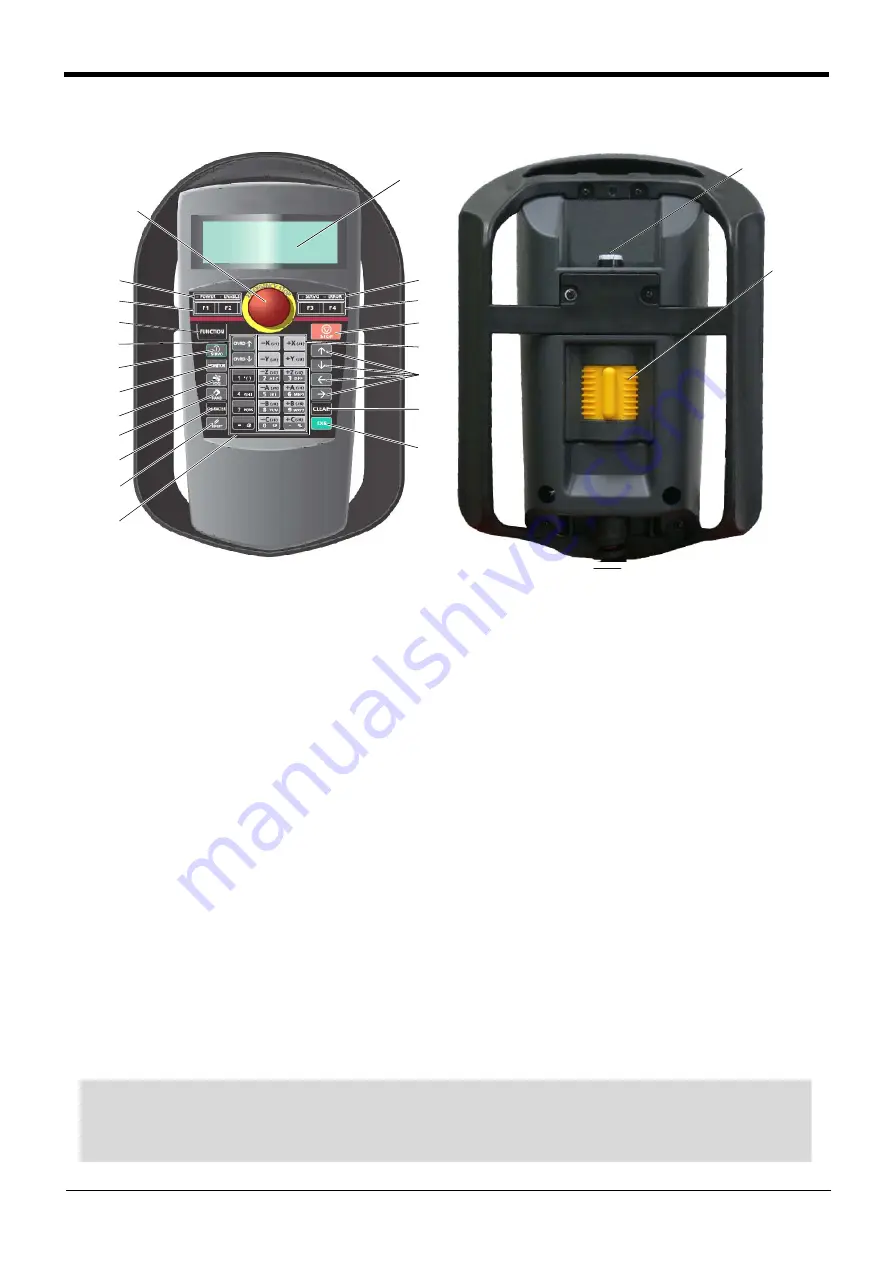
Fig. 4-8 : Teaching pendant
① [Emergency stop] switch.................The robot servo turns OFF and the operation stops immediately. The release of
the emergency stop turns the switch to the right, or pulls it.
② [Enable/Disable] switch...................This switch changes the T/B key operation between enable and disable.
③ [Enable] switch ....................................When the [Enable/Disable] switch is available, the servo will be turned off, if this
switch is release or it pushes strongly. And the robot will stop immediately.
④ LCD display panel...............................The robot status and various menus are displayed.
⑤ Status display lamp............................Display the state of the robot or T/B.
⑥ [F1], [F2], [F3], [F4] ..........................Execute the function corresponding to each function currently displayed on
LCD.
⑦ [FUNCTION] .........................................Change the function display of LCD.
⑧ [STOP] key ...........................................This stops the program and decelerates the robot to a stop.
⑨ [OVRD ↑ ][OVRD ↓ ] key............Change moving speed. Speed goes up by [OVRD ↑ ] key. Speed goes down by
[OVRD ↓ ] key
⑩ [JOG] operation key .........................Move the robot according to jog mode. And, input the numerical value.
⑪ [SERVO] key ........................................Press this key with holding AA key lightly, then servo power will turn on.
⑫ [MONITOR] key...................................It becomes monitor mode and display the monitor menu.
⑬ [JOG] key ..............................................It becomes jog mode and display the jog operation.
⑭ [HAND] key ...........................................It becomes hand mode and display the hand operation.
⑮ [CHAR] key ...........................................This changes the edit screen, and changes between numbers and alphabetic
characters.
⑯ [RESET] key .........................................This resets the error. The program reset will execute, if this key and the EXE
key are pressed.
⑰ [ ↑ ][ ↓ ][ ← ][ → ] key ................Moves the cursor each direction .
⑱ [CLEAR] key.........................................Erase the one character on the cursor position .
⑲ [EXE] key ...............................................Input operation is fixed. And, while pressing this key, the robot moves when
direct mode.
⑳ Number/Character key ....................Erase the one character on the cursor position . And, inputs the number or
character
⑪
⑭
⑬
⑫
⑨
⑤
⑥
⑦
⑮
⑯
⑳
⑤
⑥
⑧
⑱
⑲
⑩
⑰
①
④
③
②
◇◆◇ Remove the protection seal of the teaching pendant before using ◇◆◇
Installed the protection seal on the teaching pendant to prevent the damage of the display LCD and the key
seat when shipping. Remove the protection seal when using. The operation of the key and the confirmation of
the display is possible without removing the protection seal, however the adhesive may be left on the teaching
pendant as the time passes.
Summary of Contents for CR750-D Series
Page 2: ......
Page 124: ...5 112 Maintenance parts 5Maintenance and Inspection ...
Page 125: ......


