background image

EN-39

ENGLISH

 TV60, 

480i(525i) 

15.73 

59.94 

1280 x 720 

 TV50, 

576i(625i) 

15.63 

50.00 

1280 x 720 

  1080i 60 (1125i 60) 

33.75 

60.00 

1280 x 720 

- *2

  1080i 50 (1125i 50) 

28.13 

50.00 

1280 x 720 

- *2

  1080i 50a (1125i 50) 

31.25 

50.00 

1280 x 720 

 480p 

(525p) 

31.47 

59.94 

1280 x 720 

- *2

 576p 

(625p) 

31.25 

50.00 

1280 x 720 

- *2

  720p 60 (750p 60) 

45.00 

60.00 

1280 x 720 

- *2

  720p 50 (750p 50) 

37.50 

50.00 

1280 x 720 

- *2

  PC98 

640 x 400 

24.82 

56.42 

1228 x 768 

640 x 400 

  CGA70 

640 x 400 

31.47 

70.09 

1228 x 768 

640 x 400 

  VGA60 

640 x 480 

31.47 

59.94 

1024 x 768 

640 x 480 

*2

  VGA72 

640 x 480 

37.86 

72.81 

1024 x 768 

640 x 480 

  VGA75 

640 x 480 

37.50 

75.00 

1024 x 768 

640 x 480 

  VGA85 

640 x 480 

43.27 

85.01 

1024 x 768 

640 x 480 

  SVGA56 

800 x 600 

35.16 

56.25 

1024 x 768 

800 x 600

  SVGA60 

800 x 600 

37.88 

60.32 

1024 x 768 

800 x 600 

  SVGA72 

800 x 600 

48.08 

72.19 

1024 x 768 

800 x 600

  SVGA75 

800 x 600 

46.88 

75.00 

1024 x 768 

800 x 600

  SVGA85 

800 x 600 

53.67 

85.06 

1024 x 768 

800 x 600

  XGA43i 

1024 x 768 

35.52 

86.96 

1024 x 768 

  XGA60 

1024 x 768 

48.36 

60.00 

1024 x 768 

- *3

  XGA70 

1024 x 768 

56.48 

70.07 

1024 x 768 

-

  XGA75 

1024 x 768 

60.02 

75.03 

1024 x 768 

-

  XGA85 

1024 x 768 

68.68 

85.00 

1024 x 768 

-

  WXGA60 

1280 x 768 

47.77 

59.87 

1280 x 768 

*3

  MAC13 

640 x 480 

35.00 

66.67 

1024 x 768 

640 x 480 

  MAC16 

832 x 624 

49.72 

74.55 

1024 x 768 

800 x 600 

  MAC19 

1024 x 768 

60.24 

75.02 

1024 x 768 

  HP75 

1024 x 768 

62.94 

74.92 

1024 x 768 

  SXGA60 

1280 x 1024 

60.02 

63.98 

960 x 768 

Specifi cation of RGB signals in each computer mode of the projector


Signal mode 

Resolution 

Horizontal 

Vertical 

Normal mode 

Real mode


 (H x V) 

frequency (kHz) 

frequency (Hz) 

(H x V)*1 

 (H x V)

*1 :  When ASPECT in the FEATURE menu is set to AUTO 

and SCREEN SIZE in the INSTALLATION menu is set 
to 720p(16:9).

*2 :  Available for the signal for HDMI IN terminal.
*3 :  To display images of XGA60 or WXGA60 signal, set 

XGA/WXGA in the FEATURE menu according to the 
desired signal.

Important:

•  Some computers aren’t compatible with the projector.
•  The projector's maximum resolution is 1280 x 768 

pixels.  It may not display images of higher resolutions 
than 1280 x 768 correctly.

•  If the resolution and frequency of your computer 

aren't shown on the table, fi nd the compatible 
resolution and frequency by changing the resolution 
of your computer. 

•  In the case of XGA, the right side of the image may 

not appear. In this case, adjust TRACKING in the 
SIGNAL menu.

•  TV60 and TV50 are equivalent to 480i and 576i 

respectively. When these signals are supplied to 
the VIDEO or S-VIDEO signal, the signal mode is 
indicated as TV60 or TV50. When they are supplied to 
the COMPONENT VIDEO IN terminal, the signal mode 
is indicated as 480i or 576i. 
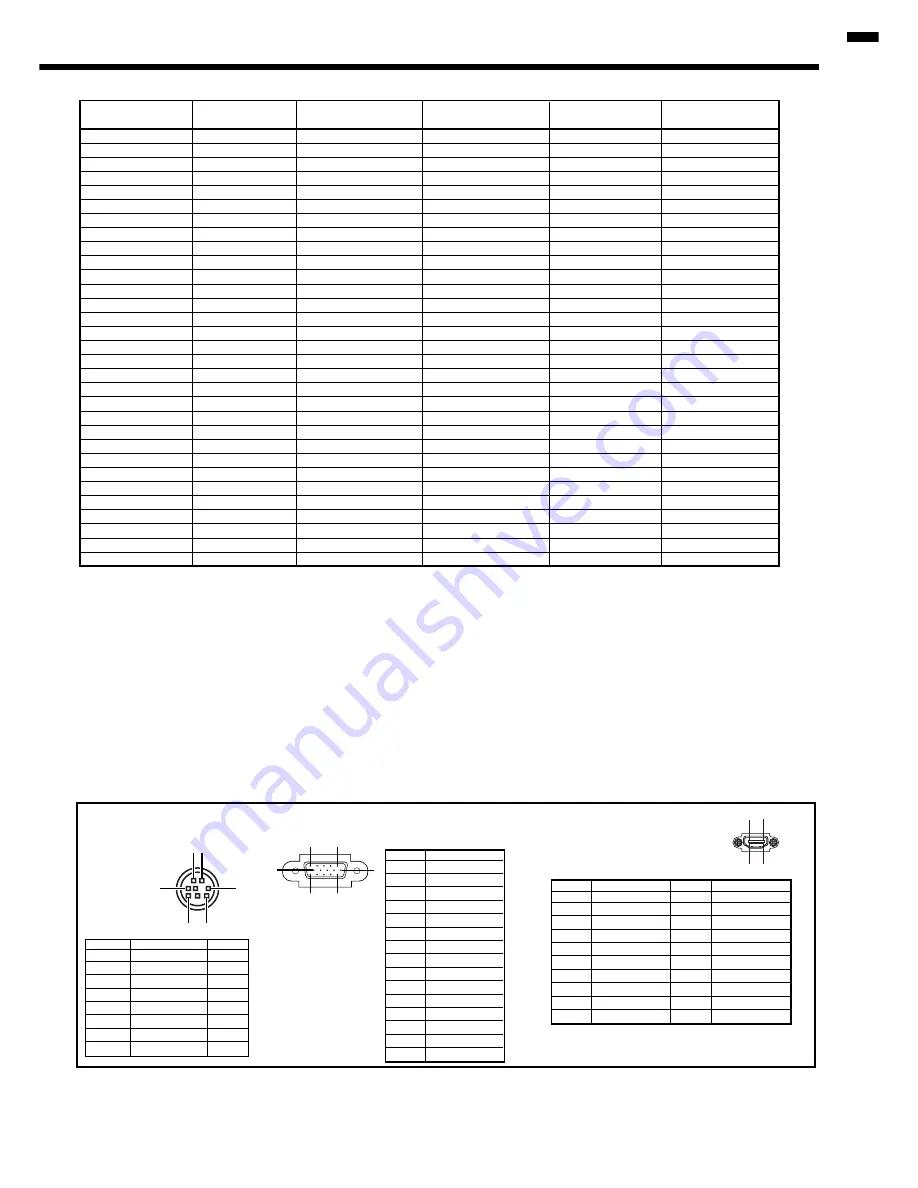
 1 

R(RED)/C

R

 2 

G(GREEN)/Y

 3 

B(BLUE)/C

B

 4 

GND


GND   


GND   

 7 

GND


GND    

 9 

DDC 

5V

 10 

GND 

 11 

GND 

 12 

DDC 

Data

 13 

HD/CS

 14 

VD

 15 

DDC 

Clock

 1 

TXD 

IN

 2 

 3 

-

  4 

GND   

 5 

-

 6 

-

 7 

RXD 

OUT 

 8 

-

1

3

5

2

6

8

1

5

11

6

10

15

SERIAL (8-pin)

 Pin No. 

Name 

I/O

COMPUTER IN / COMPONENT VIDEO IN
(Mini D-SUB 15-pin)

 Pin No. 

Spec.

19

1

2 18


Connectors

Replacement part
(Option / Not included in the box)

Spare 

lamp 

  VLT-HC910LP

HDMI IN
(HDMI 19-pin)

  1 

TMDS Data2+ 

11 

TMDS Clock Shield

  2 

TMDS Data2 Shield 

12 TMDS 

Clock-

 3 

TMDS Data2- 

13 -

 4 

TMDS Data1+ 

14 

-

  5 

TMDS Data1 Shield 

15 

SCL

 6 

TMDS Data1- 

16 

SDA

  7 

TMDS Data0+ 

17 

DDC Ground

  8 

TMDS Data02 Shield 

18 

+5 V Power

  9 

TMDS Data0- 

19 

Hot Plug Detect

 10 

TMDS Clock+ 


 PIN 

No. SPEC PIN No. SPEC

Summary of Contents for ColorView HC3

Page 1: ...HC3000 DLP PROJECTOR MODEL HC3000 User Manual ENGLISH This User Manual is important to you Please read it before using your projector ...

Page 2: ... specified power supply cord If you use another power supply cord it may cause interference with radio and television reception Use the attached RGB cable and RS 232C cable with this equipment so as to keep interference within the limit of a FCC Class B device This apparatus must be grounded DO NOT LOOK DIRECTLY INTO THE LENS WHEN THE PROJECTOR IS IN THE POWER ON MODE CAUTION Not for use in a compu...

Page 3: ...red trademark of Apple Computer Inc DLP Digital Micromirror Device DMD and BrilliantColor are all trademarks of Texas Instruments HDMI the HDMI logo and High Definition Multimedia Interface are trademarks or registered trademarks of HDMI Licensing LLC The HD ready Logo is a trademark of EICTA Other brand or product names are trademarks or registered trademarks of their respective holders Note This ...

Page 4: ...ids Never push objects of any kind through openings of this projector as they may touch dangerous voltage points or short out parts that could result in a fire or electric shock Never spill liquid of any kind on the projector 14 Servicing Do not attempt to service this projector by yourself Refer all servicing to qualified service personnel 15 Damage requiring service Unplug this projector from the ...

Page 5: ... high temperature and high humidity Please maintain an operating temperature humidity and altitude as specified below Operating temperature between 41 F 5 C and 95 F 35 C Operating humidity between 30 and 90 Never put any heat producing device under the projector so that the projector does not overheat Do not attach the projector to a place that is unstable or subjected to vibration Do not install ...

Page 6: ...ry is inserted from the side first inserting the side is difficult because the coil spring end hits on the battery side If the battery is forced in this way the outer label of the battery may get ripped and it may cause a short circuit and heating 3 Attach the back lid Important Use two size AAA batteries R03 Replace the two batteries with new ones when the remote control is slow to respond CAUTION ...

Page 7: ...played the COMPUTER VIDEO and AUTO POSITION buttons function as the and buttons respectively While the menu is on the screen the KEYSTONE button functions as the ENTER button HDMI IN USB SERIAL TRIGGER COMPONENT VIDEO IN S VIDEO IN VIDEO IN 1 2 3 4 5 8 9 10 7 6 6 11 Terminal panel 1 Power jack 2 HDMI IN terminal HDMI 19 pin 3 COMPUTER IN COMPONENT VIDEO IN terminal Mini D SUB 15 pin 4 Remote contr...

Page 8: ...ee below for the picture quality adjusting buttons Important When you press any button on the remote control the buttons on the remote control are lit Wait approx 5 seconds after releasing the button to turn them off The direction buttons are use for the keystone adjustment and fine adjustment buttons only Using the picture quality adjusting buttons When you press any of the picture quality adjusti...

Page 9: ... become unstable When you use the remote control too close to the remote control sensor the remote control may not work correctly Reception angle Vertical directions Vertical directions ceiling mount Front of projector Rear of projector Operate the remote control within a distance of 10 m 30 foot from the projector pointing the IR beam at the remote control photo sensor front or rear of the projec...

Page 10: ...he appropriate angle 2 Press the foot adjustment buttons next to the adjustment feet rear and the adjustment feet will come out 3 Release the buttons to lock the adjustment feet rear to that position 4 Rotate the adjustment feet rear for fine adjustment After using the projector 5 Put the adjustment feet rear back into the projector by pressing the foot adjustment buttons If necessary rotate the ad...

Page 11: ... use the TRIGGER terminal set TRIGGER OUT to ON in the INSTALLATION menu The factory default is OFF Use the following steps to change the setting With the INSTALLATION menu See page 24 for menu setting 1 Display the INSTALLATION menu 2 Select TRIGGER OUT by pressing the or but ton 3 Select ON by pressing the or button To cancel the menu 4 Press the MENU button Caution Do not use the signal output ...

Page 12: ... 610 22 6 57 398 10 1 45 3 115 The above figures are approximate and may be slightly different from the actual measurements Projection distance changes according to the setting of SCREEN SIZE in the INSTALLATION menu The table above is in the case of WXGA 15 9 Center of the lens Height of the projected image Width of the projected image Screen size Screen size Projected distance L Diagonal size Hei...

Page 13: ...e may be af fected by their interference See the owner s guide of each device for details about its connections Preparation Make sure that the power of the projector and that of the video equipment are turned off Basic home theater system connection HDMI IN USB SERIAL TRIGGER COMPONENT VIDEO IN S VIDEO IN VIDEO IN PB CB Y PR CR Video player DVD player Set top box or digital tuner ...

Page 14: ... or HDTV decoder To connect this projector to video equipment that has component video output terminals such as a DVD player use the COMPONENT VIDEO IN terminals When the video equipment is equipped with the S video output terminal make the connection as follows 1 Connect one end of the optional S video cable to the S VIDEO IN terminal of the projector 2 Connect the other end of the S video cable ...

Page 15: ...or may not display any image or not operate correctly If this projector doesn t display any image or not operate correctly see the operation manual of the video device for its connection When you use the video equipment other than HDMI conformity product the image may not be projected properly Use of a long cable may decrease the quality of projected images Connection for video equipment having a ...

Page 16: ... your country This projector uses the power plug of three pin grounding type Do not take away the grounding pin from the power plug If the power plug doesn t fit your wall outlet ask an electrician to change the wall outlet The provided power cord for the U S is rated at 120 V Never connect this cord to any outlet or power supply using other voltages or frequencies than rated If you use a power sup...

Page 17: ...dicator indicates that the lamp should be replaced soon Replace the lamp when the STATUS indicator blinks red See pages 34 and 37 3 Select an input source Press the VIDEO button on the projector or the VIDEO S VIDEO or COMPONENT button on the remote control that is corresponding to the terminal in use The input source is switched between VIDEO S VIDEO and COMPONENT every time you press the VIDEO b...

Page 18: ...o light the lamp again press the POWER button If the lamp doesn t light up immediately repeat pressing the POWER button two or three times If it should still fail to light up replace the lamp Cover the lens with the lens cap to protect it from dust When projected images are distorted to a trapezoid To correct vertical and horizontal keystone distortion press the KEYSTONE button on the projector or...

Page 19: ... 576i 480p 576p 16 9 image 720p 1080i 4 3 Bold frames are recommended modes When ASPECT is set to AUTO an optimum aspect ratio is automatically selected depending on the input signal When ASPECT is set to ZOOM1 or ZOOM2 display position can be changed with or button on the remote control ZOOM1 and ZOOM2 work on 480p and 576p images only They don t work on 480i and 576i images OVER SCAN and SHUTTER...

Page 20: ... button on the remote control The signal inputted to the HDMI IN terminal is not outputted from the COMPUTER OUT terminal Make sure to connect computer with HDMI cable before starting the computer If connecting the computer with HDMI cable after starting the computer the image signal may not be outputted from HDMI terminal of computer Turn on the power of the projector before that of the computer ...

Page 21: ...e STATUS indicator blinks red See pages 34 and 37 3 Select an input source Press the COMPUTER button on the projector or the COMPUTER or HDMI button on the remote control that is corresponding to the terminal in use The input source is switched between COMPUTER and HDMI every time you press the COMPUTER button on the projector Though it may take some time before an image is displayed on the screen...

Page 22: ...o cancel the procedure leave the projector for a while or press the MENU button 9 Press the POWER button on the projector or the OFF button on the remote control again The lamp goes out and the projector goes into a standby mode In this standby mode the POWER indicator blinks red 10 Wait about one minute for the POWER indicator to be lit in red steadily During this period of one minute in the stan...

Page 23: ... 3 75 7 5 VIDEO SIGNAL LANGUAGE English Español Deutsch Français Italiano SIGNAL HORIZ POSITION HOLD 0 999 0 999 FINE SYNC 0 31 TRACKING USER 0 9999 CLAMP POSITION 0 63 CLAMP WIDTH 1 63 VERT SYNC AUTO OFF 4 6 6 5 6 1 5 6 1 5 6 AUTO OFF CINEMA MODE 6 7 6 6 1 1 1 1 1 5 4 4 ON BEGIN 0 99 END 0 99 OFF COMPUTER INPUT 4 4 4 OVER SCAN 100 90 LPF ON OFF SHUTTER U 0 38 SHUTTER L 0 38 SHUTTER LS 0 95 SHUTTE...

Page 24: ...E A Ë OFF AUTO OK DISPLAY INPUT PASSWORD FUNCTION 1 AV MEMORY 1 SET UP XGA XGA WXGA SCART INPUT WXGA Available settings in the menus Set the following items on their relevant menus 1 IMAGE menu 2 INSTALLATION menu 3 FEATURE menu 1 IMAGE menu ITEM SETTING FUNCTION GAMMA MODE AUTO The proper gamma mode is automatically selected depending on the input signal Default is AUTO SPORTS This is a bright mo...

Page 25: ...with an aspect ratio of 4 3 16 9 Select to project images with an aspect ratio of 16 9 Linearly stretched ZOOM1 Select to enlarge and project images of CinemaScope size ZOOM2 Select to enlarge and project images of Vista size STRETCH Select to enlarge to 16 9 and project of the images with an aspect ratio of 4 3 Non linearly stretched REAL Select to project images in their original size as input N...

Page 26: ...lect AUTO for normal use OVER SCAN 100 90 Use to adjust the display area of the projected image when playing LD and DVD discs LPF ON OFF Use to select whether or not to enable the LPF SHUTTER U 0 38 Use to display the black bar on the top part of the image SHUTTER L 0 38 Use to display the black bar on the bottom part of the image SHUTTER LS 0 95 Use to display the black bar on the left half of th...

Page 27: ...he IMAGE menu 2 Select COLOR or TINT by pressing the or button COLOR is unavailable when the COMPUTER or HDMI is selected as the input source TINT is available only when the NTSC signal is input 3 Adjust the selected item by pressing the or button To cancel the menu 4 Press the MENU button COLOR Use to adjust the color intensity of the projected image Every time the button is pressed the color int...

Page 28: ...and B to negative values the original brightness of the image can t be obtained even when you maximize CONTRAST in the IMAGE menu CONTRAST R COLOR TEMP USER 0 CONTRAST G 0 BRIGHTNESS G 0 BRIGHTNESS B 0 CONTRAST B 0 BRIGHTNESS R 0 To adjust the ratio of change in brightness GAMMA MODE You can select a preset gamma mode using the menu See page 24 for menu setting 1 Display the IMAGE menu 2 Select GA...

Page 29: ...C in the SIGNAL USER menu Select AUTO for normal use Noise appears on the right or left half of the image Adjust SHUTTER LS or SHUTTER RS in the SIGNAL USER menu Noise appears on the top or bottom part of the image Adjust SHUTTER U or SHUTTER L in the SIGNAL USER menu 1 Display the SIGNALmenu 2 Press the or button to select an item to adjust 3 Adjust the selected item by pressing the or button To ...

Page 30: ...for setting the password function will appear 5 Press the ENTER button The screen for entering a password will appear 6 Press the or button to select a number from 0 to 9 7 Press the button You can set the next digit 8 Repeat steps 6 and 7 to set a four digit password 9 Enter the password again for confirmation using the same steps 10 Select OK and press the ENTER button If the entered passwords do...

Page 31: ... Cleaning the filter 1 Remove the screw a from the filter cover Be careful not to lose the screw 2 Move the filter cover in the direction of the arrow 3 Release three hooks and remove the filter cover from the projector If you use excess force to pull the filter cover the latches may be damaged 4 Remove the holder that is retaining the filter while pushing the tab of the holder in the direction of the ...

Page 32: ...eplacement message LAMP EXCHANGE will appear on the screen for one minute every 15 hours 1 thereafter When the lamp operation time exceeds 3000 hours 1 2 the projector automatically shuts off and can t be used until the lamp is replaced and the lamp operation time is reset 1 Duration when LAMP MODE of the INSTALLATION menu is set to LOW When it is set to STANDARD this duration will be shorted 2 Du...

Page 33: ...turn on if the lamp cover isn t attached securely Be sure to reset the lamp operation time whenever you replace the lamp Do not reset the lamp operation time unless you replace the lamp The lamp is fragile If it is broken be careful not to cut yourself with glass fragments Contact your dealer for a new lamp This projector uses a lamp that contains mercury Disposal of the lamp or the projector with...

Page 34: ...they are lightning Check that the lens cap is removed It may take about one minute for the lamp to light up The lamp fails to light up on rare occasions In such a case wait for a few minutes and then try again If the projector was turned off before the lamp was cooled down sufficiently last time the fan may start rotating and the POWER button may not work after the power cord is plugged After the f...

Page 35: ...creen surface and is not a malfunction Replace the screen or displace the focus a little Connect the plugs of the cables to external devices securely Keep the projector away from devices that emit interfering radio waves When the keystone adjustment is carried out the image may not be displayed correctly depending on the type of input signal This isn t a product malfunction In this case readjust t...

Page 36: ...in the remote control or the batteries are not weak See page 6 Check that the remote control sensor isn t exposed to direct sunlight or fluorescent light See page 9 Use the remote control within its operation range See page 9 Use the remote control at least 10 cm away from the projector PASSWORD FUNCTION in the FEATURE menu has been set to MENU ACCESS to en able the password lock Cancel the passwor...

Page 37: ...rilles Relocate the projector to a cooler place Wait until the STATUS indicator goes out then press the POWER button If the above solution is not effective replace the lamp Replace the lamp Change with a new lamp if this problem recurs Close the cover correctly Contact your dealer 1 Duration when LAMP MODE of the INSTALLATION menu is set to LOW When it is set to STANDARD this duration will be shor...

Page 38: ...nel resolution 1280 x 768 dots Signal type Terminal type Line Analog RGB D SUB 15P 1 HDMI HDMI 19P 1 Signal type Terminal type Line Video input RCA 1 S Video input S 1 Component video input RCA 1 RS 232C 8 pin DC 12 V Max 200 mA Stereo mini jack 41 F 5 C to 95 F 35 C AC100 240 V 50 60 Hz 2 9 A 310 mm W x 100 mm H x 245 mm D Not included protrusion 2 9 kg Luminance signal Vp p 1 0 V 75 Ω negative s...

Page 39: ... V frequency kHz frequency Hz H x V 1 H x V 1 When ASPECT in the FEATURE menu is set to AUTO and SCREEN SIZE in the INSTALLATION menu is set to 720p 16 9 2 Available for the signal for HDMI IN terminal 3 To display images of XGA60 or WXGA60 signal set XGA WXGA in the FEATURE menu according to the desired signal Important Some computers aren t compatible with the projector The projector s maximum r...

Page 40: ...nfo meuk mee com Asia CHINA Mitsubishi Electric Air Conditioning Visual Information Systems Shanghai Ltd 26 F Oriental Center 699 Nanjing Rd W Shanghai 200041 China Sales Inquiries Phone 86 21 5211 0882 3010 Fax 86 21 5211 0576 Technical Inquiries Phone 86 21 5211 0882 3018 Fax 86 21 5211 0576 HONG KONG Mitsubishi Electric Ryoden Air Conditioning Visual Information Systems HongKong Ltd 7th Floor M...

Reviews: