background image

Mitel 112 DECT Installation Guide 


Ver: 3.1 


Step 4d: Verify Settings 

 
With 

some installations, if the VLAN’s are not properly set up with the correct scope, the base 

station when syncing will pick up the wrong scopes and will attempt to configure itself using the 
wrong information.  This has the potential to create service issues later down the path when the 
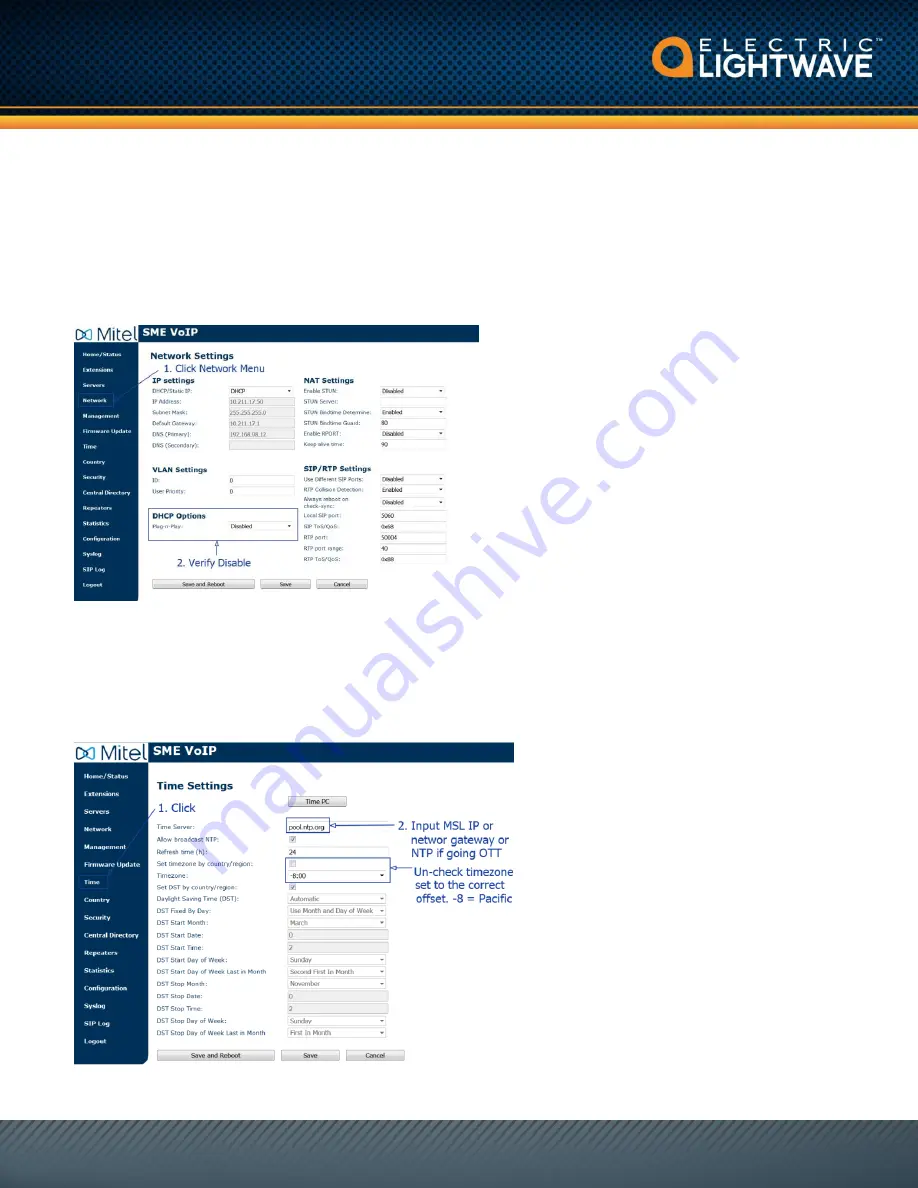
phone reboots / loses power.   It is important that under the Network menu, the DHCP Options 
for Plug-n-Play are Disabled.  (see figure 11) 
 
Fig 11 


Step 5: Set the Time 

If the base station is connect to a private voice VLAN, then you will need to set your time server 
to pull NTP from the datacenter’s UCCV server (a.k.a MSL).  This private IP is one host in front 
of the controllers IP.    (see figure 12) 
 
Fig 12 


Summary of Contents for 112

Page 1: ...of the controller for the base station to sync with See figure 1 The IP will be in a format of 10 25 2xx xxx Fig 1 The installation and configuration process works as follows 1 Prepare the voice VLAN network 2 Connect a laptop into the voice VLAN 3 Assemble and install the base station 4 Pair the DECT phone to the base station 5 Configure the base stations server to sync with the UCCV controller a...

Page 2: ...VLAN It will connect to default data network This means you will have to either configure the NIC adapter on your machine to pick up the voice VLAN or you will need to plug your machine into an untagged voice VLAN port on the LAN switch Step 3 Assemble and Connect the Base Station to the Network Un box assemble and plug the base station into the LAN By default it is set up for DHCP Please refer to...

Page 3: ...rver Alias give your server a name e g UCCV Base 2 Change the NAT Adaption to Disable 3 Registrar In most situations your will input the private IP of the UCCV controller The registrar will have a default IP that needs to be changed 4 Outbound Proxy In most situations your will input the private IP of the UCCV controller 5 All other fields should remain with their defaults 6 Click SAVE at the bott...

Page 4: ...the battery compartment To view remove the batteries and write down the number 2 Click the Extensions menu then Click Add extension see figure 5 Fig 5 Fill in the following fields see figure 6 1 Extension number 2 Authentication User Name 3 Authentication Password 4 Display Name this should be the same name as it appears in the portal This name can be found off of the welcome email 5 Mailbox Numbe...

Page 5: ...ick Register Handset s The Handset State will change from blank to Enabled see figure 8 Fig 8 5 Using the DECT wireless handset Click on the menu button Cursor to the ring with the colored dots and press menu button You will be given two options Highlight the Register option and press the menu button Enter in the access code By default it is 0000 Press the upper left button under the Ok to start t...

Page 6: ...set the last step is to start the registration process between the DECT set and the synced base station see figure 9 1 Click the Extensions menu 2 Click the Extensions tab 3 Check the box for the extension that you want to start 4 Click Start SIP Registration s Fig 9 A successful configuration is when the state shows SIP Registered see figure 10 Fig 10 ...

Page 7: ...ation This has the potential to create service issues later down the path when the phone reboots loses power It is important that under the Network menu the DHCP Options for Plug n Play are Disabled see figure 11 Fig 11 Step 5 Set the Time If the base station is connect to a private voice VLAN then you will need to set your time server to pull NTP from the datacenter s UCCV server a k a MSL This p...

Page 8: ... 112 DECT Installation Guide Ver 3 1 8 End Result The end result should show the extension with the following state disposition as SIP registered Optional Screen Shots of a Standard Configuration Extensions ...

Page 9: ...Mitel 112 DECT Installation Guide Ver 3 1 9 Servers Network Time ...

Reviews: