background image

                                                    7 

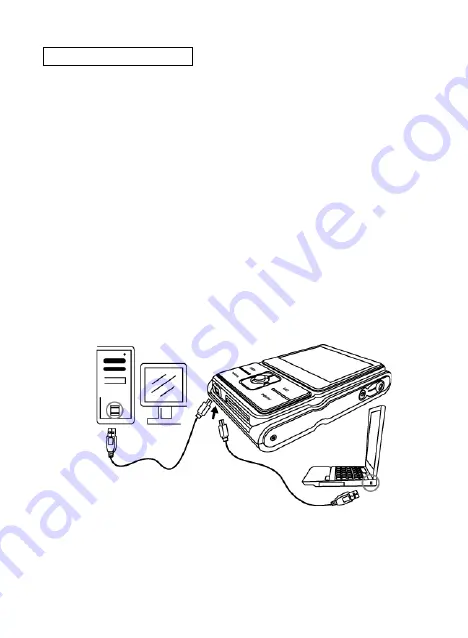
Charging the Battery 

Long battery life is one of the key benefits of this product 
compared to others. Mini Portable Digital Video Recorder 
battery has already been charged prior to shipment, 
however, to be safe, 

please charge the battery at least 

4 hours when your first use

. You may want to follow the 

instructions below to make sure that your Mini Portable 
Digital Video Recorder is fully charged. The lithium-ion 
battery used in Mini Portable Digital Video Recorder 
recharges automatically when Mini Portable Digital Video 
Recorder is plugged into a PC via the provided USB cable. 
When the battery is charging, the red LED will light up. 
When charging is complete, the red LED will be off. 

Summary of Contents for MP-468E

Page 1: ...0...

Page 2: ...External Camera 9 Powering On Off 10 Recording Video Clip 11 4 Review Mode 12 5 Delete Mode 13 6 Menu Mode 14 Set Date Time 14 Schedule Record 15 Overwrite 17 LCD Off 17 Date Time Stamp 18 Format 18...

Page 3: ...anywhere else where operation of such devices is restricted Improper use creates the risk of serious accident x Do not try to open the case of Mini Portable Digital Video Recorder or attempt to modify...

Page 4: ...power off immediately Take Mini Portable Digital Video Recorder to the nearest authorized service center for repair Never attempt to repair Mini Portable Digital Video Recorder on your own x Use only...

Page 5: ...installation If this equipment does cause harmful interference to radio or television reception which can be determined by turning the equipment on the off the user is encouraged to try to correct the...

Page 6: ...5 2 Preparation Standard Accessories Manual External Camera Recorder USB TV CABLE CD ADAPTOR...

Page 7: ...6 Part Names Front View...

Page 8: ...st 4 hours when your first use You may want to follow the instructions below to make sure that your Mini Portable Digital Video Recorder is fully charged The lithium ion battery used in Mini Portable...

Page 9: ...fully charge a depleted battery The photo viewer can be charge at ambient temperatures between 0 32 and 40 104 The battery does not need to be fully discharge or exhausted before being recharged Lithi...

Page 10: ...9 3 Recording Loading SD Card Insert SD card into SD memory card slot and push it all the way in Use finger nail to push out the SD card Connect External Camera Plug the provided camera to camera port...

Page 11: ...F Power ON 1 Press the Power Button to turn on the LCD Monitor 2 When the LCD Monitor has been activated Mini Portable Digital Video Recorder is ready to recording Power OFF 1 Press the Power Button a...

Page 12: ...era 2 Snap Press the OK Button to capture image JPG 3 Press the OK Button 2 sec to start recording a movie recording press the delete button to lock function key press again to unlock function key 4 P...

Page 13: ...movie play back mode Press REVIEW Button again to return Recording status 1 Press REVIEW Button 2 Press OK Button for play back the current movie from SD Card 3 Push or to scroll the movies 4 Press OK...

Page 14: ...o delete selected movie 1 Under REVIEW Mode 2 Press Delete Button once Push to select 9 and press OK Button to delete current movie 2 Press Delete Button twice Push to select 9 and press OK Button to...

Page 15: ...ENU Button and then push forward to select setting modes Set Date Time 1 Under MENU mode 2 Push to select Date Time Mode 3 Press OK Button 4 Push and to adjust Year Month Date 5 Hour Minute and then p...

Page 16: ...ord 1 Under MENU mode 2 Push to select Schedule Record Mode 3 Press OK Button 4 There are 3 schedules can be set for weekly recording when power on Maximum 180 min Press MENU Button again to return re...

Page 17: ...16 5 Select OFF separately to turn off schedule record function...

Page 18: ...OK Button 4 Select Overwrite function ON or OFF and press OK Button to set LCD Off 1 Under MENU Mode 2 Push to select LCD Off Mode 3 Press OK Button 4 Push to select the minutes 2 Min 5 Min 10 Min yo...

Page 19: ...de 2 Push to select Date Time Stamp Mode 3 Press OK Button 4 Select Date Time Stamp function ON or OFF and press OK Button to set Format 1 Under MENU Mode 2 Push to select Format Mode 3 Press OK Butto...

Page 20: ...19 7 LCD On Off Mode You could press LCD Button to turn off LCD monitor for power saving To press cable switch button to turn off camera...

Page 21: ...20 8 Making Connection Connecting to PC Window 2000 XP Vista No Driver Required 1 Power on the recorder first 2 Plug the USB cable to the recorder and computer properly...

Page 22: ...2000 Double click My Computer icon on the Windows Desktop For Window XP Vista Select Open Folder View Files using Windows Explorer 3 Double Click on the DCIM folder to open 4 Double click on the 100M...

Page 23: ...corder and connect TV cable to your TV Red to red audio in yellow to yellow video in 2 Turn on the camera and TV Select TV output symbol You can review the pictures and movies on TV Recording TV progr...

Page 24: ...hedule Record Overwrite LCD On Off Format PC Interface USB 2 0 Microphone External with camera optional Speaker Connector USB jack TV out in Jack Video Output NTSC PAL Power Built in rechargeable Li i...

Reviews: