background image

LT-976A Rev 3

January 2017

3

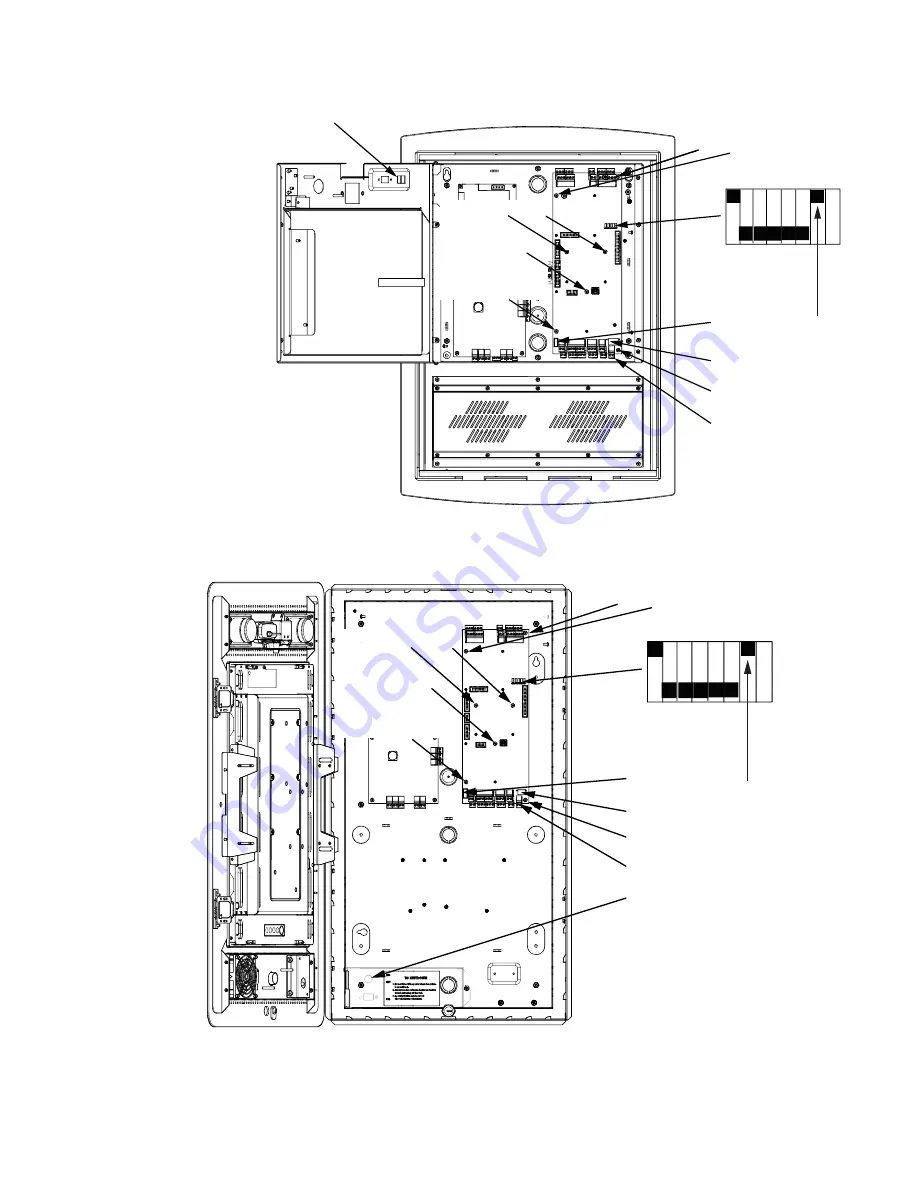
Figure 3    Installing on a TX3-TOUCH-S15-A/TX3-TOUCH-F15-A

Figure 4    Installing on TX3-TOUCH-S22/TX3-TOUCH-F22

}

RS-485 address

Switch 7 ON

DIP switches

On/Off switch

Power switch (on front of door)

Mounting screws

Mounting screws
There are
seven screws
holding the
main controller
board in place.

Mounting screw

Power connector

JW11

}

RS-485 address

Switch 7 ON

DIP switches

Power button

Mounting screws

Mounting screw

Mounting screws
There are
seven screws
holding the
main controller
board in place.

Power connector

On/Off switch

JW11

Summary of Contents for RB-MD-1086 Series

Page 1: ...that hold the current board in place B Attach the new board 1 Secure the new board with the seven screws you removed in step 6 2 If there are any daughter boards attached to the old board remove them and then install them on the new board 3 Connect all the input output and networking harnesses to the new board 4 Connect the ribbon cable to the new board if it is present 5 Connect the power harness...

Page 2: ...oard 4 Turn on the Touch Screen You are done If you need more help call us at 1 888 660 4655 F If you are installing RB MD 1086 on a non Touch Screen unit 1 Set DIP switch 7 to OFF See Figure 5 2 DIP switch 8 Set DIP Switch 8 OFF if the IP address is assigned using a DHCP server Set DIP switch 8 ON if the IP address is assigned using the TX3 Configurator software 3 Turn on the main controller boar...

Page 3: ...On Off switch Power switch on front of door Mounting screws Mounting screws There are seven screws holding the main controller board in place Mounting screw Power connector JW11 RS 485 address Switch 7 ON DIP switches Power button Mounting screws Mounting screw Mounting screws There are seven screws holding the main controller board in place Power connector On Off switch JW11 ...

Page 4: ...talling on a non Touch Screen unit There are seven screws holding the main controller board in place Mounting Screw Mounting Screw Ribbon Cable Mounting Screws On Off Switch Power Connector RS 485 address Switch 7 OFF DIP Switch Settings JW11 ...

Reviews: