background image


.......................................................................................................................................... 17 


Displa y me nu


Using the ad van ced menu 
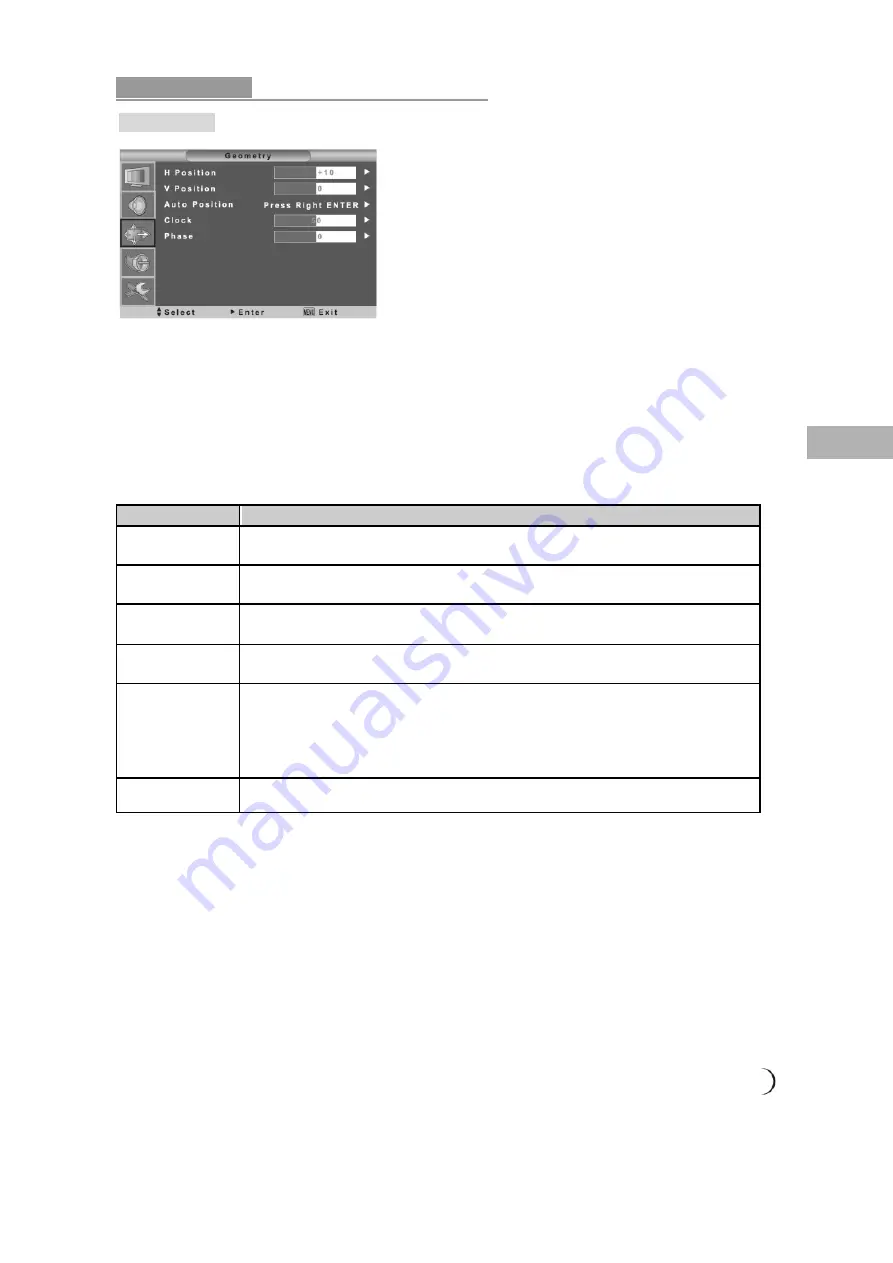
 
  GEOMETRY 

  (for VGA)


1.  Press the 

MENU

 button on the remote control to display the main menu. 

2.  Press the 

 buttons on the remote control to select the 

DEOMETRIC.


3.  Press the 

 button on the remote control to enter the submenu. 

4.  Press the 

 buttons on the remote control to select the item to be adjusted. 

5.  Press the 

 button on the remote control to confirm your choice. 

6.  Press 

 buttons on the remote control to adjust the setting. 

7.  Press the 

MENU 

again to quit the picture. 


Menu


Descriptions


H-Position


Press the 

 buttons to adjust the horizontal VGA position. 

The adjustment range is -10~0~10


V-Position


Press the 

 buttons to adjust the vertical VGA position. 

The adjustment range is -10~0~10


Auto Position


Automatic adjustment 
Press the 

 buttons to automatically adjust the picture setup.


Clock


Press the 

 buttons to adjust the VGA alignment for stable VGA display. 

The adjustment range is 0~100


Phase


Press the 

 buttons to adjust the focus and sharpness of VGA. 

The adjustment range is 0~100. 

In PC model, if the picture quality fails to meet your maximum expectation when 
“Auto” is pressed, please adjust the “Phase” function to do manual calibration for 
refining picture quality.


Recall


Press this button to restore all Geometric parameters to their default settings. 

Summary of Contents for T3714C

Page 1: ...utions 03 Descriptionsand accessories 05 LCD TV installation method operation The connectorsand sockets 06 Control panel keys 10 Remote control 11 Display Menu Display modes 13 Using the advanced menu 14 Other information Trouble shooting 21 Specifications 22 TV signal system 23 1006 ...

Page 2: ...o rain or moisture does not operate normally or hasbeen dropped 15 Apparatus shall not beexposed to dripping or splashing and no objects fill with liquids such as vases shall be placed on theapparatus 16 To reduce the risk of electric shock donot remove cover or back No user serviceable parts inside Refer servicing to qualified service personnel 17 The readily operable appliance coupler will serve...

Page 3: ...ase contact your distributor The plug is designed in such a manner that you can plug into a socket in a certain direction If you have problems with the plug contact with your distributor 1 DO NOT overload powers sockets or extension cords Overloading poses a risk of electric shock or fire 2 DO NOT place any objects on the power cord Keep your LCD TV away from any place that might cause damage to t...

Page 4: ... 2 thisdevicemust accept any interference received includinginterference that may cause undesired operation Note This equipment has been tested and found to comply with thelimits for a Class B digital device pursuant topart 15 of the FCC Rules Theselimits are designed to provide reasonable protection against harmful interferencein a residential installation This equipment generates uses and can ra...

Page 5: ...ation of batteries 1 Insert two AAA batteries into the Remote control Make sure and are facing the proper direction 2 Replace the cover If the remote control is not to be used for a long time remove the batteries Use the remote control carefully DO NOT drop the remote control on the ground Keep the remote control away from moisture sunlight and high temperatures Caution Please attach I O coverin n...

Page 6: ... uses the same connector to transmit AV SRGB Audio and S Y C input signals by main screen TV AV Scart1 AV and Audio out signals S Video and R L Audio Input S Video Y C or composite video and sound audio signal R L connectors If you connect S Video Composite video at the same time S Video has priority If you want touse composite video you must un plug S Video cable Tuner Input TV RF signalsinput an...

Page 7: ...R L Audio Input S Video Y C or composite video and sound audio signal R L connectors If you connect S Video Composite video at the same time S Video has priority If you want to use composite video you must un plug S Video cable Earphone Output Connects to headphones 16Ωor 32Ω VCR Yellow White Red or Yellow White Red ...

Page 8: ...s connects to the audio output from the PC When the DVI portis used with an HDTV source this can be used for audio input by using a cable with RCA plugs converted to stereo mini jack plug VGA Input analog Connects to VGA analog signal sources for use with a PC HDMI Input digital High DefinitionMultimedia Interface Connects to devices compatible with digital input signalsand can be used with PC or ...

Page 9: ...s switched on Programming TV channels 1 Press the SOURCE button on the remote control or on the control panel of LCD TV to select TV mode 2 Press the MENU button on the remote control to display the OSD menu 3 Press the button on the remote to highlight TV Setup and press the button to select TV Setup 4 Press the button on your remote to highlight Auto Program Sort APS and press the button to sele...

Page 10: ...TION Use these buttons to switch between preprogrammed channels Use these buttons to move between functions in the OSD VOLUME ADJUST Use these two buttons toadjust the volume Use these buttons to adjust the values of a function SOURCE Use thisbutton to change between videoinput signals Press the SOURCE button repeatedly to scroll through the following list of inputs PAL SECAM for Europe TV SAV 1 S...

Page 11: ...ain picture and the sub picturein PIP mode 7 PIP POSITION position of sub picture Changes the position of the sub picture under PIP mode 8 PIP SIZE size of sub picture Press to activate Picture In Picture PIP mode Press again to changes the size of sub picture under PIP mode Two screen sizesare available Press again to close PIP mode 9 MAIN AUDIO Selects MAIN main picture audio in PIP mode 10 PIP ...

Page 12: ... a quiz 22 SIZE Press this button to change the font size Full screen Top half and Bottom half FULL full screen standardf ull screentext TOP top half top half of page appears on the fullscreen BOTTOM bottom half bottom half of page appears on thefull screen 23 HOLD Press this button to stop the scrolling of pages The text decoder stops receiving data 24 R G Y B Press this button to select the pict...

Page 13: ... themain signal and secondary input signals simultaneously The secondary signal or input source appears in a frame in themain picture Thisis known as PIP sub picture diagram 1 To activate PIP mode press the SIZE button on the Remote control 2 Select the PIP input source from the PIP Source button on the Remote control There isno PIP button on the LCD TV control panel 3 The secondary signal options...

Page 14: ...s DISPLAY Showsmore picture modes and functions based on your favorite channelsand enables you to adjust the color and brightness setup Enables you to configureadvanced picture settings AUDIO Provides more audio selections You can also set the audio environment of theLCD TV GEOMETRIC for use in PC mode Enables you to adjust the position and sharpness of the picture TV SETUP for use with TVmode Ena...

Page 15: ...er The adjustment range is 0 100 Contrast Press to increase or decrease the picture contrast The adjustment range is 0 100 Saturation Press to adjust color saturation The adjustment range is 0 100 Hue Press to change the hue to make it redder or greener The adjustment range is 50 0 50 Sharpness Press to make the picture sharper or softer The adjustment range is 0 100 ColorTemp Press to adjust the ...

Page 16: ...Movie VideoMode User1 User2 VGA Mode Balance Press the buttons to adjust the balancebetween right andleft speakers headjustment rangeis 50 0 50 Treble Press the buttons to increase or decrease the audio treble level The adjustment range is 0 100 Bass Press the buttons to increase or decrease the audio bass level The adjustment range is 0 100 Surround Select ON or OFF to activate or inactivate the ...

Page 17: ...e buttons to adjust the horizontal VGA position The adjustment range is 10 0 10 V Position Press the buttons to adjust the vertical VGA position The adjustment range is 10 0 10 Auto Position Automatic adjustment Press the buttons to automaticallyadjust the picture setup Clock Press the buttons to adjust the VGA alignment for stable VGA display The adjustment range is 0 100 Phase Press the buttons ...

Page 18: ... remote control to confirm your choice 6 Press buttonson the remote control toadjust the setting 7 Press the MENU again to quit the picture Menu Descriptions Program Table This option provides channel editionon sequence channel skip and frequency fine tuning in the range of 3MHz Refer to next page for details Auto Program APS Country Press the buttons to select your country Start APS Automatic cha...

Page 19: ... the MENU button to confirm the name setting Press the number buttons to select your required letters Press 2 to cycle through 2 A B C Press 3 for 3 D E F etc refer the table on the right hand side Color Norm Audio Norm Use the buttons to choose whichTV system to represent the screen If you live in an area which can receive different TV systems youmay choose to change the default system to the sys...

Page 20: ...kLight Press the buttons tomake the BackLight brighter or darker The adjustment range is 0 10 Language Press the buttons to select language English Deutsch German Francais French Polski Polish Italiano Italian Espanol Spanish Nederlands Dutch голл Russian OSDTimeout Press the buttons to select the time to be shown on OSD Timeout 15 20 25 seconds Teletext Lang Press the buttons to select the Telete...

Page 21: ...y 4 TV RF signal must not belower than 50dB Cannot use remote control 1 Is the battery dead 2 Is there any disturbance from static or thunder 1 Please change battery 2 Turnoff power for 10 seconds and then restartpower The following table contains common problems and solutions to these problems Problems Possible solutions Cannot receive sufficient channels through antenna Please use the automatic ...

Page 22: ...l Mode IPS PC 1360x768 60Hz 1024x768 60 70 75 85Hz 800x600 60 72 75 85Hz 640x480 60 72 75 85Hz Compatibility SDTV HDTV scanning for mat 1080i 720p 576p 576i 480p 480i Input Voltage AC100 240V 2A 50 60Hz Operati on 200 W Power Standby 1 W Operati ng 5 35 C 41 95 F 10 90 no condensation Environment Storage temperature 20 50 C 4 122 F 10 90 no condensation Other Built in speaker 8 Ω 7W x2 ...

Page 23: ... PAL NICAM Teletext Bermuda M NTSC Brazil M PAL M MTS Bulgaria D SECAM Canada M NTSC MTS CC Canary Is B PAL China D PAL Colombia M NTSC Cyprus B PAL Czechsolvakia D K SECAM PAL Kia Denmark B PAL NICAM Teletext Egypt B SECAM Faroe Islands DK B PAL Finland B G PAL NICAM Teletext France E L SECAM Teletext Gambia I PAL Germany B G PAL FM FM Teletext Germany prev East B G SECAM PAL Gibraltar B PAL Gree...

Page 24: ...CAM Japan M NTSC MATRIX Jordan B PAL Kenya B PAL Korea M NTSC Luxembourg B G PAL NICAM Teletext Madeira B PAL Madagascar B SECAM Malaysia B PAL Malta B G PAL Mauritius B SECAM Mexico M NTSC MTS CC Monaco L G SECAM PAL Morocco B SECAM Netherlands B G PAL FM FM Teletext New Zealand B G PAL NICAM Teletext North Korea D K SECAM Norway B G PAL NICAM Pakistan B PAL Paraguay N PAL Peru M NTSC Philipines ...

Page 25: ...thAfrica I PAL South Korea M NTSC Spain B G PAL NICAM Teletext Sri Lanka B G PAL Sweden B G PAL NICAM Teletext Switzerland B G PAL FM FM Teletext Tahiti KI SECAM Taiwan M NTSC Thailand B PAL Trinidad M NTSC Tunisia B SECAM Turkey B PAL Teletext United Arab Emirates B G PAL United Kingdom I PAL NICAM Teletext Uruguay N PAL MTS USA M NTSC MTS CC Venezuela M NTSC Yugoslavia B H PAL Zimbabwe B PAL ...

Reviews: