Miraclebox premium User Manual Download Page 32


Miraclebox Premium Twin HD 


User Manual 


31 


Copyright © Miraclebox Multimedia AB 


  Add recording (enter recording duration) 

This option is used when you want to manually set the length of a recording by entering 
a certain number. 

  Add recording (enter recording end time) 

This option is used when you want to define a certain time when the recording shall stop. 

  Don’t record 

This option is used to exit from this menu without recording. 

  Stop Recording  

If you want to stop a recording press REC again while recording is running and select 
Stop Recording. You can also press STOP and select the recording you want to stop. 


  Recording by Timer  

You can manage your Timer recordings with the Timer List menu.  
Go to Main Menu > Timer or press the TIMER button on your remote control. 
 
In this menu the COLOR buttons are each assigned a different function. 


Delete

 (RED) 

This option is used to delete a timer. 


Add

 (GREEN) 

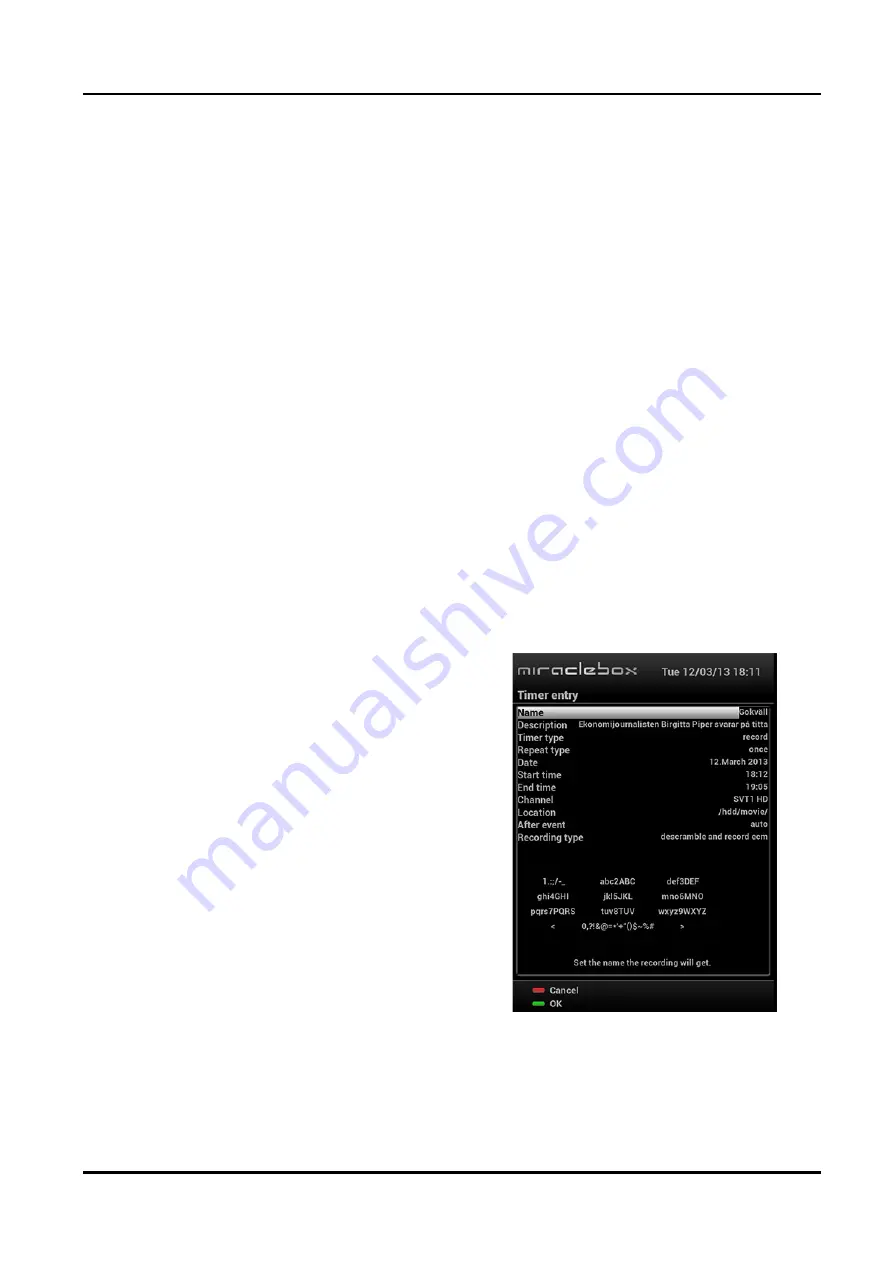
This option is used to add a timer. Here you 
will be able to set several options. 

Name 

Displays the name of the selected program. 

Description 

Displays a short description of the program. 

Timer Type 

• Select 

Zap

 for changing to program. 

• Select 

Record

 for recording program. 

Repeat Type 

• Select 

Once

 for one time. 

• Select 

Repeated

 for repeated reservation. 

If you choose 

Repeated

 you can reserve 

zapping or recording per 

Daily / Weekly / Mon-Fri / User-defined

Date 

Displays current date. This entry is on when you selected 

Once

 in 

Repeat Type

Summary of Contents for premium

Page 1: ...U s e r Ma n u a l Mi r a c l e b o x P r e mi u mT w i nH D...

Page 2: ...em 13 4 Connecting Power 14 5 Power ON OFF 14 3 First Time Installation Installation Wizard 15 1 Language selection 15 2 Video output 15 3 Network configuration 16 4 Service searching 18 4 Basic Opera...

Page 3: ...ral Settings 41 I Expert Settings 41 2 Service Searching 42 A Tuner Configuration 42 B Default Service Lists 42 C Automatic Scan 42 D Manual Scan 43 3 EPG Settings 44 4 Storage Manager 45 5 Common Int...

Page 4: ...o Liquids of any kind have been exposed to the product o The product has been dropped or the casing has been damaged If the product won t be used for a long period of time please unplug it 2 Exposure...

Page 5: ...be sure that the product is unplugged Do not operate this product or hold the power cord with wet hands as the risk of getting electronic shock is very high Use a damp cloth do not use any solvents t...

Page 6: ...Copyright Miraclebox Multimedia AB 2 Packaging Contents Please check all package contents before using your product Miraclebox Premium Twin Universal Remote Control Batteries 2 x AAA HDMI cable WiFi...

Page 7: ...rt your CI module Two slots 3 USB 2 0 Connection used for upgrading receiver external HDD WiFi etc 4 VFD Display Displays channel upgrade and menu information 5 OK Confirms the selected menu option 6...

Page 8: ...re and sound Up 1080 in resolution 6 SCART Connect to an older TV VCR etc 7 S PDIF Connect to a digital surround system using an optical cable S PDIF 8 Video Video output using RCA cable Analogue 9 Au...

Page 9: ...w OK Confirms the option INFO Shows more information MEDIA Show recordings Long press goes to MediaPlayer BACK Shows Channel History VOL Increase or Lower the Volume CH Change channel to Next Previous...

Page 10: ...Uwww miraclebox seU19T for which smartcards your Miraclebox supports 1 Open the door on the right side 2 Insert with chip downward and forward 3 Keep smartcard inserted while watching scrambled channe...

Page 11: ...nt 2 x Rear Wireless LAN included 300 Mbps Internal SATA HDD supported Timeshift Recording Playback HDMI with Full HD 1080p support 1 x Composite Video RGB 2 x RCA Audio 1 x Component Video YPbPr 1 x...

Page 12: ...atellite 2 x DVB S2 B Connection to Antenna Cable 2 x DVB C T2 C Connecting to Satellite and Antenna Cable DVB S2 DVB C T2 NOTE Loop through connection Instead of using two separate signal cables Sate...

Page 13: ...cture and sound quality HDMI connection is recommended B Via Composite RCA and or Component YPbPr Composite Video Yellow and two Audio White Red Component Blue Red Green C Via SCART If you have an ana...

Page 14: ...st possible sound experience This is the option if you want a digital Dolby Digital sound B Via RCA Analogue If you do not have an S PDIF input in your Surround System you can always use the two RCA A...

Page 15: ...te Power Shutdown There is a Power Switch on the rear panel and once it is ON you do not need to turn it on or off each time It takes longer to boot the system by this method Standby Mode Turn ON OFF...

Page 16: ...our screen and you will be ready to go within a couple of minutes 1 Language selection Miraclebox provides support for various of languages In this step you can select the main language for your Mirac...

Page 17: ...k connection choose Exit network wizard to go to the next step A Wired connection LAN If there is a network cable connected to the Miraclebox you should choose this method You will get two options Use...

Page 18: ...ES to be assigned an IP automatically from your network router Choose NO to enter the IP address Gateway etc manually Hidden network If the network is hidden choose YES otherwise NO Network name SSID...

Page 19: ...the Miraclebox before you continue to the next step in the Installation Wizard Please refer to the options given on your TV screen If no updates are found the Miraclebox will automatically proceed to...

Page 20: ...the same configuration as the second Advanced Used for advanced users Not configured Choose if there is nothing connected the tuner Mode Single Choose if there is only one satellite connected DiSEqC...

Page 21: ...bands or Frequency steps depending on your cable network provider Terrestrial For both DVB T and T2 Terrestrial provider Choose your local area Enable 5V for active antenna Choose ON if you have an a...

Page 22: ...e options No scan later manually If you have chosen to install a Channel list in Step C you probably already have the latest channels installed in your Miraclebox In that case you can skip this step a...

Page 23: ...er to section 5 Information This menu provides detailed information of your Miraclebox Premium such as Hardware Software and Network information Timer Manage your Timer recordings from this menu Check...

Page 24: ...lume level 4 Selecting Audio Track By pressing the AUDIO button you can check which audio tracks are available If the current program provides different audio tracks or languages navigate to one you w...

Page 25: ...o to There are several other functions with Teletext as you can see below MUTE Once the Teletext is activated you can toggle between the live mode and the Teletext page by pressing the MUTE button The...

Page 26: ...n the background Update available If this icon is blinking it means there is an update available REC Highlighted in red when recording is in progress HbbTV Highlighted if the HbbTV is available Press...

Page 27: ...according to Services Provider and New Provider YELLOW Displays the list of available providers based on Channel list Favorites BLUE Displays your Favorite lists In order for you to add a certain cha...

Page 28: ...your remote to enter the EPG IMDb Search RED If you have a working Internet connection you can search IMDB for information Add AutoTimer BLUE Will automatically add new matching Timers for the selecte...

Page 29: ...ng for you Press and hold the EPG button till the below menu appear IMDb Details Please refer to previous section EPG View Add AutoTimer Please refer to previous section EPG View Search EPG Please ref...

Page 30: ...hould be the default one when pressing the EPG button once in live mode C Channel EPG This view can be entered by pressing the INFO button or through the EPG Menu Section B You will be displayed all E...

Page 31: ...le recordings up to 8 recording simultaneously Instant Recording Press REC button to start show the Recording options Add recording stop after current event This option is used when you want to end th...

Page 32: ...Recording by Timer You can manage your Timer recordings with the Timer List menu Go to Main Menu Timer or press the TIMER button on your remote control In this menu the COLOR buttons are each assigne...

Page 33: ...An X mark will appear If you want to enable the disabled timer press the YELLOW button again Cleanup BLUE This option is used to remove the finished timers from the Timer List 12 Play Manage Recordin...

Page 34: ...ettings for the List Playback Network mounts Goes to Network Mount menu Add bookmark Add a bookmark Create directory Creates a new directory Delete Delete selected file Move Moves selected file Copy C...

Page 35: ...Y button Supported formats are most MP3 AVI MKV MP4 etc Depending of Codec 3 To move between the File List and Play List press the CH or RIGHT LEFT button 4 To play a file and show the Media Player wi...

Page 36: ...Plug in you wish to download and press OK 5 You can check if the Plug in was installed properly on the Plugin browser B Addons Extensions 1 Go to Menu Setup Software management Manage Addons Extension...

Page 37: ...rface Top Shows current channel name program and detailed program information Main window Displays your selection The Home screen shows available channel lists and it s also here where you can choose...

Page 38: ...nd general contact information will appear Devices Shows all connected devices and hardware Tuners USB Network HDD etc Memory Shows memory information about the internal RAM and FLASH memory See how m...

Page 39: ...en Standby mode and Deep Standby mode YELLOW Choose whether to be asked of confirmation before shutdown or not Standby Choose this option to turn off your Miraclebox go into Standby mode This Standby...

Page 40: ...and save selection with the OK or GREEN button B A V Settings You have a several Audio Video settings in Miraclebox you can setup Video output Choose between HDMI Scart and YPbPr Component Mode Choose...

Page 41: ...connection type above you will be entered this menu Network Settings Info Displays the network status and settings if you want to use interface DHCP or not Nameserver Settings This option is required...

Page 42: ...u will find more advanced settings for the advanced user Auto Language Selection Choose which language that automatically should be chosen regarding Audio Subtitle and EPG Subtitle Settings Setup the...

Page 43: ...In case there are service lists available for a certain satellite or operator for example Thor Sirius or Hotbird you can download and install the lists in your current channel list If there isn t any...

Page 44: ...eter values that you need to decide as below Tuner Choose which tuner you want to use for the manual scan Type of Scan Type of Scan Transponder Satellite Multisat for S2 and Transponder Complete for C...

Page 45: ...our EPG settings according to your needs Setup the EPG layout and information but also from where your Miraclebox should get the EPG data from Setup EPG carefully to get the best possible performance...

Page 46: ...The following options are available Mount again Run to recover any lost connections to your Network Mounts Mount Manager With the Mount Manager you have everything you need to establish and manage you...

Page 47: ...u set Protect services at YES You will see two options White list Used to block all channels except those in the parental control list Black list Used to block only those channels included in the pare...

Page 48: ...you can easily restore them buy running this option A great feature when you have upgraded the Miraclebox F Install Local Extensions Install Plugins Addons or Extensions from any connected storage dev...

Page 49: ...the TV LED starts blinking 2 Press the POWER button the TV LED should be On 3a Manual Scan Press and release the UP DOWN button to start the manual scan 3b Automatic Scan Press and hold the UP DOWN bu...

Page 50: ...4659 3840 8394 3350 7910 4783 5605 Matsui 8644 6896 6230 7647 5605 8568 6482 7910 7507 7384 6812 4530 5265 3518 3270 8060 5739 5119 2438 7014 7733 3840 3637 4648 Panasonic 4526 5620 3001 3350 5605 478...

Page 51: ...off the Miraclebox Premium with the Power switch on the rear Insert the USB memory in the USB connection on the Front Panel 5 Power on the receiver using the Power switch 6 When you see the text Press...

Page 52: ...for a long time change the batteries Point the remote control directly towards the Miraclebox Make sure that nothing blocks the front panel display 4 Channel search problem Make sure that the Tuner co...

Page 53: ...Audio Analogue 2 x RCA Stereo USB 2 0 2 HDD WiFi Keyboard Bluetooth RS232 1 Ethernet 1 x 10 100 Mbit Fan 1 Power Power switch 1 Mains Voltage AC100 250V 50 60Hz Power consumption Max operation standb...

Page 54: ...we want to make certain that everyone understands that there is no warranty for this free software If the software is modified by someone else and passed on we want its recipients to know that what t...

Page 55: ...form under the terms of Sections 1 and 2 above provided that you also do one of the following a Accompany it with the complete corresponding machine readable source code which must be distributed unde...

Page 56: ...al distribution limitation excluding those countries so that distribution is permitted only in or among countries not thus excluded In such case this License incorporates the limitation as if written...

Page 57: ...User Manual Miraclebox Premium Twin HD Contact information Miraclebox Multimedia AB Sweden info miraclebox se www miraclebox se Miraclebox Multimedia AB 56 EN...

Page 58: ......

Reviews: