background image

Trimming a Clip 

To split a video clip: 

1.  Select the clip you want to split on the Media Clip List. 

2.  Drag the Jog Bar to the point where you want to cut the clip.  


3. Click 

Split Video

 to cut the clip into two clips. 

To remove one of these clips, select the unwanted clip and click 


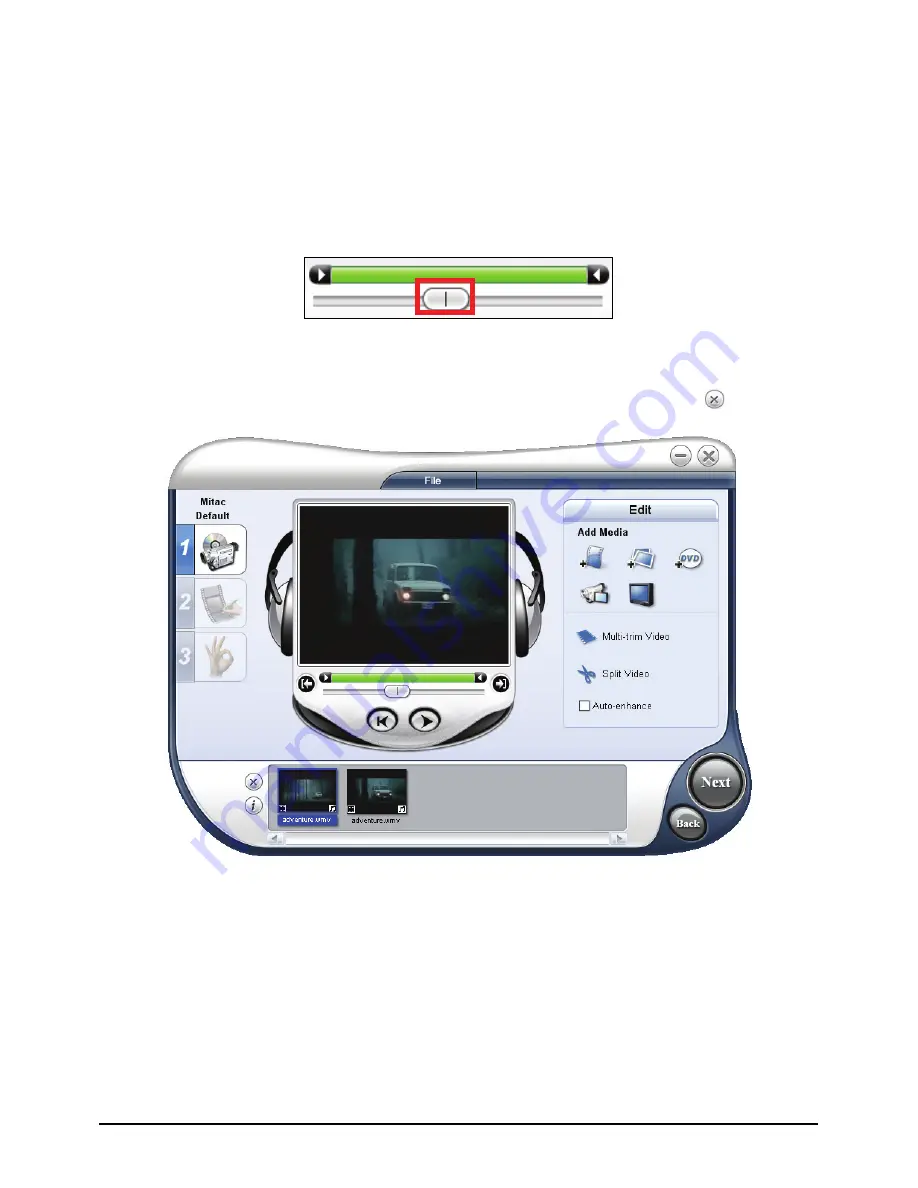
To trim a video clip with the Trim Bar: 

1.  Select the clip you want to split on the Media Clip List. 

2.  Click and drag the Trim handles on the Trim Bar to set the Mark-in/Mark-out 

points on the clip. 

97 

Summary of Contents for C520t

Page 1: ...User s Manual...

Page 2: ...oduct names are trademarks or registered trademarks of their respective companies Disclaimer Specifications and manuals are subject to change without notice Mio Technology assumes no liability for dam...

Page 3: ...e USB Cable 7 1 5 Using Your Device in a Vehicle 8 Using the Device Holder 8 Connecting the Car Charger 8 1 6 Operating Basics 9 Turning On and Off 9 Navigating on the Screen 9 Home Screen 10 Using th...

Page 4: ...iles 35 5 2 Connecting a Bluetooth Mobile Phone 36 Connecting a Mobile Phone for the First Time 36 Connecting a Different Mobile Phone 39 Using the Mobile Phone Shortcut 39 Disconnecting the Mobile Ph...

Page 5: ...he Storage Card 68 8 3 Managing Folders and Files 68 9 Settings 69 9 1 Starting and Exiting Settings 69 9 2 Backlight 70 9 3 Volume 71 9 4 Screen 72 9 5 Power 73 9 6 Date Time 74 9 7 Language 76 9 8 B...

Page 6: ...Selecting a Movie Style 101 Changing the Transition Effect 102 Editing Text 102 Change the Background Music 103 12 POI Loader 105 12 1 Installing POI Loader 105 12 2 Preparing the Source Files 106 Ex...

Page 7: ...Bluetooth 115 14 2 Safety Precautions 115 About Charging 115 About the AC Adapter 115 About the Battery 116 v...

Page 8: ......

Page 9: ...of the battery can cause malfunction and or danger GPS is operated by the United States government which is solely responsible for the performance of GPS Any change to the GPS system can affect the a...

Page 10: ...in an appropriate place so as not to obstruct the driver s view or deployment of airbags Do not mount where the driver s field of vision is blocked Do not place unsecured on the dashboard Do not moun...

Page 11: ...s Ref Component Description Touch Screen rmation Displays the output of your device Tap the screen with your fingertip to select menu commands or enter info Flashes in blue to indicate that Bluetooth...

Page 12: ...r This connector under rubber dust cover allows use of an optional external GPS antenna with magnetic mount which may be positioned on top of the car for better signal reception in areas with poor rec...

Page 13: ...tereo headphones Top Components Ref Component Description Power Button Turns on and off the device Pressing briefly or for a long duration makes a difference See Sections 1 6 and 13 1 for information...

Page 14: ...e power button to turn on and off your device 2 Your device turns on Immediately charge your device as described in the next section 3 The Switch Language screen appears Tap the arrow button to select...

Page 15: ...5 The Home screen appears You can now use your device 5...

Page 16: ...Do not immediately turn on your device after connecting the AC adapter to charge a power depleted battery If you need to turn on the device again wait for at least one minute Depending on your region...

Page 17: ...Whenever your device is connected to a computer you will not be able to use it NOTE When the device is connected to a computer it is recognized as an external mass storage device Do not delete any fil...

Page 18: ...device holder to mount your device in a vehicle Make sure that the GPS antenna has a clear view of the sky See the document supplied with the device holder for the installation instruction Connecting...

Page 19: ...the Home screen NOTE The screen you see after resuming depends on the program you were using when you suspended the device Some programs will be closed when you suspend the device meaning you can onl...

Page 20: ...creen appears The Home screen is your starting place for various tasks Tap a button to start a program or open another menu When you exit a program you are back to the Home screen No Button Name Descr...

Page 21: ...system settings Chapter 9 Using the Soft Keyboard There are occasions when you input text or numbers to your device For example you have to enter names addresses and phone numbers in the Contacts pro...

Page 22: ...tap a vowel letter repeatedly to input a different form of the letter Alternatively you can tap the letter in the pop up window as shown below Switch to the alphabet keypad Umlaut enabled Tap the but...

Page 23: ...he slot with the connector pointing to the slot and its label facing the front of the device To remove a card first make sure that no application is accessing the card then slightly push the top edge...

Page 24: ......

Page 25: ...ideos while driving It may be illegal in your state for a display showing a video to be in view of the driver Movie allows you to watch the video clips on your device See later section for the formats...

Page 26: ...NB QuickTime Movie mov eAAC MPEG4 AAC AAC QuickTime Movie mov AAC eAAC H 263 AAC AVI avi MPEG4 ADPCM AVI avi DivX MP3 3GP 3gp MPEG4 AAC AAC eAAC 3GP 3gp H 263 AAC AAC eAAC 3GP 3gp MPEG4 AMR NB 3GP 3g...

Page 27: ...will search the m The change of color indicates the file is selected Indicate the format of the video file together Exit Selected file NOTE The file information such as the length of the video and fi...

Page 28: ...Pause Play or pause the playback Stop Stop the playback Fast forward the video Tap the button to switch to the next option Fast Forward Switch to the next mode Single playback Playback Mode Repeated p...

Page 29: ...19 Control Button Name Description Volume Increase or decrease the volume The indicator at the bottom shows the current volume level Exit Stop the video playback and return to the video list screen...

Page 30: ......

Page 31: ...f MP3 WAV WMA files Basic playback controls such as play pause stop next and previous Playback includes single selection playback repeat single repeat sampling playback normal sequence and random sequ...

Page 32: ...y the files from your computer to the correct location See section 10 3 for information 3 3 Playing Audio Files 1 If your files are in a storage card insert the card into your device 2 Tap Audio on th...

Page 33: ...you press the power button or when the playback of the current play list has ended If the total length of a song exceeds 99 minutes and 59 seconds the information area cannot correctly display the le...

Page 34: ...the current play list in sequence Lyrics Opens the lyrics display Available only if the current song is with lyrics See section 2 5 for more information Minimize Minimizes the control panel and play t...

Page 35: ...fer to copy the lyrics to the correct location of your device See Section 10 3 for information When copying a lyric file to your device be sure to use the same filename as the audio file For example i...

Page 36: ...open the play list screen The screen shows the current play list Back Add song Remove the selected song from the list or from the storage media Save the play list Open the list of play lists Clear al...

Page 37: ...ard screen appears where you can change the default name of the play list Rename the play list if you want Tap when finished 6 To return to the control panel tap Opening a Play List To open one of the...

Page 38: ...ay list Open the selected play list Delete all play lists 4 To return to the control panel tap 3 7 Equalizer The program provides 11 preset audio profiles Tap to open the equalizer panel Tap or to cyc...

Page 39: ...ne on the right side of the screen Tap the check box to turn on the power saving mode Tap the up down button to set the timer to 10 seconds 30 seconds 1 minute or 5 minutes During the playback the scr...

Page 40: ......

Page 41: ...4 2 Preparing the Pictures for Your Device Before using the program have the files jpg jpeg or bmp ready on either device your rogram does not support the display of BMP files in 32 bit and above s My...

Page 42: ...card It then displays the pictures in the thumbnail view You can press the Up or Down arrow button to go to next or previous page Down Delete the selected picture Exit Start the slideshow Open the se...

Page 43: ...tap the picture again Control Button Name Description Slideshow Starts the slideshow See Section 3 6 for detailed information Interval Sets the length of time each slide is displayed before moving on...

Page 44: ...he picture Back Goes back to the thumbnail view 4 6 Viewing the Slideshow To view the slideshow of all your pictures use one of the following ways When in the thumbnail view tap to start the slideshow...

Page 45: ...free device for a Bluetooth mobile phone You can tap your device to place and receive phone calls instead of picking up the mobile phone and can use the built in speakers and microphone for your conve...

Page 46: ...discoverable mode See Section 8 8 for information 1 Make sure that the Bluetooth mobile phone is in discoverable mode 2 Tap Mobile Phone on the Home screen 3 The program will search for nearby Blueto...

Page 47: ...ing on the mobile phone model you may need to select the hands free service to complete the connection 7 When the connection is completed a message will appear on the screen Tap Yes 8 The shortcut men...

Page 48: ...n the Mobile Phone main menu you can place phone calls by tapping buttons on the screen See Section 5 3 for information 10 You can tap Back to minimize the screen and use other functions of the device...

Page 49: ...the shortcut menu tap Find Others Using the Mobile Phone Shortcut Once a Bluetooth connection has been established the shortcut will be saved When you next tap the Mobile Phone button on the Home scre...

Page 50: ...necting the Mobile Phone Tap the connected device in the shortcut menu and tap Disconnect when the message appears asking you to select your operation 5 3 Phone Operations Placing a Call After pairing...

Page 51: ...hold the 0 key until the sign appears To delete the last digit entered tap the Backspace button Tap and hold the button for about 1 second will clear the entire number Phone Book By tapping the Phone...

Page 52: ...le phone s phone book from your device use Bluetooth settings as described in Section 8 8 Call History By tapping the Call History button on the Mobile Phone main menu you can select a recent phone nu...

Page 53: ...iring with a mobile phone as described in Section 5 2 your device will ring and display the incoming call screen when there is an incoming call By default your device automatically answers the call in...

Page 54: ...he keypad and tap the digits Tap Mute to mute your sound so that the other party cannot hear you To end the mute mode tap the button again Tap to end the call Tap Voice to Phone to switch the call to...

Page 55: ...2 Tap Stereo on the Home screen 3 The program will search for nearby Bluetooth headsets if this is the first time you try to connect a headset NOTE If no device is detected the screen shows the short...

Page 56: ...e headset manual for the passkey 6 When the connection is completed a message will appear on the screen Tap Yes 7 The shortcut menu appears with the name of the connected device on top of the screen A...

Page 57: ...ect to Headset button on the Home screen the program will try to connect the last paired headset You can also tap a particular shortcut button to connect the particular headset Delete the selected sho...

Page 58: ......

Page 59: ...addresses and phone numbers NOTE If you have created Microsoft Outlook Contacts information on your computer you can copy the information to your device See Section 10 4 for information Tap on the Ho...

Page 60: ...the address of a contact call a contact and so on Tap one of the alphabet sets to quickly find a contact Tap twice to display the summary screen of a contact Add a contact Exit Edit the selected conta...

Page 61: ...ing to a Contact s Address You can set a contact s address as your GPS navigation destination 1 Tap the Contacts button on the Home screen to start the program 2 In the contact list select the desired...

Page 62: ...ur device with a Bluetooth mobile phone as described in Section 5 2 2 Tap the Contacts button on the Home screen to start the program 3 In the contact list select the desired contact and tap NOTE The...

Page 63: ...6 6 Managing Contacts Adding a Contact 1 Tap the Contacts button on the Home screen to start the program 2 Tap 3 Tap an entry field twice Or tap a field and then tap The soft keyboard appears 53...

Page 64: ...ields such as address and phone number fields You will need to scroll down to see all available fields NOTE When entering the address the soft keyboard guides you through different parts of the addres...

Page 65: ...ap the contact twice to open the summary screen or In the contact list tap the contact and then tap 2 Tap twice the field you want to edit and use the soft keyboard to edit If you want to clear a fiel...

Page 66: ......

Page 67: ...rsion can use these modes to perform basic arithmetic currency conversion and measure conversion functions You Tools Calculator Tap on the Home screen and then tap to start the program You will see th...

Page 68: ...Calculator Mode The Calculator mode allows you to perform any of the standard operations for which you would normally use a handheld calculator If you are currently not in the Calculator mode tap the...

Page 69: ...emory Memory Plus Adds the current value to the value in memory Memory Minus Subtracts the current value from the value in memory 7 3 Using the Currency Mode Use the Currency mode to perform the curre...

Page 70: ...played on the upper left corner of the input field Input field Currency indicator Currency scroll list Scroll bar Tap to go to the editing screen 4 Tap the down arrow next to the output field to displ...

Page 71: ...t field The converted currency immediately appears in the output field Input value Output value NOTE The program uses the default exchange rates unless you change them See the sub section below for in...

Page 72: ...the Conversion Mode The Conversion mode allows you to convert measures from one unit to another 1 Start the Calculator program as described in Section 7 1 2 Tap to switch to the Conversion mode 3 Tap...

Page 73: ...on of the unit will be displayed on the upper left corner of the input field Unit indicator Input field Unit scroll list 5 Tap the down arrow next to the output field to display a list of units and se...

Page 74: ...list 6 Enter the value in the input field by tapping the number buttons on the numeric keypad You can also perform basic arithmetic in the input field The converted value immediately appears in the o...

Page 75: ...er 8 1 Starting and Exiting File Manager File Manager storage card allows you to transfer multimedia files between your device and a Tap Tools on the Home screen and then tap File Manager to start the...

Page 76: ...ific folders refer to pre defined data folders for multimedia programs such as My Audio folder for the Audio program Other folders are not accessible within the File Manager program To exit the progra...

Page 77: ...en the folder 4 If the source file is in a folder of the storage card tap twice the folder in the right column to open the folder Or tap the folder and then tap to open the folder If you want to selec...

Page 78: ...he direction is from the left column to the right column 8 3 Managing Folders and Files In addition to copying files File Manager provides the below functions Rename Changes the name of the selected f...

Page 79: ...customize the system settings such as backlight brightness volume an language Once you change the settings the new settings will remain until you change them again d Settings Tap the button on the Hom...

Page 80: ...Tap the Settings button on the Home screen 2 Tap the 9 2 Backlight Backlight button Move the knob along the trac 3 k bar to adjust the brightness of the backlight To darken the backlight m m ove the k...

Page 81: ...utton on the Home screen 2 Tap the Volume button 3 Move the knob along the track bar to adjust the volume To decrease the volume move the knob to the left To increase the volume move the knob to the r...

Page 82: ...calibrate the touch screen if it is not responding accurately to your taps 1 Tap the Settings button on the Home screen 2 Tap the Screen button 3 Tap to start the calibration 4 Tap and hold the centr...

Page 83: ...heck the remaining power level of your battery and or set up the power saving feature 1 Tap the Settings button on the Home screen 2 Tap the Power button 3 The screen shows the remaining power of your...

Page 84: ...4 Tap to save the changes 9 6 Date Time 1 Tap the Settings button on the Home screen 2 Tap the Date Time button 3 To change the time zone tap the arrow in the Time Zone item 74...

Page 85: ...e later month and year Alternatively you can tap the month or year on top of the calendar to directly change the month or year When the calendar shows the current month tap the date on the calendar 5...

Page 86: ...1 Tap the Settings button on the Home screen 2 Tap the Language button 3 Tap the up down arrow button to select the desired language 4 Tap to save the changes 5 Tap the button for the new setting to t...

Page 87: ...gs button on the Home screen 7 Tap the Bluetooth button 8 The Bluetooth Settings screen contains 3 buttons as described below 9 After you complete your settings in a screen tap Done 10 Tap Back to go...

Page 88: ...appears for you to enter the new name Enable Bluetooth The Bluetooth radio is on when this item is checked Uncheck this item if you want to turn off the Bluetooth radio Discoverable Bluetooth Check th...

Page 89: ...ete particular data as listed below check the corresponding item s in the Delete preferences screen Phonebook phone number Empty call history A message will appear on the screen asking if you want to...

Page 90: ...3 Tap 80...

Page 91: ...photos your device and a computer To install MioTransfer to your computer between 2 age selecting screen appears click the language that you wish 1 Turn on your computer and insert the supplied CD DVD...

Page 92: ...MioTransfer icon on the Windows Desktop to start the program The MioTransfer screen appears It provides the following tools Audio Allows you to transfer the audio files between your device and your c...

Page 93: ...without following the correct removal procedure can result in data loss 10 3 Copying Multimedia Files to Your Device Before playing multimedia files such as MP3 files you need to have the files ready...

Page 94: ...the drives of your computer and the right column shows the files in the appropriate folder of the target device either or Target Device 6 Select your target device by clicking one of the icons the fl...

Page 95: ...rom the right column and select a folder on the left column to place these files Then click to start the file transfer Managing Files Various buttons are available for you to manage the files Rename C...

Page 96: ...in on your device or on your computer For information on Contacts see Chapter 6 1 Turn on your computer and your device 2 Connect the mini USB end of the USB cable to the bottom of your device and the...

Page 97: ...87...

Page 98: ......

Page 99: ...g tools such as trimming the clip and adding special effects to create a customized project CD DVD ROM drive of your computer 2 electing screen appears click the language that you installation 11 2 In...

Page 100: ...f this panel change depending on the step you are in and the selected project element Step buttons Click to go to the next or previous step Media Clip List Displays the clips transition effects and te...

Page 101: ...ox 2 0 Home Edition Video ToolBox 2 0 Home Edition 2 On the first screen click Enter Step 2 Add Edit Media Clip 3 Click one of the Add Media buttons depending on your media source For detailed informa...

Page 102: ...4 Click Next to continue Step 3 Choose Style 5 If you want you can choose a movie style from the available themes and edit movie style elements If you do not want to apply a style for your project sel...

Page 103: ...6 Click Next to continue Step 4 Create Video File 7 Click Create to save your video file in the selected output video format 8 In the dialog box enter the filename and click Save 93...

Page 104: ...1 Click Capture Digital Video 2 Click Toggle Display 3 Specify a Capture folder in which to save video files 4 Click Options to open a menu for customizing more capture settings The available options...

Page 105: ...y 3 Specify a Capture folder in which to save video files 4 Click Capture Video to start capturing Click Stop Capture or press the Esc key to stop capturing 5 Click OK Capturing Still Images In additi...

Page 106: ...re added the editing tools include Multi trim Video Allows you to choose desired segments from a video file and extract them Split Video Cuts the selected clip into two Auto enhance Select to automati...

Page 107: ...ou want to cut the clip 3 Click Split Video to cut the clip into two clips To remove one of these clips select the unwanted clip and click To trim a video clip with the Trim Bar 1 Select the clip you...

Page 108: ...licking to determine how you want to mark segments If you want to mark segments to retain click Selection Mode then select Retain selection Otherwise select Delete selection if you prefer to mark segm...

Page 109: ...ances through the video in fixed increments By default these buttons move up or down through the video in increments of 25 seconds To change this tap the up or down arrow to adjust the value Click and...

Page 110: ...l or Shift to select multiple files you want to include in the slideshow and click Open The duration of each image can be set in the Preferences dialog box Media Clip List Editing tools Use the rotate...

Page 111: ...ransition effects and background music Select background music Style elements are added to the Media Clip List Select a style Selecting a Movie Style In the Options Panel click the style you want to u...

Page 112: ...k the transition effect you want to change 2 In the Options Panel select a transition effect from the drop down menu NOTE You can click Delete All to remove all transition effects in the Media Clip Li...

Page 113: ...to change the shadow color Change the Background Music 1 Click the button 2 In the Options Panel click Open Audio File In the dialog box locate the audio file you want to use for your background musi...

Page 114: ......

Page 115: ...ons will be added to the My POI category of the POI function of MioMap See MioMap manual for information on POIs uter 1 Turn on your computer and insert the supplied CD DVD into the CD DVD ROM drive o...

Page 116: ...alues of the WGS84 system The letter N S E W before the value indicates the hemisphere North South East West If the letters are omitted the program will simply match the values to your location of hem...

Page 117: ...your device to your computer 4 Click the POI Loader shortcut on the Windows desktop 5 Click Next 6 Select your device from the pull down menu that lists all the available removable disk s connected t...

Page 118: ...hout following the correct removal procedure can result in data loss Using the Imported POIs with Your Device Every time you want to use your POIs you must insert the SD card before running MioMap Mio...

Page 119: ...restart your device press the power button for 5 seconds until the Power Off Selection screen appears and then tap Restart down ware failure prevents the Power Off Shutting Down Your Device To shut do...

Page 120: ...unt assistance Power Problems Power does not turn on The remaining batte when using battery power ry power may be too low to run your device Charge the slowly device is not running out of battery powe...

Page 121: ...GPS reception can be affected by Bad weather Dense overhead obstacles e g trees and tall buildings Other wireless device in the car Reflective car window tint and heated screens trying to establish a...

Page 122: ...will void any warranty Do not store or carry flammable liquids gases or explosive materials in the same compartment as your device its parts or accessories Keep your device away from excessive moistu...

Page 123: ...nterference Statement This device complies with Part 15 of the FCC Rules Operation is subject to the following two conditions 1 This device may not cause harmful interference 2 This device must accept...

Page 124: ...ay void the user s authority to operate the equipment ements of the Canada respecte toutes les exigences du R glement Canadien sur le mat riel brouileur to correct the interference by one or more of R...

Page 125: ...ger approved by the manufacturer About the AC Adapter Do not use the adapter in a high moisture environment Never touch the adapter when your hands or feet are wet Allow adequate ventilation around th...

Page 126: ...rns do not disassemble crush puncture or dispose of in fire or water Important instructions for service personnel only Caution Risk of explosion if battery is replaced by an incorrect type Dispose of...

Reviews: