background image

2

ASSEMBLY INSTRUCTIONS

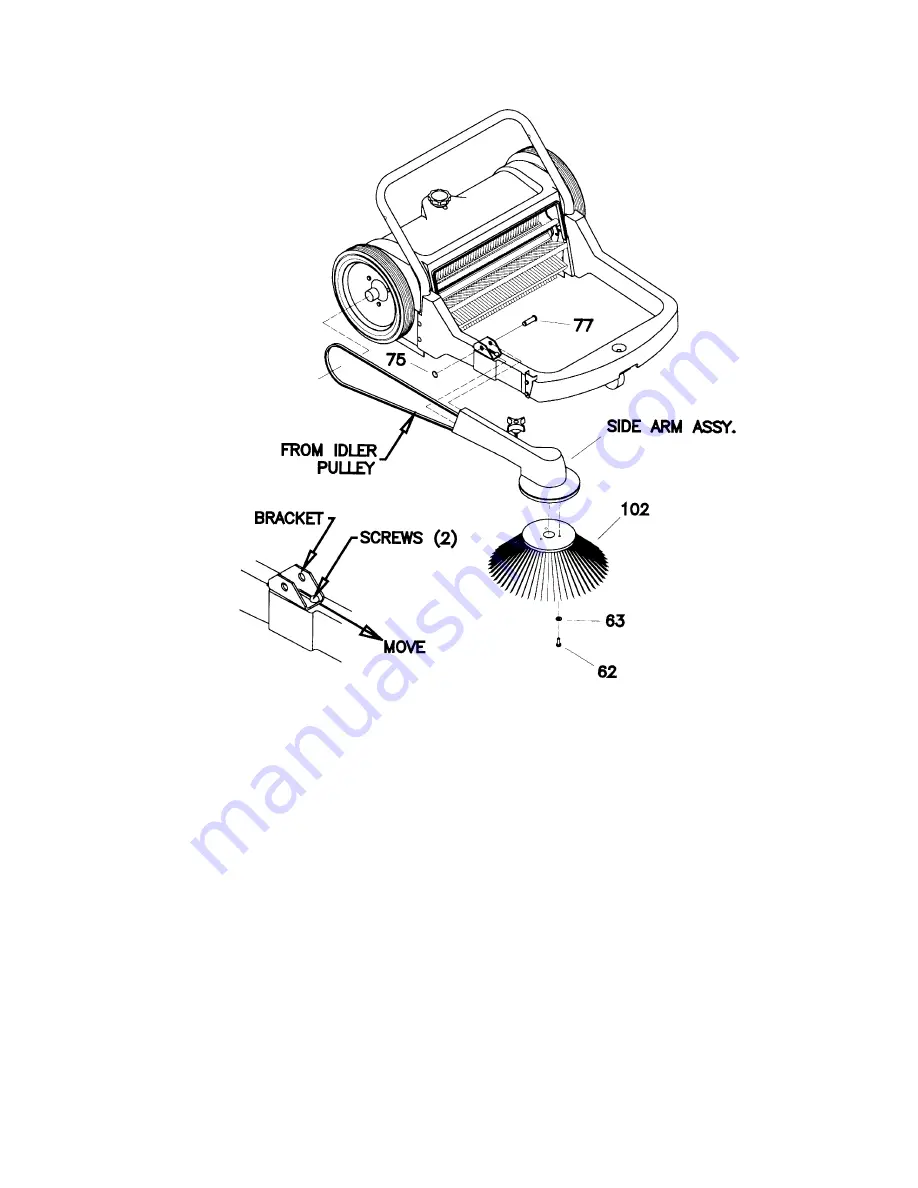
1. Mount the side broom (102) to the brush plate on the side arm assembly using (3) hex head bolts

(62) with flat washers (63).

2. Position the v-belt from the side arm assembly around the pulley attached to the backside of the

right wheel. In order to do this it will be necessary to twist the v-belt. The lower loop of the v-belt
should be coming from the idler pulley (not from the broom pulley).

3. Attach the side arm assembly to the hinge bracket on the frame by aligning the bushing in the

side arm with the holes in the sides of the hinge bracket and inserting a pin (77). Secure the pin
in place by inserting a retaining ring (75) into the groove in the pin.

4. Check for proper rotation and operation of the side broom. The broom should rotate

counterclockwise when the sweeper is pushed forward - if not the v-belt was installed incorrectly.
If the belt slips the tension can be adjusted by loosening the 2 screws that attach the hinge
bracket to the frame, move the bracket forward, then re-tighten the screws.

Summary of Contents for Kleen Sweep 27 C89000-00

Page 1: ...Model C89000 00 Kleen Sweep 27 Revised 8 02 OPERATION SERVICE PARTS CARE...

Page 2: ...otate in both directions depending on forward or backward motion The main broom assembly is a split core design Refer to page 4 Item 45 of the Parts Manual When replacing broom assembly both halves sh...

Page 3: ...3 Attach the side arm assembly to the hinge bracket on the frame by aligning the bushing in the side arm with the holes in the sides of the hinge bracket and inserting a pin 77 Secure the pin in place...

Page 4: ...3...

Page 5: ...4...

Page 6: ...sket 105 850059 1 Guide Plate 106 107 711566 8 WSR Flat 259 x 5 x 07 108 711517 2 WSR Flat 75 x 1 38 x 03 109 711149 6 SCR HI LO 14 x 1 00 Item Part No Qty Description 1 360108 1 Handle Sleeve 2 85003...

Page 7: ...on Hopper 2 460000 1 Handle 3 711204 2 BLT HH 1 4 20 x 3 4 STPL 4 850025 1 Dust Ramp 5 850060 1 Dust Flap Brace 6 850016MCH 1 Hopper Flap 7 711160 6 SCR HI LO No 10 x 75 PL 8 715518 1 Decal Kleen Swee...

Page 8: ...3 1 Bearing 6003 Seal 7 711319 1 Nut Hex 5 16 18 STPL 22 850013PTD 1 Front Brush Cover 8 840059 1 Cap Thread Cover 23 850027 1 Rubber Ring 9 710178 2 SCR MC 1 4 20 x 50 STPL 24 711615 1 Roll Pin 125 x...

Page 9: ...t and left side are determined from the operators position 4 Pinion with part number 74 79 LB is to be replaced on the left side of the shaft Part number 74 78 RB is for the right side Line up the pin...

Page 10: ...l warranteed items become the sole property of Minuteman International Inc or its original manufacturer whichever the case may be Minuteman International Inc disclaims any implied warranty including t...

Reviews: