background image

BASIC ADJUSTMENT SETTINGS

page24

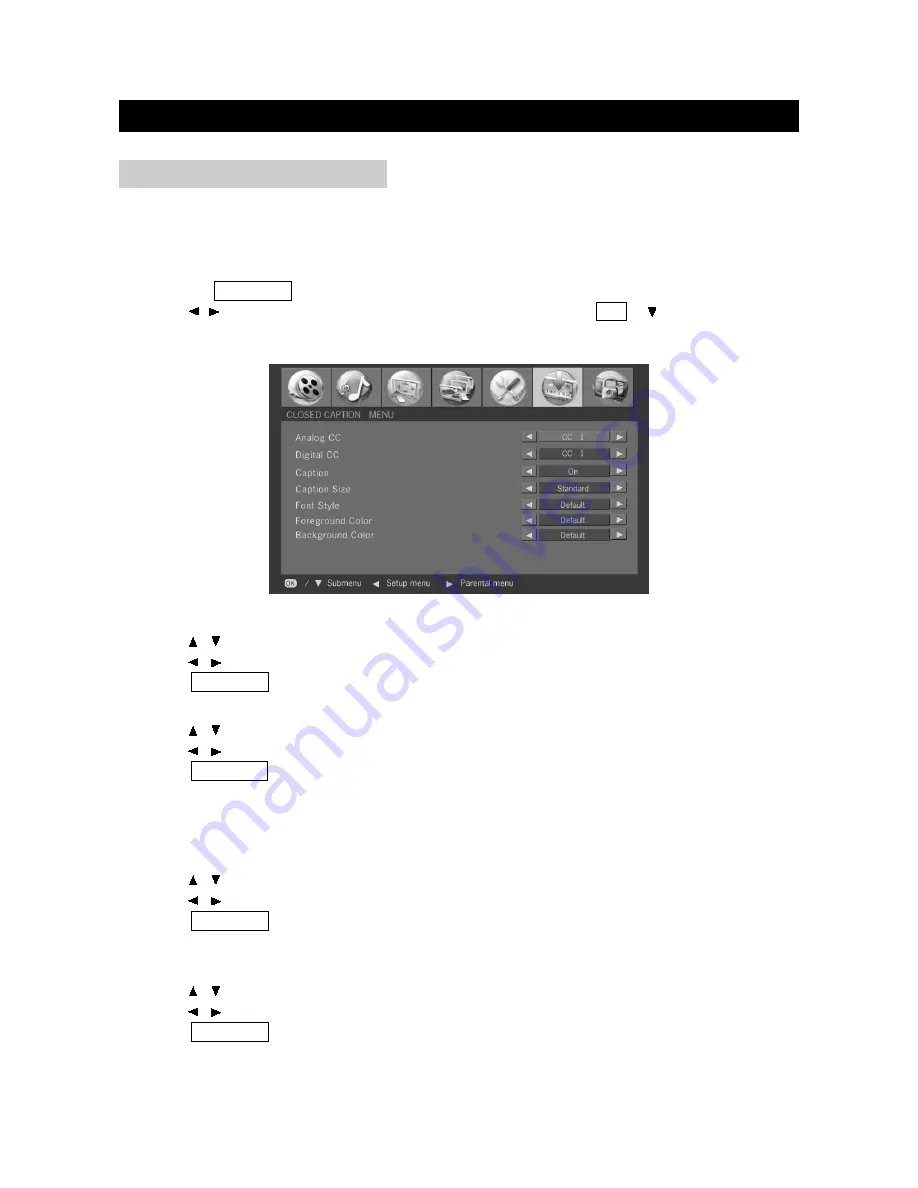
CLOSED CAPTION MENU

Your system is equipped with an internal closed caption decoder; closed caption is the system that
allows you to view conversations, narration, and sound effects in TV programs and home videos
as subtitles on your display.
Only in Digital TV, Analog TV, Composite and S-Video mode, there is Closed Caption menu.
1. Press the  TV MENU  button to enter LCD menu.
2. Press /    to select "CLOSED CAPTION MENU", and then press  OK  or to enter "Closed 

Caption" menu.

ANALOG CC

1. Press    /    to select "Analog CC" in "Closed Caption" menu.
2. Press    /    to select a closed caption among: OFF, CC1, CC2, TEXT1, and TEXT2.
3. Press  TV MENU  to exit.

DIGITAL CC

1. Press    /    to select "Digital CC" in "Closed Caption" menu.
2. Press    /    to select a closed caption among: OFF, CC1, CC2, CC3, CC4, CC5, and CC6.
3. Press  TV MENU  to exit.

Note:

a. Only in Digital TV mode, digital CC is available.

b. In digital TV mode, the  "Analog CC" is preferential. If you want to view "Digital CC", only 

set "Analog CC"  to "OFF" in CLOSED CAPTION MENU.

Caption

1. Press    /    to select "Caption" in "Closed Caption" menu.
2. Press    /    to select a closed caption mode among: Off, On, and On Mute.
3. Press  TV MENU  to exit.

Note:

In ANALOG TV, Composite and S-Video mode, only Analog CC and Caption are available.

Caption Size

1. Press    /    to select "Caption Size" in "Closed Caption" menu.
2. Press    /    to select a closed caption size among: Standard, Large, and Small.
3. Press  TV MENU  to exit.

Summary of Contents for DTV-265-D

Page 1: ...DTV 265 D OWNER S MANUAL 26 LCD HDTV With Built in DVD Player ...

Page 2: ... 810 20 GROUNDING CONDUCTORS NEC SECTION 810 21 GROUND CLAMPS POWER SERVICE GROUNDING ELECTRODE SYSTEM NEC ART 250 PART H GROUND CLAMP ELECTRIC SERVICE EQUIPMENT NEC NATIONAL ELECTRICAL CODE For added protection for this television equipment during a lightning storm or when it is left unattended and unused for long periods of time unplug it from the wall outlet and disconnect the antenna This will...

Page 3: ...URNING ON THE POWER TURNING OFF THE POWER SIMPLE BUTTON OPERATIONS FOR CHANGING CHANNELS USING FLASHBACK ON THE REMOTE UNIT SIMPLE BUTTON OPERATION FOR CHANGING VOLUME SOUND ELECTRONIC PROGRAM GUIDE SETTING MTS SAP STEREO MODE BASIC ADJUSTMENT SETTINGS VIDEO MENU AUDIO MENU SCREEN MENU CHANNEL MENU SETUP MENU CLOSED CAPTION MENU PARENTAL MENU WINDOW ADJUSTMENT TROUBLESHOOTING TECHNICAL SPECIFICATI...

Page 4: ...UDIO MODE MUTE FAST PLAY REPEAT PLAY ZOOM PLAY SELECT SUBTITLES PROGRAM PLAY SHUFFLE RANDOM PLAY MENU SETTING GENERAL SETUP AUDIO SETUP PASSWORD SETUP PREFERENCES TROUBLESHOOTING TECHNICAL SPECIFICATIONS 33 37 33 33 33 36 36 36 37 37 41 37 37 38 38 39 39 40 41 42 46 43 44 44 45 45 46 47 48 TABLE OF CONTENTS FOR DVD PLAYER ...

Page 5: ... and if not installed and used in accordance with the instructions may cause harmful interference to radio communications However there is no guarantee that interference will not occur in a particular installation If this equipment does not cause harmful interference to radio or television reception which can be determined by turning the equipment off and on the user is encourage to try to correct...

Page 6: ... them or objects from resting on them Check the cords at the plugs and product 8 Overloading Do not overload AC outlets or extension cords Overloading can cause fire or electric shock 9 Entering of objects and liquids Never insert an object into the product through vents or openings High voltage flows in the product and inserting an object can cause electric shock and or short internal parts For t...

Page 7: ... cart stand tripod or table Unstable installation is likely to make the product fall resulting in serious injuries as well as material damage Use only the cart stand tripod bracket or table specified by the manufacturer or sold with the apparatus 19 When a cart is used use caution when moving the cart apparatus combination to void injury from tip over 20 Ventilation The vents and other openings in...

Page 8: ... P MODE VIEW MODE PREV NEXT FR FF CC FLASHBACK TV MENU REPEAT AUDIO VIEW MODE MTS SAP EJECT RC 600B PLAY MODE SUBTITLE OSD DVD TITLE DVD MENU 10 EPG TV DVD DTV 265 D OWNER S MANUAL 26 LCD HDTV With Built in DVD Player AV cables Power cord User guide Remote control It also include batteries 2 Warranty card Component Video Cable or Y Pb Pr cable Audio cable for PC input ...

Page 9: ...lay or operate the remote control unit closer to the remote sensor window CAUTIONS REGARDING REMOTE CONTROL UNIT Use the remote control by pointing it towards the remote sensor on the TV Objects between the remote control and the sensor may disrupt operation Effective range is 20 feet but is dependant on what your viewing angle is Range can also be affected by direct sunlight on the TV s sensor US...

Page 10: ... CD disc to play under DVD status In other status insert a disc to change to DVD status 10 PLAY PAUSE BUTTON Use to begin or pause the DVD playback Only 12cm discs can be inserted 11 STOP Use to stop the DVD playback 12 PREV Use to skip to the previous chapter 13 NEXT Use to skip to the next chapter 14 EJECT BUTTON Use to eject the disc being played in the disc slot And the TV set returns to the p...

Page 11: ... R AUDIO VIDEO AUDIO CB PB Y CR PR L R S VIDEO L R Y PB PR INPUT 1 OUTPUT INPUT A N T I N 1 DVI Input 2 HDMI Input 3 AUDIO DVI Input 4 RS 232 Terminal 5 Component Video Y PB CB PR CR and Audio Input 6 INPUT1 Composite Video S Video and Audio Input 7 Audio Output 8 Antenna In 9 INPUT2 Composite Video and Audio Input ...

Page 12: ...E Use to select between Favorite Mode On and Favorite Mode Off Favorite Mode On press CH to select your favorite channel in favorite channel list Favorite Mode Off press CH to select the all channel searched Note Only in TV mode Favorite button is available REMOTE CONTROL page8 DVD OK 5 6 7 8 1 2 3 4 9 FAVORITE SETUP VOL CH MUTE ZOOM 100 TV VIDEO S MODE P MODE VIEW MODE PREV NEXT FR FF CC FLASHBAC...

Page 13: ...playback 23 ZOOM Use to zoom the DVD playback picture 24 SETUP Use to bring up the DVD setup menu 25 DVD Press to change to DVD mode directly 26 Use to begin pause the DVD playback 27 DVD MENU Use to bring up the DVD root menu 28 FLASH BACK Use to return to the previous channel In other mode press it to change to the previous mode 29 MUTE Use to mute the sound 30 CH Use to skip to the next previou...

Page 14: ...NECTIONS page10 g f b d c e DVI Audio Cable VIDEO L R AUDIO INPUT 2 DVI INPUT INPUT HDMI DVI INPUT AUDIO R S 2 3 2 L R AUDIO VIDEO AUDIO CB PB Y CR PR L R S VIDEO L R Y PB PR INPUT 1 OUTPUT INPUT A N T I N ...

Page 15: ...tton and the buttons to set the DTV 265 D s signal source to Composite 2 d Using the S Video and RCA Audio input Connect AV equipment to the DTV 265 D through the S Video and Audio input jacks on the back use the VIDEO button and the buttons to set the DTV 265 D s signal source to S Video e Using the Component input The Component input may be used for Progressive scan or HDTV inputs use the VIDEO ...

Page 16: ...omposite 2 S Video Component DVD HDMI DVI TURN ON THE POWER TURN OFF THE POWER SOURCE MENU CH CH VOL VOL ON OFF POWER SOURCE 1 Press POWER button on the front panel to turn on the TV set The POWER indicator lights up green 2 If the STANDBY indicator still lights up red press POWER on the remote control to turn the TV set on 1 Press POWER on the remote control the image on the screen disappears and...

Page 17: ...nt panel to turn on the TV set The POWER indicator lights up green 2 If the STANDBY indicator still lights up red press POWER on the remote control to turn the TV set on 1 Press POWER on the remote control the image on the screen disappears and the STANDBY indicator lights up red NOTE Weak electric power is still consumed even when the power is turned off 1 Press CH to increase channel number 2 Pr...

Page 18: ...the channels directly by pressing the number buttons EXAMPLE To select a 1 digit channel e g channel 2 Press 2 To select a 2 digit channel e g channel 12 Press 1 followed by 2 USING FLASHBACK ON THE REMOTE UNIT NUMBER BUTTONS OK 5 6 7 8 1 2 3 4 9 FAVORITE VOL CH MUTE 100 S MODE P MODE CC FLASHBACK TV MENU MTS SAP 10 FLASHBACK OK 5 6 7 8 1 2 3 4 9 FAVORITE VOL CH MUTE 100 S MODE P MODE CC FLASHBACK...

Page 19: ...h A B C D E A Displays titles about upcoming programs of the currently channel selected B Displays which channel is currently selected C Other details about the selected digital programs D Displays the content for the selected digital programs E Displays the start and end times of the selected digital programs Note The availability of details depends on the broadcaster When the TV program being pl...

Page 20: ...und The normal program soundtrack either in mono or stereo SAP sound Listen to second language supplementary commentary and other information SAP is mono sound If stereo sound is difficult to hear Obtain a clearer sound by manually switching to fixed mono sound mode Note Once MONO mode is selected the sound remains mono even if the System receives a stereo broadcast You must switch the mode back t...

Page 21: ...ess press OK to return to the Video menu 4 Press TV MENU to exit Contrast 1 Press to select Contrast in Video menu 2 Press OK to enter the Contrast menu 3 Press to adjust the contrast press OK to return to the Video menu 4 Press TV MENU to exit Saturation 1 Press to select Saturation in Video menu 2 Press OK to enter the Saturation menu 3 Press to adjust the saturation press OK to return to the Vi...

Page 22: ... Mode 1 Press to select Temperature Mode in Video menu 2 Press to select a Temperature Mode among Cool Normal Warm and User When User is selected the screen shows 3 Press to select Temperature R Temperature G Temperature B and press to adjust 4 Press TV MENU to exit ...

Page 23: ... treble 3 Press TV MENU to exit BASIC ADJUSTMENT SETTINGS page19 AUDIO MENU Adjust the quality of the sound through the following Audio menu Press the VIDEO button to select various signal modes Press the TV MENU button to enter LCD menu Press to select AUDIO MENU and then press OK or to enter Audio menu Multi Channel Sound only in Analog TV mode 1 Press to select Multi Channel Sound in Audio menu...

Page 24: ...Horizontal Position menu 3 Press to adjust the horizontal position of the playback picture 4 Press OK to return press TV MENU to exit Vertical Position 1 Press to select Vertical Position in Screen menu 2 Press OK to enter the Vertical Position menu 3 Press to adjust the vertical position of the playback picture 4 Press OK to return press TV MENU to exit Position Reset 1 Press to select Position R...

Page 25: ...ITE button and then enter into the channel menu after searching all the TV program 2 Press OK or to select ANALOG in Favorite Channel And the ANALOG displays the current channel press to select your favorite TV programs i e A8 Then press OK to put the current channel i e A8 into the favorite list It will appear a list mark 3 Exit the TV menu And press FAVORITE button to select Favorite Mode On 4 P...

Page 26: ...t channel to play when the auto search ends Fine Tune When the auto search ends or is stopped the screen shows 1 Press to select Fine Tune in Channel menu 2 Press OK to enter the Fine Tune menu 3 Press to adjust the current channel clearer as your desired 4 Press OK to return press TV MENU to exit NOTE Fine Tune only works on Analog TV channels Air Cable 1 Press to select Air Cable in Channel menu...

Page 27: ...exit Sleep 1 Press to select Sleep in Setup menu 2 Press to set the sleep time among Off 15Mins 30Mins 45Mins 60Mins 90Mins and 120Mins 3 Press TV MENU to exit Menu Transparency 1 Press to select Menu Transparency in Setup menu 2 Press to adjust the menu transparency 3 Press TV MENU to exit Menu Timeout 1 Press to select Menu Timeout in Setup menu 2 Press to set the menu timeout among Off 10Second...

Page 28: ... OFF CC1 CC2 TEXT1 and TEXT2 3 Press TV MENU to exit DIGITAL CC 1 Press to select Digital CC in Closed Caption menu 2 Press to select a closed caption among OFF CC1 CC2 CC3 CC4 CC5 and CC6 3 Press TV MENU to exit Note a Only in Digital TV mode digital CC is available b In digital TV mode the Analog CC is preferential If you want to view Digital CC only set Analog CC to OFF in CLOSED CAPTION MENU C...

Page 29: ...ss to select Foreground Color in Closed Caption menu 2 Press to select a foreground color among Default Black Green Blue Red Purple Orange and Yellow 3 Press TV MENU to exit Background Color 1 Press to select Background Color in Closed Caption menu 2 Press to select a background color among Default White Green Blue Red Purple Orange and Yellow 3 Press TV MENU to exit Note When Digital CC is off Ca...

Page 30: ...ntal menu 1 Press the TV MENU button to enter LCD menu 2 Press to select PARENTAL MENU and then press OK or to enter Parental menu The password menu displays 3 Enter the password with number buttons and press OK to confirm The factory password is 9999 After entering the password the following screen will be displayed ...

Page 31: ... Press to select desired MPAA position and press OK to confirm 4 Press TV MENU to exit Note If Status is not set to ON the configuration settings will not work Change Password 1 Press to select Change Password in Parental menu 2 Press OK to display the Change Password menu MPAA Movie Rating 1 Press to select MPAA in Parental menu 2 Press OK to display the MPAA menu ...

Page 32: ...rating items do as follows Press to access block content items from the currently selected age based rating item Press to select an individual item and then press OK to confirm Repeat the same step for other items Press to return to the previous menu 4 Press TV MENU to exit Note If Status is not set to ON the configuration settings will not work Status 1 Press to select Status in Parental menu 2 P...

Page 33: ...ou selected is 60Hz Setup your PC software Even if your actual display setting screen looks different from the windows below basic setup methods will be applied in most of the case 1 First click on Setting on the Windows Start menu While Setting is selected move the cursor to submenu Control panel Resolution VGA SVGA XGA WXGA 640 480 640 480 640 480 800 600 800 600 800 600 1024 768 1024 768 1024 7...

Page 34: ... displays 4 Navigate to the Setting tab on the display dialog box Set the Screen resolution to 1024 768 pixel 5 Select the screen refresh rate of your PC if the resolution is 1024 768 pixel the screen refresh rate 60Hz 2 Click on Control panel the control panel screen appears ...

Page 35: ...ic or neon sign disturbs the sound effect Check the susceptible interference by other electronic devices such as radio and television and keep magnetic or electronic devices away from the TV Long distance from the station or other radio waves can generate bad sound Reception If so change the mode to Mono Check if the batteries in the Remote control die Check if any object between IR sensor of the ...

Page 36: ... ANTENNA IN LCD DIMENSION WEIGHT TV FUNCTION TERMINALS INPUT POWER SOUND OUTPUT POWER CONSUMPTION 26 WIDE LCD 1366 X 768 176 176 600 1 500 MORE THAN 99 99 26 18 X 22 24 X 7 72 inch 665 X 565 X 196 mm 665 X 495 X 100 mm 26 18 X 19 49 X 3 94 inch NTSC ATSC ELECTRIC TUNING SYSTEM VHF UHF 125 CHANNELS AC100 240V 50 60Hz 8W 8W 150W VIDEO S VIDEO AUDIO L R Y Pb Cb Pr Cr AUDIO OUT DVI CONNECTOR HDMI IN H...

Page 37: ... resume the playback OSD The On Screen Display OSD contains many playback features To see the Display press the OSD button on the remote while a disc is playing The Display appears across the top of the screen Each feature is illustrated with an icon Use the or buttons on the remote to move through the different icons in the Display When an icon is highlighted use the or butons on the remote to sc...

Page 38: ...splay 1 While the disc is playing press OSD on the remote to bring up the Display DVD 2 Press the or buttons to highlight the Chapter icon 3 Press the or buttons to go to the previous or next chapter Notes The chapter feature won t work if the disc isn t formatted with separate chapters You can also advance to the next chapter by pressing on the remote and go to the preceding chapter by pressing o...

Page 39: ...emote Using the Repeat Feature The default mode for the Repeat feature is off There are three Repeat options All repeats the disc that is playing Title repeats the title that is playing Chapter repeats the chapter that is playing To Use Repeat 1 While a disc is playing press OSD on the remote to bring up the Display 2 Highlight the Repeat icon 3 Press the or buttons to scroll through the Repeat op...

Page 40: ...the volume VOLUME DVD CD DVD Menu Play Some DVDs have title menus and chapter menus Press PLAY the screen shows the menu Press or to skip to the next or previous page Select with number buttons or direction buttons Example select track 13 1 Press to enter the next menu 2 Press number buttons to select directly You can also select as follows 1 Press to select track 13 2 Press PLAY to start playing ...

Page 41: ... 1 If the track number isn t over 10 just push buttons 1 10 Example push 8 to select track 8 The screen shows 2 If the track number is over 10 press 10 once and a button between 1 10 Example if you select track 12 press 10 once and button 2 The screen shows Select with Number Buttons CD TRACK08 20 00 00 TRACK12 20 00 00 AUDIO 1 2 AC 3 5 1CH AUDIO 2 2 AC 3 5 1CH DVD CD DVD 8 AUDIO page37 BASIC OPER...

Page 42: ...LAY DISCS IN VARIOUS WAYS Repeat Play This function can be used to repeatedly play a title chapter track or a whole disc DVD CD You can repeat a title or chapter 1 To repeat a chapter Press REPEAT the screen will show 2 To repeat a title Press REPEAT twice the screen will show 3 To repeat all Press REPEAT third time the screen shows ALL 4 To remove REPEAT function Press REPEAT until ALL disappears...

Page 43: ...ure is in normal size 2X DVD 3X 2X 1 4 3X 4X 1 2 1 3 and ZOOM DVD SETUP ZOOM VIEW MODE PREV NEXT FR FF REPEAT AUDIO VIEW MODE EJECT RC 600B PLAY MODE SUBTITLE OSD Select Subtitles This operation works only with discs with multiple subtitle languages recorded DVD 1 Press SUBTITLE repeatedly until the desired language is selected The screen shows 2 Remove the subtitle Press SUBTITLE until the screen...

Page 44: ... _ _ CH _ _ 09 TT _ _ CH _ _ 05 TT _ _ CH _ _ 10 TT _ _ CH _ _ EXIT NEXT PROGRAM TT 20 CH 01 TT 0 8 CH 0 1 06 TT _ _ CH _ _ 02 TT _ _ CH _ _ 07 TT _ _ CH _ _ 03 TT _ _ CH _ _ 08 TT _ _ CH _ _ 04 TT _ _ CH _ _ 09 TT _ _ CH _ _ 05 TT _ _ CH _ _ 10 TT _ _ CH _ _ EXIT START NEXT DVD PLAY MODE DVD SETUP ZOOM VIEW MODE PREV NEXT FR FF REPEAT AUDIO VIEW MODE EJECT RC 600B PLAY MODE SUBTITLE OSD 1 Press P...

Page 45: ...ing The screen shows 2 Shuffle or random play will begin 3 Remove shuffle or random play When playing a DVD disc press twice When playing a CD disc press twice Shuffle Random Play The unit can play DVD chapters or audio tracks in random order The order is different each time DVD CD SHUFFLE RANDOM OR PLAY MODE ...

Page 46: ...ross the top of the screen illustrating General Setup Audio Setup Preference Password Setup and Exit Setup The screen shows Setup Menu Main page General Setup Audio Setup Preferences Password Setup Exit Setup Go To General Setup Page Press direction buttons to select Left Mono The screen shows The screen shows Press direction buttons or to highlight Dolby Digital Setup and press PLAY to enter Dolb...

Page 47: ...eo Left Mono Right Mono Mixed Mono D R C Audio Setup Press PLAY to confirm your selection Set Dual Mono in Dolby Digital Setup to Left Mono The sereen shows General Setup The setting structure is General Setup Page TV Display Wide Normal PS Normal LB Wide OSD Lang ENG English French Spanish Captions On On Off Screen Save On On Off Last Memory On On Off Main Page TV DISPLAY 1 NORMAL PS This is sele...

Page 48: ...put signal will be incorported to left and right channel STEREO A disc recorded multi channel soundtrack the output signal will be incorported to stereo DUAL MONO This is the output mode of the L and R signals of the set audio output If it is set to MIXED MONO the function only works when the DVD being played is 5 1 channel D R C This is selected to adjust linear compression rate to obtain the dif...

Page 49: ...e which you want The setting structure is PASSWORD MODE ON The password function is on and PARENTAL is dim and cannot be selected OFF The password is locked PARENTAL can be selected PASSWORD CHANGE Select this to adapt the code the screen shows Password Setup Enter a password according to the screen Note The password is automatically factory set to 88888 Password Setup Page PW Mode Off On Off Pass...

Page 50: ...oned above is recorded on the disc you can select sound subtitles or disc menu languages If not the language recorded on the disc is shown PARENTAL LOCK When playing a disc with parental lock function you may select an age control grade according to the rating your desire Example If PG is selected you cannot play DVD video discs rated higher than the PG grade DEFAULT RESET Each function setting re...

Page 51: ... protection technology must be authorized by Macrovision Corporation and is intended for home and other limited viewing uses only unless otherwise authorized by Macrovision Corporation Reverse engineering or disassembly is prohibited Disc cannot be played There is no disc in the unit Put the disc on the disc tray properly with the label side up Clean the disc Moisture has condensed in the unit Rem...

Page 52: ...C100 240V 50 60Hz 20W This manual is only for your reference any change to the design and specifications will not be advised Wavelength 650nm NTSC 20Hz 20KHz 2 5dB 80dB 60dB 1KHz 80dB 1KHz 80dB 1KHz Audio distortion noise Channel separation Dynamic range Output Audio out analog audio Video out Power Consumption Power supply page48 TECHNICAL SPECIFICATIONS 0 2V 0 5V ...

Reviews: