


28
29
case, turn the parallax adjustment knob counterclock-
wise to increase the parallax-free distance and adjust
it to the target distance.
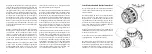
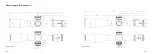
If the reticle moves in the same direction as the move-
ment of the head (e.g. the head moves to the left, the
reticle moves to the left), then the target is closer than
the parallax-free distance. In this case, turn the paral-
lax adjustment knob clockwise to lower the parallax-
free distance and adjust it to the target distance.
If the reticle no longer moves over the target image
when moving the head, then the parallax error has
been completely corrected. If the target image re-
mains somewhat out of focus even after the parallax
error has been corrected, please check the diopter
adjustment setting.
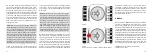
The parallax adjustment ring does not have a dis-
tance scale. The engraved scale merely indicates the
direction in which to turn the knob for close and far
distances. Due to thermal expansion of the riflescope
and varying atmospheric conditions, a distance scale
cannot be accurate under all circumstances and could
lead to a false sense of precision. If high precision
is required, the parallax should always be adjusted
under the current conditions using the procedure de-
scribed above.
In some cases it may be desirable to do a rough pre-
adjustment to get an approximate parallax setting
before a target is acquired, or the user may want to
use a standard setting from which to start when the
exact location of the target is still unknown. In order
to facilitate this, the markings on the parallax knob
are designed in a way that allows good orientation
within the 180° adjustment range. Approximate par-
allax settings that are significant to the individual
user can be memorized and preset without having to
acquire an actual target.
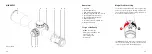
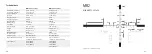
Reticle illumination and battery
change
The illumination adjustment ring and battery compart-
ment are integrated within the parallax adjustment
knob on the left side of the main tube.
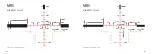
The battery compartment is covered by a screw cap.
To insert or replace the battery, turn the screw cap
counterclockwise using a coin or suitable tool. Push
on the edge of the battery with your fingernail to
release it from the battery holder. Insert the battery
with the minus pole towards the riflescope and screw
the cap tightly into place.
Use only new and undamaged CR 2032 batteries from
a high-quality manufacturer.
The desired illumination intensity can be adjusted in
11 levels. There are tactile clicks for every setting.
Between the brighness settings, there are “off”-set-
tings so that a pre-selected brightness level can be
activated with a single click.
The reticle illumination is automatically switched off
when the brightness setting has not been changed
for 3 hours. This prevents the battery from draining
if the illumination has been inadvertently left on. The
illumination reactivates after a change in brightness
settings.
Note:
The reticle illumination in the ZP5 riflescopes
has been designed specifically for use in twilight
or darkness. It can be finely dimmed such as not
to overpower the target image even in almost
complete darkness. The reticle illumination is not