background image

17

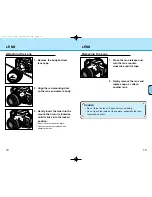
LOADING FILM

16

LOADING FILM

1. Slide the back-cover release

down to open the back cover.

2. Insert a film cartridge into the

film chamber.

Check the film window before loading film. If film is loaded, do not
open the back cover. Refer to Manual Rewind on page 28 for
instructions on removing a partially exposed roll.

• Load film in the shade to reduce the chances of fogging the film.
• Do not use Polaroid Instant 35mm film. Winding problems may occur.
• If DX-coded film is used, the camera automatically sets the correct ISO (film

speed).

• If non DX-coded film is used, the camera will use the previous roll’s ISO

setting. Refer to page 58 to set the film speed manually.

• Do not use infrared film in this camera. The camera’s frame counter sensor will

fog infrared film.

3. Extend the leader between the

guide rails to the index mark.

• If the film tip extends beyond the index

mark, push the excess film back into the
cartridge.

blinks in the frame counter and the

shutter locks when the film is loaded
incorrectly. Open the back cover and
repeat steps 2 – 4.

If film is loaded with the power off…
The films ISO and 

appear in the data panel for approx. five

seconds to indicate successful loading, then the camera shuts
down.

• If the film did not load, 

will blink in the data panel before the camera

shuts down. Reload the film.

The shutter curtain’s precision design
makes it extremely sensitive to
pressure. Never touch it with your
fingers or the film tip.

4. Close the back cover.

• The camera automatically advances the

film to the first frame. 1 will appear in the
frame counter.

• The ISO is displayed in the data panel for

5 seconds after loading.

2154-E (US).qed  3/4/98 2:39 PM  Page 16

Summary of Contents for MAXXUM HTsi

Page 1: ...INSTRUCTION MANUAL E QUICK OPERATION GETTING STARTED FULL AUTO OPERATION SUBJECT PROGRAM SELECTION CREATIVE EXPOSURE MODES ADDITIONAL FEATURES APPENDIX...

Page 2: ...nt or relocate the receiving antenna Increase the separation between the equipment and the receiver Connect the equipment to an outlet on a circuit different from that to which the receiver is connect...

Page 3: ...f timer 36 Continuous Advance 37 Taking Pictures in Full Auto 20 Focus Signals 21 Special Focus Situations 22 Focus Hold 23 Using the Built in Flash Flash signals 25 Flash range 25 Fill flash 26 Flash...

Page 4: ...lf timer lamp 36 Battery chamber lock Tripod socket Battery chamber door 12 Built in flash 24 27 Accessory shoe Flash mode button Exposure compensation button 45 57 Function button Function dial Lens...

Page 5: ...ator Multiple exposure indicator Red eye reduction indicator Flash mode indicators High speed flash sync indicator Battery condition indicator Self timer indicator Exposure mode indicators Subject pro...

Page 6: ...film Align the film tip with the red mark then close the back cover 5 Set Full Auto operation Press the program reset button to set the camera to fully automatic operation 6 If using a zoom lens rota...

Page 7: ...s Loading the Film Camera Handling Fully Automatic Camera Operation Special Focus Situations Basic Flash Operation Rewinding the Film Once you fully understand the instructions in this section proceed...

Page 8: ...tch is set to ON a battery symbol appears in the data panel indicating the power status of the batteries Checking Battery Power Full battery symbol Power is sufficient for all camera operations will o...

Page 9: ...the lens at an angle Do not press the lens release when attaching the lens Attaching the Lens 1 Press the lens release and turn the lens counter clockwise until it stops 2 Gently remove the lens and...

Page 10: ...ensor will fog infrared film 3 Extend the leader between the guide rails to the index mark If the film tip extends beyond the index mark push the excess film back into the cartridge blinks in the fram...

Page 11: ...n the event you accidentally drop the camera Do not touch the end of the lens barrel while taking a picture Use a tripod when using slow shutter speeds or a telephoto lens Pressing the Shutter Release...

Page 12: ...e lens zooming ring to frame the subject as desired 4 Center your subject in the focus frame then press the shutter release button partway down to activate autofocus or will appear in the viewfinder w...

Page 13: ...ee page 21 for an explanation of the focus signals 1 Center your subject in the focus frame then press the shutter release button partway down appears in the viewfinder when the focus is confirmed Foc...

Page 14: ...you don t want the flash to fire Pressing the program reset button P resets the flash to autoflash mode Do not use the built in flash with focal lengths shorter than 28mm The built in flash cannot co...

Page 15: ...e flash will fire a few short flash bursts just before the picture is taken Turn the function dial to then press the function button and turn the control dial until and OFF appear in the data panel Re...

Page 16: ...of the camera take more control of the creative process by telling the camera what kind of picture you want to take The subject program modes let you take more control without leaving the program exp...

Page 17: ...capture the perfect expression 30 SUBJECT PROGRAM SELECTION Press the subject program button until the subject program pointer is under Landscape photography requires a large depth of field to make su...

Page 18: ...3 ft The lens may block the flash creating a shadow at the bottom of your image lens shadowing Use a tripod to reduce camera shake Press the subject program button until the subject program pointer is...

Page 19: ...d a tripod Focus on the main part of your subject Warn your subject not to move while the picture is taken Photographing Night Scenes Cancel the flash in Night Portrait mode to photograph night scenes...

Page 20: ...after the shutter is released Do not press the shutter release button while standing in front of the camera Attach the eyepiece cap if there is a bright light source behind the camera p49 1 Press the...

Page 21: ...mages Set M mode when you want full control over all the exposure functions A Mode Manually select aperture 39 S Mode Manually select shutter speed 42 M Mode Manually select the shutter speed 45 and t...

Page 22: ...in the data panel Cancelling the Flash The size of the aperture lens opening determines the depth of field in the final image as well as the intensity of the light falling on the film Depth of field...

Page 23: ...ress the flash mode button to pop up the built in flash will appear in the data panel 2 Turn the control dial to select any shutter speed up to 1 125th of a second The camera automatically sets the ap...

Page 24: ...hake Use a fast shutter speed to stop the motion of your subject Use a slow shutter speed to blur the motion of your subject Shutter Control Fast Shutter Speed Slow Shutter Speed 1 Turn the function d...

Page 25: ...eter reading 1 Press the flash mode button to pop up the built in flash will appear in the data panel M Mode Flash When the built in flash is up or an attached accessory flash is on it will fire each...

Page 26: ...ne and focus on your subject If the scene is too dark for autofocus to operate press the focus mode button and focus the lens manually p53 2 Set the camera to M mode then turn the control dial until a...

Page 27: ...ving subjects Wide focus area is the camera s standard focus mode The camera determines which sensor is focusing on your subject and sets the focus accordingly The focus areas are not visible in the v...

Page 28: ...on is released 1 Press the focus mode button will appear in the data panel 2 Turn the focusing ring until your subject appears sharp and focused appears in the viewfinder when the subject in the focus...

Page 29: ...luminator will not operate with 3x 1x Macro Zoom When an accessory flash is attached its AF illuminator will be active in place of the camera s AF illuminator Fourteen Segment Honeycomb Pattern Meteri...

Page 30: ...Spot Metering 2 Press and hold the spot AE lock button and the locked exposure will be displayed in the viewfinder 3 Recompose the scene as desired then press the shutter release button all the way do...

Page 31: ...d 1 Turn the function dial to 2 Press the function button and turn the control dial until appears in the data panel appears in the frame counter after the function button is released This function aut...

Page 32: ...o the first frame Bracketing with the Exposure Compensation Button While pressing the exposure compensation button press the shutter release button all the way down and hold The camera automatically e...

Page 33: ...take the first exposure blinks in the data panel indicating the next exposure will be the last in the series To take more than 2 exposures repeat steps 1 and 2 until ME glows in the data panel 4 Press...

Page 34: ...aperture high shutter speed combinations to separate your subject from the background by limiting the depth of field The above corrections are intended as a general guideline Some testing may be neces...

Page 35: ...o 50 C 32 to 122 F Exposing the Date Time Before taking the picture MODE button SELECT button ADJUST button Print indicator In P and A modes slow shutter sync sets a slower shutter speed to increase t...

Page 36: ...era batteries are removed FOR OWNERS OF THE QUARTZ DATE MODEL 1 Press the MODE button to choose the data imprinting format M will appear above the month 2 Use the SELECT button to move between differe...

Page 37: ...uses the film to be rewound into the cartridge when the power is switched back on CUSTOM FUNCTIONS 1 Turn the function dial to CUST 2 Turn the control dial to select the number of the custom function...

Page 38: ...of the previous roll Cust 4 DX Memory 2 DX Memory On Changes to the film speed for a DX coded roll are saved and applied to future rolls with the same DX coded ISO Use to consistently over under expo...

Page 39: ...is used for metering until the spot AE lock button is pressed again Slow shutter sync is set when the flash is selected Wide focus area Left local focus area Right local focus area Center spot focus a...

Page 40: ...Refer to the flash instruction manual for details Press the program reset button to return the following camera functions to their program settings Exposure mode P mode Focus mode Autofocus Flash mod...

Page 41: ...h this camera MD and MC series lenses manual focus cannot be used with this camera Compatibility of Accessories Flashes All Minolta i si and HS series flash units and the Vectis SF 1 flash are compati...

Page 42: ...RMATION Fit the lens hood into the mount at the end of the lens barrel then turn the hood clockwise until it stops To store the hood reverse it attach it to the lens then replace the lens cap Flare is...

Page 43: ...n the camera to autofocus mode Subject is too close Check the minimum focus distance for your lens 23 Shutter cannot be released Focus cannot be confirmed Camera is attached to a microscope or telesco...

Page 44: ...ng Temp and Conditions This camera is designed for use from 20 to 50 C 4 to 122 F Never leave your camera where it may be subjected to extreme temperatures such as the glove compartment of a car Data...

Page 45: ...ecifications and accessories are based on the latest information available at the time of printing and are subject to change without notice SPECIFICATIONS Camera Type 35mm SLR with built in flash auto...

Page 46: ...tifies that this product meets the requirements of the EU European Union concerning interference causing equipment regulations CE stands for Conformit Europ enne European Conformity NOTES 2154 E US qe...

Page 47: ...9058 Albygatan 114 S 17109 Solna Sweden Finland Branch Niittykatu 6 PL 37 SF 02201 Espoo Finland Minolta Portugal Limitada Av do Brasil 33 A P 1700 Lisboa Portugal Minolta Corporation Head Office 101...

Reviews: