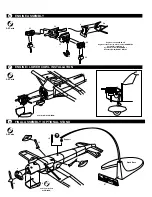
MINICRAFT Cessna 150 Quick Start Manual Download Page 2

FUSELAGE ASSEMBLY

3

NOSE GEAR AND STABILATOR MOUNTING, WING ASSEMBLY

4

All Parts

All Parts

5

5

41  

42

34

34

9

Right fuselage half

Left fuselage half

40

29

28

37

37

36

38

Right lower

wing

Left lower

wing

Upper wing

 Seat back (5) DARK and LIGHT GRAY

 Interior LIGHT GRAY

 Instrument panel BLACK-GRAY

with SILVER and BLACK details

 Control wheels BLACK

IMPORTANT NOTE!

Fuselage stripe decals must be applied before

mounting stabilators 28/29.

Refer to Paint & Decal Guide.

IMPORTANT NOTE!

You may choose to assemble wing struts 30/31

after final paint and decals are applied.

Refer to Paint & Decal Guide.

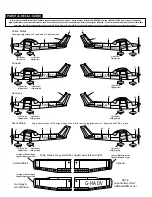
WINGS, STRUTS AND WINDSHIELD MOUNTING

5

All Parts

30

39

31

Summary of Contents for Cessna 150

Page 1: ...at operation RŽpeeter l opŽration Vorgang wiederholen Repitir la operacion Ripetere Repitir a opera ao Herhalen Symmetrical assembly Drill hole Your MINICRAFT Cessna 150 is a highly detailed replica of one of the world s most popular civil aircraft Please review the assembly steps as well as the color and decal guide to become familiar with the parts before beginning assembly IMPORTANT NOTE Paint ...

Page 2: ... 5 DARK and LIGHT GRAY Interior LIGHT GRAY Instrument panel BLACK GRAY with SILVER and BLACK details Control wheels BLACK IMPORTANT NOTE Fuselage stripe decals must be applied before mounting stabilators 28 29 Refer to Paint Decal Guide IMPORTANT NOTE You may choose to assemble wing struts 30 31 after final paint and decals are applied Refer to Paint Decal Guide WINGS STRUTS AND WINDSHIELD MOUNTIN...

Page 3: ...32 33 26 6 24 Engine mount 24 BLACK Engine accessories 6 block 32 33 GUNMETAL Carburator 35 BLACK Cylinders 21 22 BLACK GRAY Exhousts 25 26 BURNT METAL Cowl interior ALUMINUM 1 FINAL ASSEMBLY OPTIONAL STAND 8 All Parts Support 10 12 3 2 20 11 27 Stand Base Cowl part interiors ALUMINUM ...

Page 4: ...ly attach removable upper cowl Part 2 to fuselage before applying decals Extra decals are provided for the advanced modeler to change registration numbers to personalize the model 1 6 Left side 7 Right side 8 Left side 9 Right side 8 Left side 9 Right side 12 Left side 13 Right side 14 Left side 15 Right side 14 Left side 15 Right side 5 11 10 18 18 17 26 26 16 21 Left side 22 Right side 23 Left s...

Page 5: ... lay on a paper towel After approximately 10 20 seconds the decal will slide freely from the backing paper Use a small brush to help slide the decal from the backing paper and into position on the model Carefully blot excess water from the decal using care not to move the decal or tear it If you choose to use a setting solution apply a thin coat over the decal following the manufacturer s instruct...

Page 6: ...Look for our other Cessna aircraft 11634 Cessna 172 Floatplane 11635 Cessna 172 11663 Cessna 150 Floatplane ...

Reviews: