background image


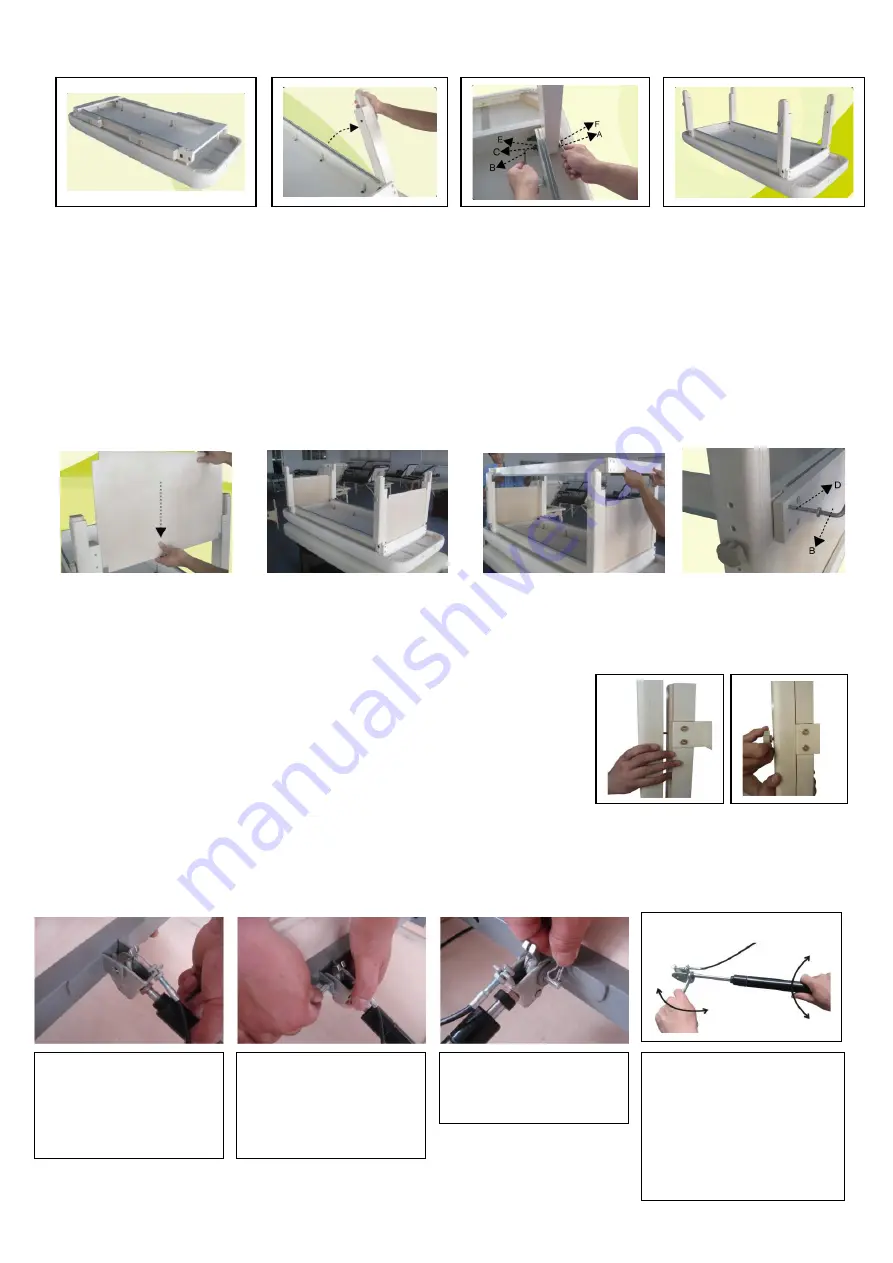
(Fig. 1)                                    (Fig.2)                                          (Fig.3)                                          (Fig.4) 

Step 2:


Unfold the legs and tighten the legs with provided bolts and nuts (Part C, E and F) at each 

corner by socket wrench and open-end wrench (Part A and B). (Fig.2/3) 
Ensure each nut and bolt and washer on table is installed properly. (Fig.4)


Step 3:

 Place the short side ply-woods into its related side slots and make sure they are installed into 

the inner slot correctly and tightly. (Fig. 5/6)


(Fig. 5)                                        (Fig.6)                                            (Fig.7)                                        (Fig.8)


Step 4: 

Place the bottom shelf into the shelf slots and tighten it with provided bolts (Part B) at each 

corner by socket wrench. (Part E) (Fig.7/8) 

Step 5: 

Connect four leg extensions to the main legs at the desired 

and tighten the locking knobs (Part F). (Fig. 9/10) 


(Fig. 9)                    (Fig.10)       

Step  6: 

For Kaiser-Tilt and Kaiser-Deluxe table, you need to install the gas pump for  adjusting the 

backrest or leg rest.   


Fill  the  U-end  of  the  gas 

pump  into  notch  in  the 

central of the metal beam.


(Fig. 11)     


Insert  the  metal  bolt  into 

the  hole  and  run  through 

the  U-end  of  gas  pump 

and the notch.

 (Fig. 12)     


Lock  the  bolt  by  metal 

tach.

 (Fig. 13)     


Adjust the screw cap properly 

to ensure the gas pump’s 

push button is stick to the 

Duck-Tongue-Lever tightly 

and the cable won’t fall out.


(Fig. 14)     


缺图???? 


Summary of Contents for 8910b

Page 1: ...Instruction Manual Sanctuary Adjustable Massage Table Model 8910b ...

Page 2: ...able away from children and pets as it is not toy Do not sit on the elevated backrest leg rest or Armrest Warning aggressive disinfectants may damage your upholstery fabric Damages caused by the use of disinfectants are not covered by our warranty 2 Year Limited Warranty on upholstery fabric Instructions for Assembly How to Install the Sanctuary Massage Table Please check all parts and tools packe...

Page 3: ... tighten it with provided bolts Part B at each corner by socket wrench Part E Fig 7 8 Step 5 Connect four leg extensions to the main legs at the desired and tighten the locking knobs Part F Fig 9 10 Fig 9 Fig 10 Step 6 For Kaiser Tilt and Kaiser Deluxe table you need to install the gas pump for adjusting the backrest or leg rest Fill the U end of the gas pump into notch in the central of the metal...

Page 4: ...thod Fig 15 16 Ensure the backrest and the leg rest are in the lowest position and locked tightly when turning over the table At least two people are needed during the assembly Correct method Fig 15 Wrong method Fig 16 Fig 17 Fig 18 Fig 19 Fig 20 Step 8 Fix the metal handles on the sliding door by provided part I and G Fig 17 Step 9 Install the sliding door into the inner slot on the cabinet frame...

Page 5: ...est and weight of the client with one hand Pull the switch and lower the backrest to the desired position Fig 22 it helps if the client lifts themselves off the backrest to take some of the weight off the backrest while you move it into position You need to press the backrest a little bit when there s no client on the table Fig 21 Fig 22 Fig 23 Fig 24 How to Adjust the Leg Rest Pull the switch and...

Page 6: ...ompletely then circumvolve adown until it stays level Fig 27 Make sure the convex rod on the metal pole fix with the channel on the nylon access during the assembly Uplift the Side Armrests on proper angle and pull it out Fig 28 This feature is helpful when doing massager or helping someone get on or off the table Fig 27 Fig 28 Fig 29 Fig 30 How to Remove Install the Flexible Side Armrests Curve t...

Page 7: ...outlets if you want to take off the headrest Fig 31 Fig 32 Fig 33 How to Use the Lowered Armrest Sling 1 Place face cradle tubes through the loop on the sling Fig 34 2 Attached the end with the Velcro to the top of the face cradle Fig 35 3 Place face cushion onto the cradle Fig 36 4 Fig 34 Fig 35 Fig 36 How to Use the Neck Pillow 1 Place rectangular headrest tubes into loop on the neck pillow Fig ...

Page 8: ...down the table with clean wet towel Use both ends of the table Occasionally switch the face rest from one end of the table to the other to avoid uneven wear Protecting your table from general abrasions cuts and punctures 1 Rubbing alcohol will dry out the vinyl and cause it cracking 2 Prolonged exposure to extreme temperatures will cause damage to vinyl 3 Aggressive disinfectants may damage your u...

Reviews: