MIMAKI Tx500-1800B Requests For Daily Care And Maintenance Download Page 14

14

5. Periodically care (Once a year)

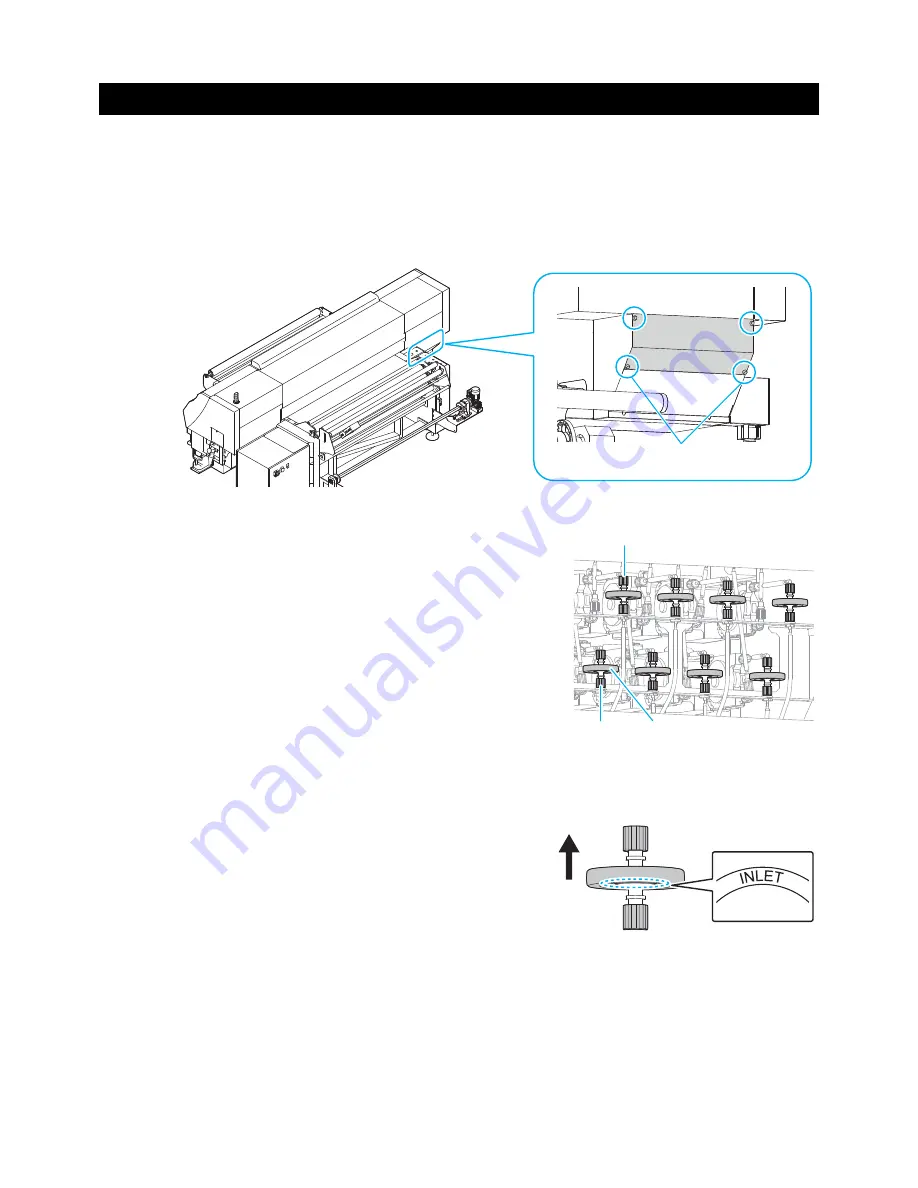
(1) Replacing the ink filter at main body side

Replace it once a year.

1

After turning off the main power switch, open the rear maintenance cover (right) of
the rear surface right side of this machine.

• Remove the screws (for 4 positions) of the rear surface maintenance cover (right).

2

Loosen the joints of upper/ lower of the ink filter.

3

Replacing the used ink filter.

4

Attach new ink filter (SPA-0196), and tighten 
the joint.

• When attaching the ink filter, be careful of the ink

feeding direction.

• Face the side of the filter with “INLET” written on it

downwards and attach the filter.

5

Return the rear surface maintenance cover (right) to the original position, and turn on 
the main power switch.

Screw

Joint

Joint

Ink filter

In

k fe

ed

in

di

recti

o

n

Summary of Contents for Tx500-1800B

Page 1: ...hat to care Reference Page Once a day at the end of the daily work Surroundings of the heads P 2 Capping station P 4 Wiper P 5 Wiper blade P 6 Once a week at the end of the work on weekend Exterior P...

Page 2: ...ink cap and the wiper of capping station every day If you leave it dirty dirt may adhere to the nozzle surface or dust and dry ink may be rubbed against the nozzle It may cause discharge defect Clean...

Page 3: ...om surface of the slider until it looks as shown in the photo below Immerse much enough so that maintenance liquid may drip from it Do not wipe the nozzle surface with dry COTTON CIEGAL If COTTON CIEG...

Page 4: ...003 Z K1 1 Move the carriage and open the right maintenance cover Refer to the Step 1 to 5 of Chapter 4 Cleaning the Wiper and Cap of the user s manual to perform the operation 2 Clean the cap Dip the...

Page 5: ...the ink sticking to the wiper and bracket with a clean stick dipped in cleaning solution for maintenance Wipe off so that cleaning solution for maintenance will not remain Further in the cases as exp...

Page 6: ...1 to 5 of Chapter 4 Cleaning around the wiper of the user s manual to perform the operation 2 Clean the wiper blade Wipe off the ink of the wiper blade with clean stick or waste cloth dipped in clean...

Page 7: ...an Chapter 4 of the Operation Manual Water based ink does not flow easily Ink dries gets stuck and accumulates Use a rubber spatula or the like to frequently push the ink that piles up in the ink pan...

Page 8: ...4 Operation Manual Depending on the using environment the dusts or sand powder could stick to the exterior of the main unit To avoid the entry of the dusts into the moving part of the head wipe them o...

Page 9: ...Place a few drops of washing liquid on the upper part of the float 3 Move the float up down to spread washing liquid evenly 4 When the float comes to move smoothly wipe washing liquid adhering to the...

Page 10: ...the upper part of the carriage filter cover and pull it to the front 3 Remove the used carriage filter cover 4 Mount a new carriage filter SPA 0189 Insert the holes of right and left of the carriage f...

Page 11: ...the mist filter ASSY s tab with your finger and thumb and pull out the mist filter ASSY 2 Removed the used filter 1 Slide the filter holder a little and remove it 2 Removed the used filter 3 Attach n...

Page 12: ...1 Slide the filter holder a little and remove it 2 Removed the used filter 7 Attach new mist filter SPA 0190 and the filter holder 8 Attach the mist filter ASSY to the original position Ink at printi...

Page 13: ...air cleaning filter ASSY down to remove 2 Removed the used filter 1 Slide the filter holder a little and remove it 2 Removed the used filter 3 Attach new mist filter SPA 0190 and the filter holder 4 A...

Page 14: ...ce maintenance cover right 2 Loosen the joints of upper lower of the ink filter 3 Replacing the used ink filter 4 Attach new ink filter SPA 0196 and tighten the joint When attaching the ink filter be...

Page 15: ...r Remove five screws fixing the front cover left with a driver and remove it 2 Loosen the finger screw of the filter for vacuum and remove the cup part 3 Replace the filter element 4 Attach new filter...

Page 16: ...emove the screws for 4 positions of the ink cover and remove the cover 2 Replacing the filter holder Remove the screw of the filter holder and remove the filter holder 3 Loosen the joints of upper low...

Page 17: ...tion and turn on the main power switch When returning the ink cover to the original position attach it so that the hole on the ink bottle lamp matches the hole on the ink cover If the holes do not mat...

Page 18: ...le and the ink IC together 8 The examples of defective printing These following examples indicate improper head nozzle firing by dust which effect printing Confirm the nozzle condition periodically be...

Page 19: ...al If the nozzle missing does not disappear even after repeating the head cleaning normal several times reset the cleaning mode to hard and perform the cleaning again Perform test printing and check C...

Page 20: ...depending on the kinds of the ink When not using for an extended period of time execute the CUSTODY WASH function of this equip ment When the Machine Is Not Used for a Long Time CUSTODY WASH Chapter...

Page 21: ...vironment Fans and air blowers could cause the dustspewing The using environment of this printer is from 20 to 30 C 68 F to 86 F in temperature and from 35 to 65 in relative humidity Avoid the use of...

Page 22: ...22 MEMO...

Page 23: ...23 MEMO...

Page 24: ...You can also download the latest manual from our website 2014 MIMAKI ENGINEERING CO LTD D202493 12 19092014 IT FW 2 20...

Reviews: