background image

8

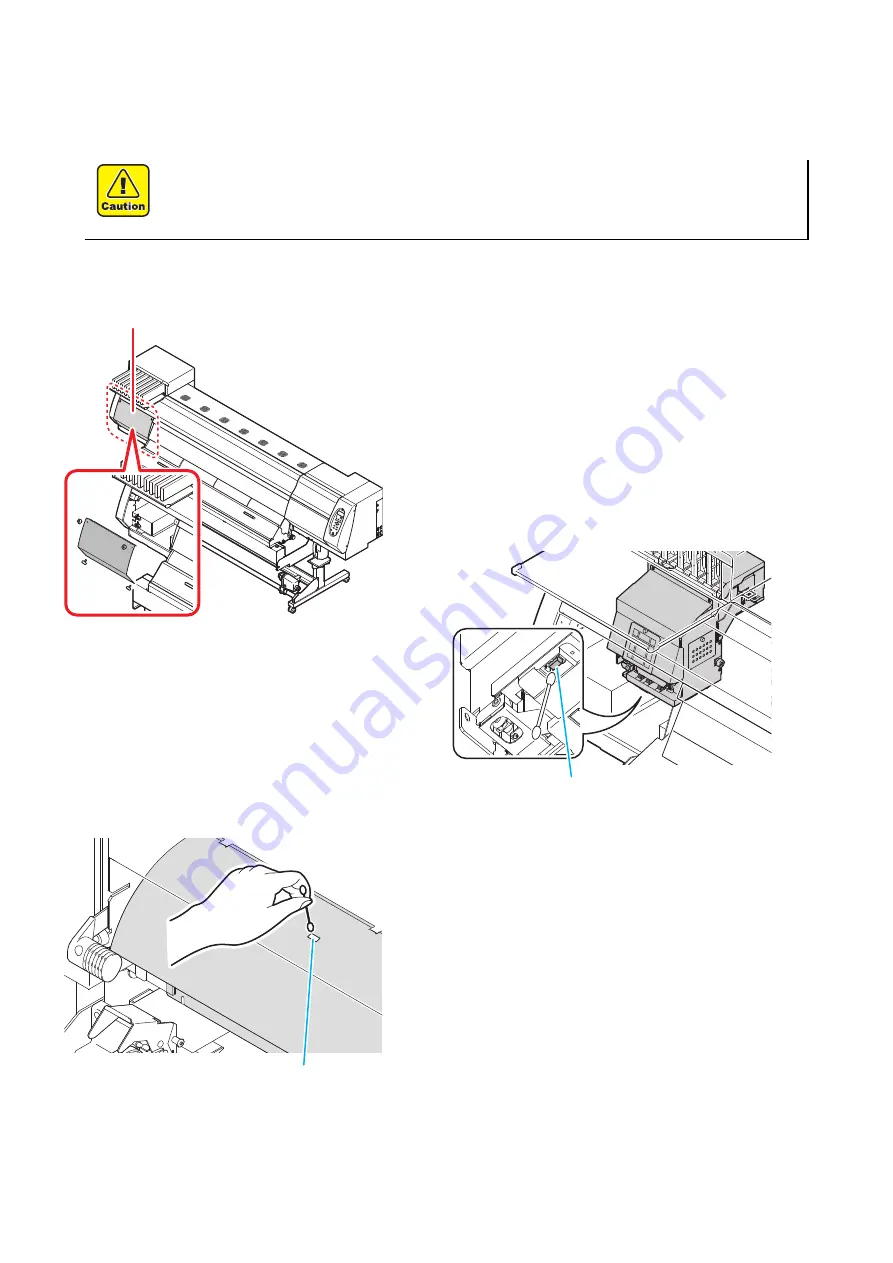
Media sensor ("Cleaning the Media Sensor"  Chapter 4 of the Operation Manual)

Two media sensors are provided: one above the platen on the rear surface of the equipment and another on the
bottom surface of the head. If the dusts and ink accumulate on the sensor, it could cause false detection of the
media or the register mark. Wipe off the sensors with soft cloth or clean sticks.

Cleaning the media sensor at the bottom surface 
of the heads.

1

Move the carriage to the left.

• Move it with reference to “Cleaning the Ink Head and the 

Area around It” Step 1, Chapter 5 of the Operation Manual.

2

Open the maintenance cover.

• Remove the screws and open the maintenance cover.

3

Clean the media sensor.

• Wipe off the dusts and stuck ink with soft cloth or clean 

sticks.

Cleaning of the media sensor at the rear surface 
of the machine

Wipe off the dusts and stuck ink with soft cloth or clean sticks.

For the cleaning of the media sensors, never use the solvent.

When the sensor is heavily stained, wipe off with a cloth soaked in the water-
diluted neutral detergent.

Maintenance 

cover

Media sensor on the head

Media 

Summary of Contents for JV400-SUV Series

Page 1: ...rea of the heads caps and wipers To secure the stability of the ink discharge when the printer is not used output for an extended period of time it could become necessary to discharge periodically a s...

Page 2: ...Ink Head and the Area around It Step 1 Chapter 5 of the Operation Manual 2 Open the maintenance cover Remove the screws and open the maintenance cover 3 Clean the head and the surrounding area Gelled...

Page 3: ...carriage Move the carriage referring to Cleaning the Wiper and Cap Step 1 Chapter 4 of the Operation Manual 2 Clean the cap Dip the clean stick into the maintenance liquid 07 and wipe off so that you...

Page 4: ...ve the carriage referring to Cleaning the Wiper and Cap Step 1 Chapter 4 of the Operation Manual 2 Clean the wiper Dip the clean stick into the maintenance liquid 07 and wipe off the wiper Wipe off so...

Page 5: ...e cases as explained below replace the wiper with the new one in accordance with Replacing the wiper on Chapter 4 of the Operation Manual When the wiper is deformed When the stuck ink can not be wiped...

Page 6: ...iper replacement is indicated Ink guard Cleaning the Wiper and Cap Chapter 4 of the Operation Manual On the ink guard the ink dust and paper powder are liable to accumulate Check the state of the ink...

Page 7: ...Chapter 4 of the Operation Manual If ink adheres to the C absorber it is required to replace the C absorber Rough guide for replacement Replace when the concavity and convexity of the surface of the a...

Page 8: ...e carriage to the left Move it with reference to Cleaning the Ink Head and the Area around It Step 1 Chapter 5 of the Operation Manual 2 Open the maintenance cover Remove the screws and open the maint...

Page 9: ...especially liable to accumulate Clean them thoroughly Exterior Cleaning the Exterior Surfaces Chapter 4 Operation Manual Depending on the using environment the dusts or sand powder could stick to the...

Page 10: ...static electricity to the board mounted on the ink cartridges The board mounted on the ink cartridge Typical examples of the defects created on the printings by the defective discharge at the head no...

Page 11: ...rm test printing and check Chapter 2 of Operation Manual In the event nozzle missing etc have not been improved 3 Performing Head Cleaning hard Refer to Chapter 2 of Operation Manual If the nozzle mis...

Page 12: ...2014 MIMAKI ENGINEERING CO LTD D202380 20 30072020 KM FW 2 8...

Reviews: