Miller Blue Thunder 253 Owner'S Manual Download Page 7

OM-233 381 Page 3

1-3.

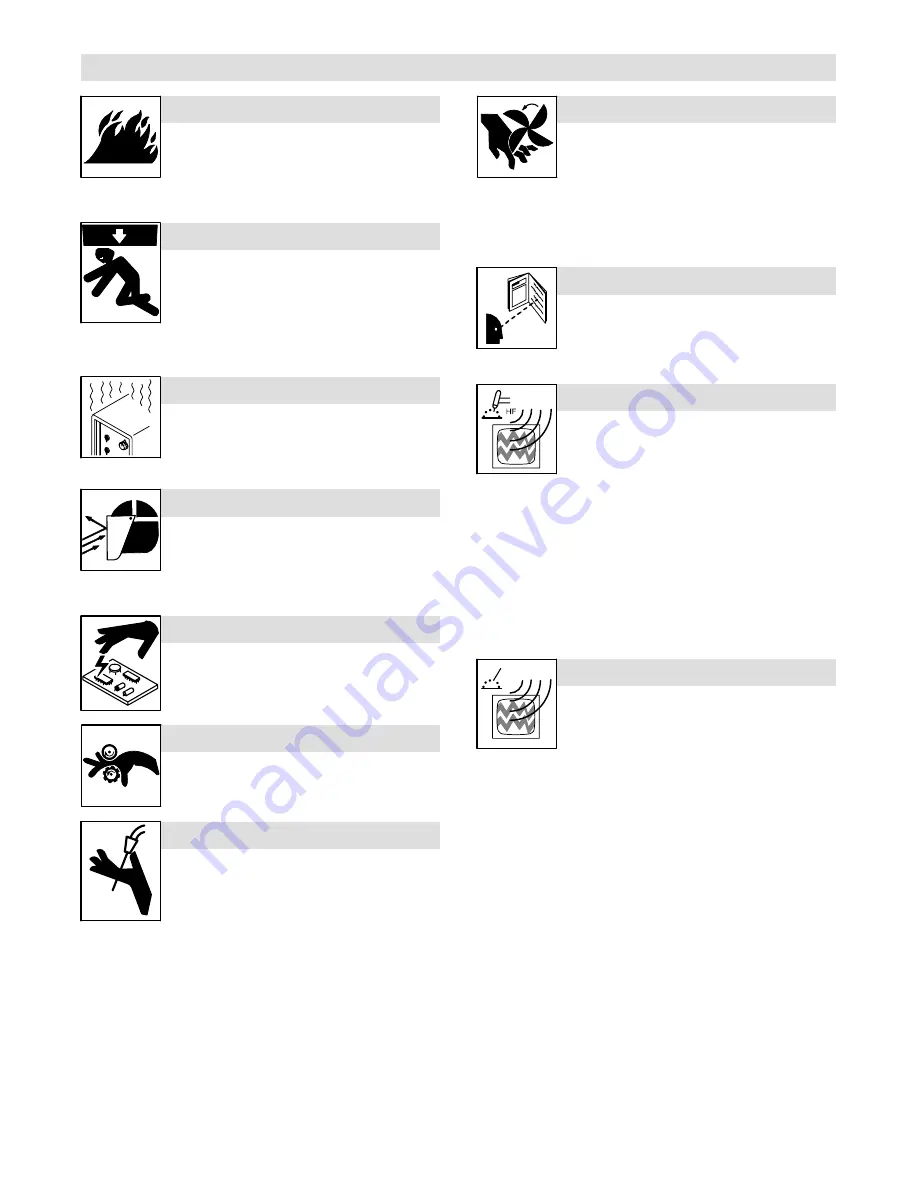
Additional Symbols For Installation, Operation, And Maintenance

FIRE OR EXPLOSION hazard.

Do not install or place unit on, over, or near
combustible surfaces.

Do not install unit near flammables.

Do not overload building wiring − be sure power supply system is
properly sized, rated, and protected to handle this unit.

FALLING UNIT can cause injury.

Use lifting eye to lift unit only, NOT running
gear, gas cylinders, or any other accessories.

Use equipment of adequate capacity to lift and
support unit.

If using lift forks to move unit, be sure forks are
long enough to extend beyond opposite side of
unit.

OVERUSE can cause OVERHEATING

Allow cooling period; follow rated duty cycle.

Reduce current or reduce duty cycle before
starting to weld again.

Do not block or filter airflow to unit.

FLYING SPARKS can cause injury.

Wear a face shield to protect eyes and face.

Shape tungsten electrode only on grinder with
proper guards in a safe location wearing proper
face, hand, and body protection.

Sparks can cause fires — keep flammables away.

STATIC (ESD) can damage PC  boards.

Put on grounded wrist strap BEFORE handling
boards or parts.

Use proper static-proof bags and boxes to
store, move, or ship PC boards.

MOVING PARTS can cause injury.

Keep away from moving parts.

Keep away from pinch points such as drive
rolls.

WELDING WIRE can cause injury.

Do not press gun trigger until instructed to do
so.

Do not point gun toward any part of the body,
other people, or any metal when threading
welding wire.

MOVING PARTS can cause injury.

Keep away from moving parts such as fans.

Keep all doors, panels, covers, and guards
closed and securely in place.

Have only qualified persons remove doors, panels, covers, or
guards for maintenance as necessary.

Reinstall doors, panels, covers, or guards when maintenance is
finished and before reconnecting input power.

READ INSTRUCTIONS.

Read Owner’s Manual before using or servic-
ing unit.

Use only genuine replacement parts from the
manufacturer.

H.F. RADIATION can cause interference.

High-frequency (H.F.) can interfere with radio
navigation, safety services, computers, and
communications equipment.

Have only qualified persons familiar with
electronic equipment perform this installation.

The user is responsible for having a qualified electrician prompt-
ly correct any interference problem resulting from the installa-
tion.

If notified by the FCC about interference, stop using the
equipment at once.

Have the installation regularly checked and maintained.

Keep high-frequency source doors and panels tightly shut, keep
spark gaps at correct setting, and use grounding and shielding to
minimize the possibility of interference.

ARC WELDING can cause interference.

Electromagnetic energy can interfere with
sensitive electronic equipment such as
computers and computer-driven equipment
such as robots.

Be sure all equipment in the welding area is
electromagnetically compatible.

To reduce possible interference, keep weld cables as short as
possible, close together, and down low, such as on the floor.

Locate welding operation  100 meters from any sensitive elec-
tronic equipment.

Be sure this welding machine is installed and grounded
according to this manual.

If interference still occurs, the user must take extra measures
such as moving the welding machine, using shielded cables,
using line filters, or shielding the work area.

Summary of Contents for Blue Thunder 253

Page 1: ...Processes Blue Thunder Series OM 233 381C 2007 09 Description Arc Welding Power Source Stick SMAW Welding Models 253 343 403 443 Visit our website at www MillerWelds com...

Page 2: ...inue the tradition They re just as committed to providing equipment and service that meets the high standards of quality and value established in 1929 This Owner s Manual is designed to help you get t...

Page 3: ...anufacturer s Rating Label 7 2 4 Symbols And Definitions 8 SECTION 3 INSTALLATION 9 3 1 Specifications 9 3 2 Volt Ampere Curves 9 3 3 Duty Cycle and Overheating 10 3 4 Selecting A Location 11 3 5 Tipp...

Page 4: ...at this product Blue Thunder 253 343 403 443 conforms to the following Directives and Standards Directives Low Voltage Directive 73 23 EEC 2006 95 EC Electromagnetic Compatibility Directives 89 336 EE...

Page 5: ...affolds when in cramped positions such as sitting kneeling or lying or when there is a high risk of unavoid able or accidental contact with the workpiece or ground For these conditions use the followi...

Page 6: ...pes unless they are properly prepared according to AWS F4 1 see Safety Standards Do not weld where the atmosphere may contain flammable dust gas or liquid vapors such as gasoline Connect work cable to...

Page 7: ...s Keep all doors panels covers and guards closed and securely in place Have only qualified persons remove doors panels covers or guards for maintenance as necessary Reinstall doors panels covers or gu...

Page 8: ...York NY 10036 8002 phone 212 642 4900 website www ansi org Standard for Fire Prevention During Welding Cutting and Other Hot Work NFPA Standard 51B from National Fire Protection Association P O Box 91...

Page 9: ...Keep your head out of the fumes 2 2 Use forced ventilation or local exhaust to remove the fumes 2 3 Use ventilating fan to remove fumes 3 Welding sparks can cause explosion or fire 3 1 Keep flammable...

Page 10: ...procedures 3 Move jumper links as shown on inside label to match voltage at job site 4 Having a loop of extra length connect grounding conductor first 5 Connect line input conductors as shown on insid...

Page 11: ...OM 233 381 Page 7 2 3 Manufacturer s Rating Label...

Page 12: ...ve Earth Ground Output Supplementary Protector Off On V Volts Shielded Metal Arc Welding SMAW Input Remote Constant Current CC X Duty Cycle I1 Rated Supply Current Three Phase Transformer Rectifier U0...

Page 13: ...x 410 x 650 403 400 A 36 Volts DC 35 Duty Cycle 60 400 A 66 73 V IP22 73 A 42 A 28 23 115 kg 980 x 410 x 650 443 420 A 36 8 Volts DC 45 Duty Cycle 60 420 A 78 V IP22 80 A 47 A 47 A 34 A 32 26 175 kg 1...

Page 14: ...Resting 3 5 Minutes Welding 6 5 Minutes Resting Overheating 0 15 A or V OR Reduce Duty Cycle Minutes 20 25 30 40 50 60 70 80 90100 35 250 200 150 100 50 Rated Output 300 20 25 30 40 50 60 70 80 90100...

Page 15: ...el Use rating label to determine input power needs 4 Line Disconnect Device Locate unit near correct input pow er supply Special installation may be required where gasoline or volatile liquids are pre...

Page 16: ...terminals Do not use worn dam aged undersized or poorly spliced cables Welding Amperes 10 60 Duty Cycle 60 100 Duty Cycle 10 100 Duty Cycle poorly spliced cables 100 20 20 20 25 35 50 50 50 150 25 25...

Page 17: ...125 60 70 70 50 Min Input Conductor Size In AWG 4 10 14 8 10 12 12 8 10 6 8 10 10 Max Recommended Input Conductor Length In Feet Meters 106 32 127 39 107 33 193 59 130 40 220 67 84 25 168 51 114 35 2...

Page 18: ...NOTICE Verify jumper links match input voltage see Section 3 8 See rating label on unit and check input voltage available at site 1 Disconnect Device switch shown in OFF position 2 Disconnect Device...

Page 19: ...ng Current Indicator 2 Weld Current Control 3 Positive Weld Terminal 4 Negative Weld Terminal 5 Power On Off Switch 6 Power On Pilot Light 804 944 1 2 3 4 5 6 Notes Work like a Pro Pros weld and cut s...

Page 20: ...ent of fan If fan does not run freely replace fan motor Erratic or improper weld output Clean and tighten all weld cable connections Check for proper size and type of cable see Section 3 6 Check for p...

Page 21: ...OM 233 381 Page 17 SECTION 6 ELECTRICAL DIAGRAMS S9215019 Figure 6 1 Circuit Diagram For Blue Thunder 253...

Page 22: ...OM 233 381 Page 18 S9215018 Figure 6 2 Circuit Diagram For Blue Thunder 343 And 443 Models 380 520 V...

Page 23: ...OM 233 381 Page 19 S9215023 Figure 6 3 Circuit Diagram For Blue Thunder 343 And 443 Models 230 400 V...

Page 24: ...OM 233 381 Page 20 S9215020 Figure 6 4 Circuit Diagram For Blue Thunder 403...

Page 25: ...OM 233 381 Page 21 Notes Work like a Pro Pros weld and cut safely Read the safety rules at the beginning of this manual...

Page 26: ...e 22 SECTION 7 PARTS LIST Hardware is common and not available unless listed 9 8 7 6 5 31 30 27 4 3 1 28 25 24 23 22 21 20 19 37 18 17 36 35 16 14 15 32 33 12 11 10 34 13 804 964 26 2 29 Figure 7 1 Bl...

Page 27: ...1 20 056054056 Wheel Rear Fixed 2 21 156023157 Wheel Retaining Clip 2 22 056054058 Pivoting Wheel 2 23 156118007 Base 1 24 256071008 Primary Input Cable 1 25 656089026 Cable Clamp Hole D 30 1 26 15611...

Page 28: ...381 Page 24 Hardware is common and not available unless listed 9 8 7 6 5 31 32 33 4 27 3 1 34 26 25 24 23 22 21 20 19 39 18 17 38 37 16 13 14 15 30 28 12 11 10 36 29 804 963 2 35 Figure 7 2 Blue Thund...

Page 29: ...se Socket 50 Sqmm Cx31 2 19 156012079 Axle 1 20 056054056 Wheel Rear Fixed 2 21 156023157 Wheel Retaining Clip 2 22 056054058 Pivoting Wheel 2 23 156118007 Base 1 24 057014053 Primary Input Cable 4 x...

Page 30: ...381 Page 26 Hardware is common and not available unless listed 804 963 9 8 7 6 5 31 31 32 4 27 3 1 33 26 25 24 23 22 21 20 19 38 18 17 37 36 16 13 14 15 30 28 12 11 10 35 29 2 34 Figure 7 3 Blue Thund...

Page 31: ...Wheel Rear Fixed 2 21 156023157 Wheel Retaining Clip 2 22 056054058 Pivoting Wheel 2 23 156118007 Base 1 24 057014054 Primary Input Cable 4 x 6 M4 1 25 656089026 Cable Clamp Hole D 30 1 26 156118049 P...

Page 32: ...381 Page 28 Hardware is common and not available unless listed 1 3 36 34 4 9 8 7 6 5 31 27 26 25 24 23 22 21 20 19 39 18 17 38 37 16 10 11 12 13 14 15 30 28 32 33 804 962 29 2 35 Figure 7 4 Blue Thund...

Page 33: ...inse Socket 50 Sqmm Cx31 2 19 156012080 Axle D 25 L 619 1 20 056054057 Wheel Rear Fixed 2 21 156023156 Wheel Retaining Clip 2 22 056054059 Pivoting Wheel D 125 2 23 156118008 Base 1 24 057014054 Prima...

Page 34: ...Notes Work like a Pro Pros weld and cut safely Read the safety rules at the beginning of this manual...

Page 35: ...r whichever is greater 4 1 Year Parts and Labor Unless Specified DC 253 403 Rectifier April 06 Migmatic 171 April 06 5 6 Months Batteries 6 90 Days Parts MIG Guns TIG Torches Induction Heating Coils a...

Page 36: ...stal Code Please complete and retain with your personal records Owner s Record Always provide Model Name and Serial Style Number Contact a DISTRIBUTOR or SERVICE AGENCY near you Welding Supplies and C...

Reviews: