background image

Operator's M

anual:  Millereek 6700P & 8700P PT

O Spreaders 

SECTION 4:  MAINTENANCE & ADJUSTMENT 

Guidelines 

for  Regular Maintenance 

WARNING: 

All shields must be replaced after maintenance or adjustment procedures are 

Ah 

performed.  Failure to  do  so  could result  in  serious personal injury or  death. 

Performing regular maintenance  on  you  Millcreek  Spreader will  help  ensure  optimal performance. 

Please follow  these  guidelines  for  maintaining your  spreader: 

• 

Clean the spreader once a week and before storing the unit for an  extended period oftime. 

ATTENTION: 

NEVER store manure in the spreader between unloading times during 

criticalcoldweathermonthswhenafrozenloadcouldresultinsevereequipmentdamage 

(i.e. tom floor apron chain).  Storing wet manure in the spreader( or keeping the spreader 
outdoorswithmanureinit)willacceleraterustingofthesteel. 

• 

Check the spreader each time it is used for loose, bent, broken or missing parts. 

ATTENTION: 

During operation, listen for abnormal soundswhichmightindicate loose 

parts or other equipment damage.  Correct anypartsproblems immediately; expanded parts 

views of all spreader assemblies are provided in the Appendixes at the back ofthis manual. 

ATTENTION: 

For safe and proper operation of the spreader, adhere to the following 

specifications fortightening the hitch hardware; failure to tighten all hitch hardware securelymay 

result in equipment damage. 

Hardware 

Torque5Specification 

1/2"° 

60 ft. lbs. 

3/8" 

25 ft. lbs. 

5/16" 

15 ft. lbs. 

• 

Check and grease the lube fitting at the PTO (at the front of the spreader) once a year.  Remove the 
telescoping shaft, clean, and add alight coating of grease. 

• 

Check that implement tires have adequate air pressure (30 psi).  Wheel bolts should be torqued to 

7 5 to  80 ft.  lbs. 

• 

Inspect the safety chain regularly to check the condition of the links and locking/hooking 
mechanisms; replace the chain as soon as weakness/breakage is noted. 

• 

Periodically check the belt tension.  Refer to the 

Front Drive Assembly Parts Detail 

in 

Appendix A at the back ofthis manual to locate the belt tension components.  The belt and 
tensioning spring are located under the front belt shield.  As needed, re-tension the belt by tightening 
the eyeboltuntil the spring stretches to five ( 5) inches. 

• 

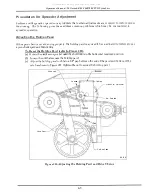
Apply chain lube once a month to the drive chains (showninFigure4B); use vegetable oil or a 

common spray lube for chains. 

4-1 

All manuals and user guides at all-guides.com

Summary of Contents for 6700P

Page 1: ...e information provided in this manual and the ADMA Safety Manual for Agricultural Implement Drivelines Failure to follow all safety precautions as stated in these manuals may result in serious persona...

Page 2: ...her assumes nor authorizes any other person t o assume for it any other liability in connection with the sale o f this equipment This Warranty shall not apply t o this equipment or t o any part thereo...

Page 3: ...ding the Spreader 3 1 Operating the Spreader 3 1 SECTION 4 MAINTENANCE ADJUSTMENT as sos ass s a cs so a a 4 1 Guidelines for Regular Maintenance 4 1 Procedures for Spreader Adjustment 4 3 Adjustingth...

Page 4: ...mbly operation procedures doing so allows you to use your Millcreek Spreader s a f e l y with optimal performance For Your Safety For your safety Millcreek documentation contains the following types o...

Page 5: ...ader as it may become caught in the moving parts of the machine A WARNING Never allow children o r anyone else to ride on the spreader ATTENTION For proper and safe operation ofthe spreader periodical...

Page 6: ...TENTION Do NOT exceed specified speed MillcreekLogo Label Spreader Serial Number Label Spreader Model Number Label 42778 NOTE Label 42756 i s provided i n three locations on rear side shield as shown...

Page 7: ...er adjust lubricate o r clean machine while engine is running and or machine i s operating Never operate machine without safety shields in place Moving parts can crush or cut A WARNING Entanglement Fl...

Page 8: ...er for assistance as needed Ifyou ordered an optional endgate with your spreader you may also have t o assemble this component on your spreader refer to Appendix Bat the back ofthis manual fo r t h e...

Page 9: ...wbar with a hitch pin that fits securely i e so that it will not come out during spreader operation and lock in place with the clip a s shown Remove the weight from the jack by lowering the spreader h...

Page 10: ...slide collar snaps forward t o indicate that the spreader PTO assembly i s properly secured t o the tractor PTO shaft 3 Fasten the PTO safety chain t o the hitch cross member to prevent rotation ofthe...

Page 11: ...of the steel Operating the Spreader WARNING Before proceeding with operation of the spreader review all safety statements as provided in Section 1 of this manual 6 1 2 3 4 5 WARNING To prevent serious...

Page 12: ...l spreader assemblies are provided in the Appendixes a t the back ofthis manual ATTENTION For safe and proper operation ofthe spreader adhere to the following specifications fortightening the hitch ha...

Page 13: ...ion is achieved when the apron s lowest point is 4 t o 4 1 2inches below the frame behind the tire b Use a9 16 wrench to loosen the two side nuts o n each side ofthe spreader box as shown inFigure4A T...

Page 14: ...ted to restore proper apron chain speed an d functioning To Reset the Holding Pawl refer to Figure 4B a Rotate the crankarm sprocket until the short link is in the horizontal rearward position b Loose...

Page 15: ...t resulting i n premature failure Ifthe chains a r e too loose they can slip and jump sprocketteeth when the spreader is operating with a full load Check the drive chains in two positions a Gearbox to...

Page 16: ...th 1 1 ft 6 inches 1 3 ft 6 inches Overall Width 61 inches 61 inches Overall Height 33 inches 33inches Loading Height 33 inches 33inches Construction All steel polyfloor All steel poly floor Apron Cha...

Page 17: ...owing information t o your local Millcreek dealer Model and Serial Number of the unit located on the front right comer of the spreader Part Number and Description a s it appears on the following drawi...

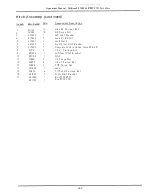
Page 18: ...Jack Crank 6 261203 1 Right Front Hitch Bracket 7 215320 1 Complete Jack includes items 25 26 8 34112 2 1 2 x 1 Carriage Bolt 9 261202 1 Left Front Hitch Bracket 10 261199 1 Hitch 1 1 34384 4 1 2 Fla...

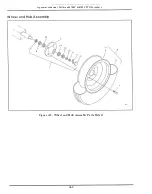
Page 19: ...Operator s Manual Millcreek 6700P 8700P PTO Spreaders Wheel and Hub Assembly Figure A2 Wheel and Hub Assembly Parts Detail A 4 6 1 86074 All manuals and user guides at all guides com...

Page 20: ...ems 4 1 1 215132 2 Model 8700 PTO Wheel and New Tire includes items 4 1 1 4 215106 2 Wheel 5 215205 2 Spindle Nut 6 215222 8 Wheel Lug 7 215204 2 Hub includes items 13 14 8 215203 2 Inner Bearing Cone...

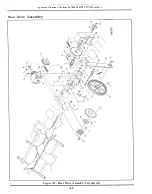
Page 21: ...Operator s Manual Millcreek 6700P 8700P PTO Spreaders Rear Drive Assembly Figure A3 Rear Drive Assembly Parts Detail A 6 All manuals and user guides at all guides com a l l g u i d e s c o m...

Page 22: ...t Coupler includes 2 set screws 34325 17 210389 1 22 Tooth Sprocket includes set screw 34325 18 34009 8 3 8 Flange Nut 19 261229 1 Pitman Link includes 2 bushings 210403 2 0 261230 1 Crank Sprocket in...

Page 23: ...Operator s Manual Millereek 6700P 8700P PTO Spreaders Front D rive Assembly RN I 9 Figure A4 Front Drive Assembly Parts Detail A 8 All manuals and user guides at all guides com...

Page 24: ...ft Bracket 1 1 34099 18 5 16 Flange Nut 12 210202 2 Belt Sheave includes set screw 34325 13 261289 1 PTO Stub Shaft 14 261222 1 Front PTO Shaft Bracket 15 210144 4 1 2 Flange Bearing 16 34336 2 5 16 x...

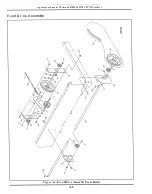
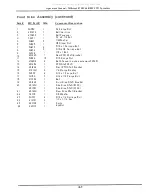
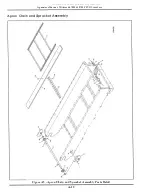
Page 25: ...perator s Manual Millcreek 6700P 8700P PTO Spreaders Apron Chain and Sprocket Assembly 7 I I Figure A5 Apron Chain and Sprocket Assembly Parts Detail A 10 All manuals and user guides at all guides com...

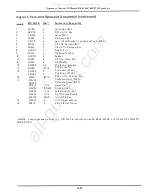
Page 26: ...p Nut 12 34018 6 3 8 Washer 13 260482 1 2 Poly Board Bracket 14 34099 12 18 5 16 Flange Nut 15 261480 6 Poly Board 6700 261482 6 Poly Board 8700 16 34320 12 18 5116 x 1 1 4 Carriage Bolt 17 261478 1 C...

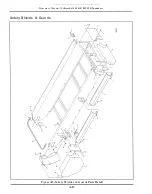
Page 27: ...Operator s Manual Millcreek 6700P 8700P PTO Spreaders Safety Shields Guards Figure A6 Safety Shields aud Guards Parts Detail A 12 All manuals and user guides at all guides com...

Page 28: ...lt 8 34099 21 5 16 Flange Nut 9 261388 1 Side Shield 6700 261236 2 Side Shield 8700 10 34328 2 5 16 3 4 Flange Bolt 1 1 34222 1 5 16 x 1 1 4 Bolt 12 34057 1 5 16Washer 13 220113 1 Rubber Latch 14 2612...

Page 29: ...Operator s Manual Millcreek 6700P 8700P PTO Spreaders PTO Shaft Assembly 0 17 86090 Figure A7 PTO Shaft Assembly Parts Detail A 14 All manuals and user guides at all guides com...

Page 30: ...210290 1 Inner Shield Tube 6 210335 1 6 Rib Shield Cone 7 210292 2 Cross and Bearings 8 210293 1 Snap Yoke 9 210298 2 8 x 50mm Roll Pin 10 210325 1 Inboard Yoke 1 1 210295 1 Outer Profile 12 210296 1...

Page 31: ...sembly drawings provided in this Appendix Some options come pre assembled on the spreader from the factory others may require assembly installation Please contact Millcreek for additional instructions...

Page 32: ...ndle 2 34367 13 5 16 Flange Nut 3 34328 6 5 16 x 3 4 Flange Bolt 4 261221 1 Endgate 5 34274 7 5 16 x 3 4 Carriage Bolt 6 261361 2 Endgate Bracket 7 34057 4 5 16Washer 8 34373 2 3 8 Large Washer 9 2613...

Page 33: ...the chain around the tractor drawbar support or other structural member of the tractor frame and connect it as shown A WARNING For the safety chain t o be effective th e installation ofth e chain shou...

Reviews: