background image

HDMI 2.0 6x1 Presentation Switcher with Audio Extraction 

29 

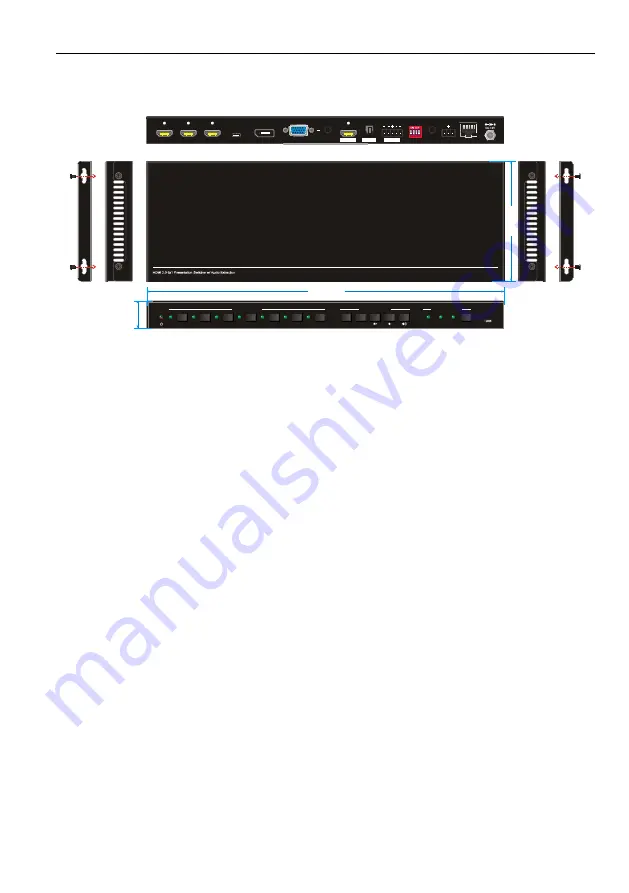
9. Panel Drawing 


FW

VIDEO SOURCE

DISPLAY CONTROL

ON

OFF

1

2

3

4

5

6

AUTO

RES

1920x1080

1280x720 

1920x1200

VGA RESOLUTION

1. HDMI/MHL IN

2. HDMI/MHL IN

3. HDMI IN

6. VGA IN

4. USB-C IN

HDMI OUT

OPTICAL

Tx 

Rx 

RS232 

IR IN 

EDID

ON

OFF

1
0

L

R

1 2

3

4

5. DP IN

TCP/IP 

342.5 mm

1

1

5

.0

 m

m

2

6

.0

 m

m

Summary of Contents for MP-SC-61E

Page 1: ...MP SC 61E HDMI 2 0 6x1 Presentation Switcher with Audio Extraction All Rights Reserved Version MP SC 61E_2019V1 6 User Manual ...

Page 2: ...atest details FCC Statement This equipment generates uses and can radiate radio frequency energy and if not installed and used in accordance with the instructions may cause harmful interference to radio communications It has been tested and found to comply with the limits for a Class B digital device pursuant to part 15 of the FCC Rules These limits are designed to provide reasonable protection ag...

Page 3: ... rain moisture or install this product near water Do not put any heavy items on the extension cable in case of extrusion Do not remove the housing of the device as opening or removing housing may expose you to dangerous voltage or other hazards Install the device in a place with fine ventilation to avoid damage caused by overheat Keep the module away from liquids Spillage into the housing may resu...

Page 4: ...tem Diagram 7 5 Button Control 8 5 1 Manual Switching 8 5 2 Automatic Switching 8 5 3 Display Control 8 5 4 VGA Resolution Selection 9 5 5 EDID Setting 9 6 IR Remote Control 11 7 GUI Control 12 7 1 Switching Tab 13 7 2 Display Control Tab 13 7 3 Audio Tab 15 7 4 EDID Tab 16 7 5 RS232 Tab 17 7 6 Interface Tab 18 7 7 Access Tab 19 7 8 Network Tab 19 7 9 GUI Upgrade 20 8 RS232 Control 21 8 1 RS232 Co...

Page 5: ... 2 Source Switching 24 8 2 3 VGA Resolution Selection 25 8 2 4 EDID Management 26 8 2 5 Audio Control 26 8 2 6 Display Control 27 8 2 7 CEC Control 27 8 2 8 Third party Device Control 28 9 Panel Drawing 29 10 Troubleshooting Maintenance 30 11 Customer Service 31 ...

Page 6: ...al audio output and a balanced analog audio output The switcher features multiple methods of control When in the AUTO mode the switcher will automatically switch to the first detected source device When the active source is removed the switcher will switch from input 1 to 6 The switcher can be manually controlled by the front panel buttons IR remote and RS232 command CEC allows the display device ...

Page 7: ...itcher 2x Mounting Ears with 4 Screws 4x Plastic Cushions 1x IR Receiver 1x IR Remote 1x 3 pin Terminal Block 1x 5 pin Terminal Block 1x RS232 Cable 3 pin terminal block to DB9 1x Power Adapter 12V DC 2A 1x User Manual Note Please contact your distributor immediately if any damage or defect in the components is found ...

Page 8: ...I HDMI Output Resolution Up to 4Kx2K 60Hz 4 4 4 8bit HDMI Version 2 0 HDCP Version 2 3 MHL Version 2 2 DP Version 1 2 HDR 10 Supported CEC Supported HPD Supported Audio Audio Output 1 OPTICAL 1 Stereo balanced L R Audio Output Connector 1 Toslink connector 1 5 pin terminal block HDMI Audio Format LPCM 7 1 audio Dolby Atmos Dolby TrueHD Dolby Digital Plus DTS X and DTS HD Master Audio pass through ...

Page 9: ...igher supports 10x paralleled 10KΩ loads Stereo Channel Separation 70dB 1KHz Control Part Control 1 FW 1 EDID 1 IR IN 1 RS232 1 TCP IP Control Connector 1 Micro USB 1 4 pin DIP switch 1 3 5mm mini jack 1 3 pin terminal block 1 RJ45 General HDMI 2 0 Cable Length 4K 60Hz 4 4 4 5m 4K 60Hz 4 2 0 10m 1080P 15m Bandwidth 18Gbps Operation Temperature 10 55 Storage Temperature 25 70 Relative Humility 10 9...

Page 10: ...N to turn on the display Press OFF to turn off the display Press to mute unmute display audio Press to decrease the audio volume gradually or press and hold it to decrease the audio volume constantly Press to increase the audio volume gradually or press and hold it to increase the audio volume constantly VGA RESOLUTION When the VGA input is selected press RES repeatedly can set the VGA resolution ...

Page 11: ... to connect the video display OPTICAL Toslink connector for digital audio output L R 5 pin terminal block for balanced audio output EDID 4 pin DIP switch for EDID setting IR IN 3 5mm mini jack to connect the IR receiver to control the switcher by the included IR remote RS232 3 pin terminal block to connect the RS232 control device e g PC or a device to be controlled by RS232 commands TCP IP RJ45 c...

Page 12: ...e sure all components and accessories included before installation System should be installed in a clean environment with proper temperature and humidity All of the power switches plugs sockets and power cords should be insulated and safe All devices should be connected before power on 4 2 System Diagram ...

Page 13: ...ew input Reboot If power is restored to the switcher it will automatically reconnect the input before powered off Source removed When an active source is removed the switcher will switch to the first available active input starting at 1 HDMI MHL input Press the Video Source button 1 2 3 4 5 or 6 can directly change the input source If the corresponding source device is active it will be switched a...

Page 14: ... a built in fixed value Use the following table to determine the setting for the 4 pin DIP switch for specific video resolution and audio capabilities The switch represents 0 when in the lower OFF position and it represents 1 while putting the switch in the upper ON position Switch Status Video Resolution Audio Format 0000 Default EDID pass through 0001 1920x1080 60Hz RGB 4 4 4 8bit Stereo Audio 0...

Page 15: ...esentation Switcher with Audio Extraction 10 1101 User defined 3 1110 User defined 4 1111 Enable GUI or RS232 EDID management Note Stereo Audio LPCM 2Ch High Definition Audio LPCM 8Ch AC 3 6Ch DTS 5 1 Dolby Digital5 1 ...

Page 16: ...tion buttons 1 6 and AUTO mode button Source device control buttons Page Up Page Down Rewind Fast Forward Pause Play Stop Exit Enter Up Down Left Right Power On Off VGA resolution selection buttons Display device control buttons Power On Off Mute Unmute Volume Down Volume Up OK 5 6 HDMI 2 0 Presentation Swither DISPLAY SOURCE Manual Auto VGA RESOLUTION 1280x720 1360x768 1920x1080 1920x1200 INPUTS ...

Page 17: ...TCP IP and the default IP setting is IP Address 192 168 0 178 Subnet Mask 255 255 250 0 Please type 192 168 0 178 in the internet browser and it will enter the below log in webpage Username admin Password admin Please type the user name and password and then click Login to enter the section for video switching ...

Page 18: ... Presentation Switcher with Audio Extraction 13 7 1 Switching Tab Click the AUTO button to enable automatic switching mode Click 1 6 button to select input source respectively 7 2 Display Control Tab 1 CEC Control ...

Page 19: ...isplay Off Mute unmute display audio Volume down display audio Volume up display audio 2 VGA Resolution Selection VGA output resolution can be selected as 1024x768 60Hz 1280x720 50Hz 1280x720 60Hz 1360x768 60Hz 1600x1200 60Hz 1920x1080 50Hz 1920x1080 60Hz Default or 1920x1200 60Hz ...

Page 20: ...HDMI 2 0 6x1 Presentation Switcher with Audio Extraction 15 7 3 Audio Tab Turn on or turn off the digital audio output Turn on or turn off the analog audio output ...

Page 21: ...on Built in EDID There are ten built in EDID values can be selected by this tab User defined EDID There are four EDID values can be customized by the below steps Step 1 Prepare the EDID file bin on the control PC Step 2 Select the user defined 1 2 3 4 Step 3 Click the black box and then select the EDID file bin according the tooltip Step 4 Click Apply to upload the user defined EDID ...

Page 22: ...ion 17 7 5 RS232 Tab Baud Rate Supports 2400 4800 9600 19200 38400 57600 or 115200 Command Ending NULL CR LF or CR LF can be chosen Command Type the command in this box to control the third party device which is connected to the RS232 port of the switcher ...

Page 23: ...HDMI 2 0 6x1 Presentation Switcher with Audio Extraction 18 7 6 Interface Tab Modify the title bar label Modify the button labels ...

Page 24: ...er with Audio Extraction 19 7 7 Access Tab Modify the login password Lock or unlock the front panel buttons 7 8 Network Tab Set Static IP or Dynamic Host Configuration Protocol DHCP Modify the static IP Address Subnet Mask and Gateway ...

Page 25: ...e Type the username and password the same as the GUI log in setting modified password will be available only after rebooting to login the configuration interface After that click Administration in the source menu to get to Upload Firmware as shown below Select the update file and click Apply button and then it will start upgrade process ...

Page 26: ...rol Software Installation Copy the control software file to the control PC Uninstallation Delete all the control software files in corresponding file path Basic Setting Connect the switcher with all input devices and output devices needed then to connect it with a PC which is installed with RS232 control software Double click the software icon to run this software Here take the software CommWatch ...

Page 27: ...w Please set the parameters of COM number bound rate data bit stop bit and the parity bit correctly and then the command is ready to be sent in command sending area Parameter configuration area Monitoring area show the commands and its feedback information Command sending area Operation area ...

Page 28: ... 1 Device Control Command Function Feedback Example POWON Power on system POWER ON POWOFF System standby POWER OFF LOCK Lock front panel buttons FRONT PANEL LOCKED UNLOCK Unlock front panel buttons FRONT PANEL UNLOCK GETGUIIP Report GUI IP GUI_IP 192 168 0 178 SETGUIIP xxx xxx xxx xxx Set GUI IP to xxx xxx xxx xxx Example SETGUIIP 192 168 0 178 Feedback SETGUIIP 192 168 0 178 STA Report system sta...

Page 29: ... UNLOCK 8 2 2 Source Switching Command Function Feedback Example HDMI1 Switch to HDMI input 1 HDMI OUT SWITCH TO 1 HDMI2 Switch to HDMI input 2 HDMI OUT SWITCH TO 2 HDMI3 Switch to HDMI input 3 HDMI OUT SWITCH TO 3 HDMI4 Switch to USB C input HDMI OUT SWITCH TO 4 HDMI5 Switch to DP input HDMI OUT SWITCH TO 5 HDMI6 Switch to VGA input HDMI OUT SWITCH TO 6 HDMIA Enable auto switching mode HDMI OUT S...

Page 30: ...ION OF VGA OUTPUT TO 1280x720 60Hz VGARES4 Set the VGA output resolution to 1360x768 60Hz SET RESOLUTION OF VGA OUTPUT TO 1360x768 60Hz VGARES5 Set the VGA output resolution to 1600x1200 60Hz SET RESOLUTION OF VGA OUTPUT TO 1600x1200 60Hz VGARES6 Set the VGA output resolution to 1920x1080 50Hz SET RESOLUTION OF VGA OUTPUT TO 1920x1080 50Hz VGARES7 Set the VGA output resolution to 1920x1080 60Hz SE...

Page 31: ... must be in the 1111 status Command Function Operation EDIDW xxxx User define EDID xxxx 1011 1100 1101 or 1110 Operation Step 1 Prepare the EDID file bin Step 2 Set the 4 pin DIP switch to 1111 status Step 3 Send the command EDIDW1101 and the feedback is PLEASE SEND THE EDID FILE Step 4 Send the EDID file bin If successfully upload the feedback is RECEIVED THE FILE LENGTH 134 EDID1101 UPDATE SUCCE...

Page 32: ... Control If the input sources and display support CEC they can be controlled by sending the below command to replace IR remote Command Description Command Example CECxx yy yy yy Send CEC command yy yy yy to control the source device or the display device The xx represents the port number xx Port 00 1 HDMI MHL IN 01 2 HDMI MHL IN 02 3 HDMI IN 03 4 USB C IN 04 5 DP IN 05 HDMI OUT The yy yy yy repres...

Page 33: ...3 to the third party whose baud rate is 9600 B xx xx xx xx xx xx HEX string The B represents the baud rate of third party device B 1 the baud rate is 2400 B 2 the baud rate is 4800 B 3 the baud rate is 9600 B 4 the baud rate is 19200 B 5 the baud rate is 38400 B 6 the baud rate is 57600 B 7 the baud rate is 115200 3 1A 2A 3A 4A Send the HEX command 1A 2A 3A 4A to the third party whose baud rate is...

Page 34: ...awing FW VIDEO SOURCE DISPLAY CONTROL ON OFF 1 2 3 4 5 6 AUTO RES 1920x1080 1280x720 1920x1200 VGA RESOLUTION 1 HDMI MHL IN 2 HDMI MHL IN 3 HDMI IN 6 VGA IN 4 USB C IN HDMI OUT OPTICAL Tx Rx RS232 IR IN EDID ON OFF 1 0 L R 1 2 3 4 5 DP IN TCP IP 342 5 mm 115 0 mm 26 0 mm ...

Page 35: ...Make sure the power cord connection is good EDID management does not work normally The HDMI cable is broken at the output end Change for another HDMI cable which is in good working condition Static becomes stronger when connecting the video connectors Bad grounding Check the grounding and make sure it is connected well Cannot control the device by control device e g a PC through RS232 port Wrong R...

Page 36: ...ormal wear and tear Use of supplies or parts not meeting our specifications No certificate or invoice as the proof of warranty The product model showed on the warranty card does not match with the model of the product for repairing or had been altered Damage caused by force majeure Servicing not authorized by distributor Any other causes which does not relate to a product defect Shipping fees inst...

Reviews: