background image

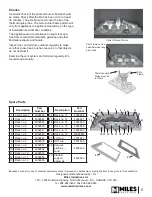
Correct Flame Picture

Pilot Flame can be 

seen between twig 

and rocks

Pilot 

Flame

Thermocouple 

Probe must be 

in Flame

Spare Parts

Description

Part 

Number

1 Centre piece

4002629

2 Rock no. 1

4002644

3 Rock no. 2

4002645

4 Rock no. 3

4002646

5 Rock no. 4

4002647

6 Rock no. 5

4002648

7 Rock no. 6

4002649

8 Rock no. 7

4002650

9 Rock no. 8

4002651

10 Rock no. 9

4002652

11 Rock no. 10

4002653

12 Rock no. 11

4002654

13 Rock no. 12

4002655

22

23

1

2

3

4

5

6

7

8

9

10

11

12

13

14 15

16

17

18

19

20

21

Checks

A periodic check of the pilot and burner flames should 

be made. Check after the fire has been on for at least 

30 minutes. The pilot flame must cover the tip of the 

thermocouple probe. The main burner flame pattern will 

vary from appliance to appliance depending on the type 

of installation and climatic conditions.
The appliance area must always be kept clear and 

free from combustible materials, gasoline and other 

flammable vapors and liquids.
Inspect the vent terminal outdoors regularly to make 

sure that snow, trees, bushes, leaves, or other objects 

do not obstruct it.
Examine the vent system and terminal regularly. We 

recommend annually.

Description

Part 

Number

14 Rock no. 13

4002656

15 Rock no. 14

4002657

16

Rock no. 15

4002658

17 Rock no. 16

4002659

18

Rock no. 17

4002660

19 Rock no. 18

40026461

20 LH Twig

4001827

21

RH Twig

4001828

22 Ceramic 

platform—

sand

4002439

23 Platform 

support 

assembly

4002663

Designed and Manufactured by / for

Miles Industries Ltd.

 190 – 2255 Dollarton Highway, North Vancouver, B.C., CANADA  V7H 3B1

Tel. 604-984-3496  Fax 604-984-0246

www.valorfireplaces.com

Because our policy is one of constant development and improvement, details may vary slightly from those given in this publication.

5

Summary of Contents for 781RSK

Page 1: ...h side of the window towards the top Using your finger pull the lever towards you and unhook it from the window frame bracket 2 Gently pull the top of the window outward 3 Lift the window out of its bottom railing and set it aside in a safe place to avoid damage Section Views Window frame Bottom railing The 781RSK Rock Set is intended to be used with Valor heaters models 780 only to replace the ex...

Page 2: ...and 18 as well as the twigs may be installed or omitted at the customer s choice 1 Install the platform frame into the firebox over top of the burner The metal tabs at the bottom of the frame slide into the slots in front of the burner 2 Insert the ceramic platform textured side up into the frame 3 Insert the ceramic rock base in the platform behind the burner Ensure that the base lies against the...

Page 3: ...he pegs of the ceramic platform Install these rocks positioning them so the arrow embossed underneath points to the front of the fireplace 14 11 9 7 17 18 13 6 8 10 8 Identify the rocks 7 9 11 and 14 These rocks have one hole underneath and fit on the peg of the rocks 6 8 10 and 13 respectively Install these rocks positioning them so that the arrow embossed underneath points to the front of the fi...

Page 4: ...rn it 4 Apply light hand pressure against the window frame sides to bed in the window seal Window frame Bottom railing Burner rail Pilot These rocks overhang slightly above the burner but do not touch the black base IMPORTANT The rocks of the top row 14 11 9 and 7 overhang slightly over the burner 11 Optional Lay the twigs on the rocks They can be placed as suggested below or elsewhere on the rock...

Page 5: ...ing on the type of installation and climatic conditions The appliance area must always be kept clear and free from combustible materials gasoline and other flammable vapors and liquids Inspect the vent terminal outdoors regularly to make sure that snow trees bushes leaves or other objects do not obstruct it Examine the vent system and terminal regularly We recommend annually Description Part Numbe...

Page 6: ... Tous droits réservés Miles Industries Ltd 2010 Ensemble de pierres 781RSK Directives d installation Pour modèles Valor 780 seulement Legend G4 Enlèvement de la fenêtre La fenêtre est retenue de chaque côté par un mécanisme à ressort et levier 1 Pour enlever la fenêtre repérez les leviers de chaque côté de la fenêtre vers le haut Tirez sur les leviers vers vous et décrochez les du cadre de la fenê...

Page 7: ...et 18 de même que les morceaux de simili bois peuvent être installés ou non au choix du consommateur 1 2 3 5 6 7 8 9 10 11 12 13 14 15 17 16 18 4 1 Installez le cadre de la plateforme dans la boîte de foyer par dessus le brûleur Insérez les onglets de métal du devant du cadre dans les fentes devant le brûleur 2 Insérez la plateforme de céramique dans le cadre côté texture en haut 3 Insérez la base...

Page 8: ...nt de la plateforme Installez ces pierres en les plaçant de façon à ce que la flèche d en dessous pointe vers l avant du foyer 17 18 14 11 9 7 13 6 8 10 8 Identifiez les pierres numéro 7 9 11 et 14 Chaque pierre possède un trou en dessous servant à la fixer aux chevilles des pierres 6 8 10 et 13 respectivement Installez ces pierres en les plaçant de façon à ce que la flèche d en dessous pointe ver...

Page 9: ...flamme de la veilleuse ou du brûleur Réinstallation de la fenêtre 1 Pour réinstaller la fenêtre placez la sur la rainure du bas et poussez la contre la boîte de foyer 2 En tenant la fenêtre d une main accrochez en les tirant les leviers à ressort au cadre de la fenêtre de chaque côté dans les encoches à cet effet tel qu indiqué à droite 3 Tirez sur le dessus de la fenêtre et relâchez le afin de vo...

Page 10: ...es inflammables Inspectez la sortie d évacuation à l extérieur de façon régulière afin de vous assurez qu elle n est pas obstruée par de la terre de la neige des insectes des feuilles des buissons ou des arbres Examinez tout le système d évacuation régulièrement Une inspection annuelle est recommandée Description Part Number 14 Pierre no 13 4002656 15 Pierre no 14 4002657 16 Pierre no 15 4002658 1...

Reviews: