background image

GETTING STARTED

2121 Blount Road Pompano Beach, FL 33069        MileMarker.com        1.800.886.8647

PAGE 4

Mounting Options

Winch Mounting

When installing a winch, your installation may vary from the manual diagrams and instructions included here due to physical vehicle 
differences.  Always disconnect the battery from the vehicle to before starting installation. If you choose not to use an ATV/UTV mounting kit you 
may be required to drill holes in a structural support on the ATV/UTV. Be sure the location will be strong enough to support the rated pulling force 
of the winch.


DO NOT DRILL INTO OR NEAR WIRING OR GAS TANK!

NOTE:

NOTE:

It is essential that the mounting surface be flat and the 
winch is mounted such that the three major sections (gear 
housing end, drum and motor end) are in proper alignment.

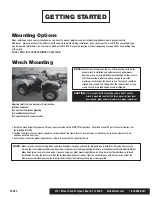
Mounting Points that can be used in this installation: 
(A) Winch and Mount 
(B) Under Seat Control Box Mounting
(C) Handlebar Pendant Mount  
(D) Remote Pendant Receiver Location

1.  Install the mounting kit or prepare a flat and secure location on the ATV/UTV for the winch. The winch mount kit has it’s own instructions for 

the intended ATV/UTV.

2.  Position the winch over the mount and check for operation of the clutch lever to frame clearance. Check for tire to winch clearance. If ok, 

continue on to the next step.

3.  Secure the winch to the mounting bracket or surface chosen with the correct hardware.

Make sure the winch mounting bolts and winch hardware has been checked for proper torque. Sometimes it may be necessary to 
remove the steel cable/synthetic rope from the winch drum to install the mounting hardware or roller/hawse fairlead. All Mile Marker 
Mounting Systems come fairlead ready. If you are using any other mounting platforms, drill two holes for the roller/hawse fairlead 
installation. Position the holes such that the fairlead opening hole stretches from the circumference of the drum to the end of the 
maximum permissible layers on the drum in the direction steel cable/synthetic rope is being rolled.

CAUTION:

Mile Marker recommends the use of its mounting systems for 
proper winch installation and optimum winch performance. 
However, when not using Mile Marker Mounting System, ensure 
that the mounting platform is strong enough to meet the 
maximum rated load of the winch in use. Your winch should be 
aligned and secured to a solid part of the vehicle (front or rear) 
where the full rated load will be evenly distributed.

Summary of Contents for 77-50120W

Page 1: ...Installation Operator s Manual PE5000 5 000 lbs 77 50120W STEEL CABLE 77 53120W SYNTHETIC ROPE 2121 BLOUNT ROAD POMPANO BEACH FL 33069 USA MILEMARKER COM INFO MILEMARKER COM 800 886 8647...

Page 2: ...4 Wiring Instructions 5 Winch Operation 6 Winching Tips Techniques 7 Winch Maintenance 10 Troubleshooting 11 Parts Breakdown and Assembly 12 Warranty 14 TABLE OF CONTENTS 2121 Blount Road Pompano Beac...

Page 3: ...contain long hair USE HEAVY GLOVES When handling or rewinding steel cable synthetic rope always use hand protection to eliminate the possibility of cuts caused by burrs slivers from broken strands DR...

Page 4: ...item with the winch secure the item Do not rely on the winch to hold it for an extended period Examine winch before using Components may be affected by exposure to everyday weathering chemicals salts...

Page 5: ...intended ATV UTV 2 Position the winch over the mount and check for operation of the clutch lever to frame clearance Check for tire to winch clearance If ok continue on to the next step 3 Secure the w...

Page 6: ...outed properly with out any interference with the vehicular components that could potentially damage the cable or cause electrical short Long battery cable runs may have significant voltage drops that...

Page 7: ...cable synthetic rope will spool in on drum 3 Toggle the Joystick up to Power Out winch steel cable synthetic rope When using the handlebar remote you can also toggle the OUT button for the same Power...

Page 8: ...LEVER WHEN THERE IS A LOAD ON THE WINCH Mile Marker electric winches utilize an automatic load holding brake therefore no adjustment to clutch is needed to maintain load Store the remote control cord...

Page 9: ...ch hooks to nylon slings NOTE The shackle must pass through both eyes of the sling The safe working load of the nylon sling is based on the use of both eye ends Do not use the cable or hook to connect...

Page 10: ...s condition that can break the steel cable synthetic rope or damage the winch Avoid pulling at an angle for an extended period This will stack the steel cable synthetic rope up on side of the spool an...

Page 11: ...ue to environmental changes This may result in reduced performance of the winch or even possible electrical shorting Hence always clean the electrical connections before and after using the winch Afte...

Page 12: ...lace motor Water has entered motor Drain and dry Run in short bursts without load until completely dry Motor runs too hot Long period of operation Let winch cool down periodically Motor runs slowly or...

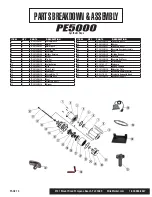
Page 13: ...0W 13 Joint Gear 14 1 77 50120W 14 Screw M4 x 12 15 1 77 50120W 15 Gearbox Base 16 1 77 50120W 16 Seal 17 1 77 50120W 17 Planetary Gear 3 18 1 77 50120W 18 Washer 19 1 77 50120W 19 Planetary Gear 2 20...

Page 14: ...16 1 77 50120W 16 Seal 17 1 77 50120W 17 Planetary Gear 3 18 1 77 50120W 18 Washer 19 1 77 50120W 19 Planetary Gear 2 20 1 77 50120W 20 Washer 21 1 77 50120W 21 Planetary Gear 1 22 2 77 50120W 22 Gea...

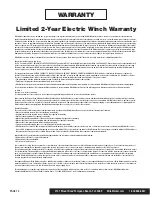
Page 15: ...receiving the Returns Good Authorization RGA Number Attach the RGA Number your name address phone number and a detailed description of problem relating to malfunc tion and a copy of a bill of sale To...

Page 16: ...2121 BLOUNT ROAD POMPANO BEACH FL 33069 USA 800 886 8647 MILEMARKER COM INFO MILEMARKER COM...

Reviews: