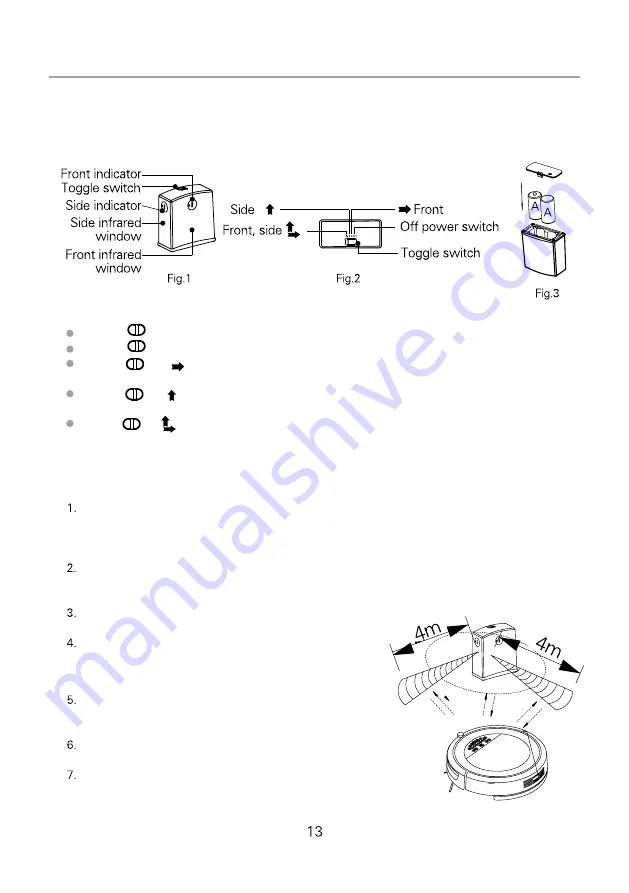
Introduction of the virtual wall
Introduction to the virtual wall
Toggle“
”to turn off the power for virtual wall, switch among front, side, and front/side;
Toggle“
”to Off: the power of virtual wall is cut off.
Toggle“
”to“ ”position: it indicates the power of the virtual wall on, at this point of
time, this is the front position, and the control radius of the virtual wall is 4 m.
Toggle“
”to“ ”position: it indicates the power of the virtual wall is on, at this point of
time, this is the sidewise position, and the control radius of the virtual wall is 4 m.
Toggle“
”to“ ”position: it indicates the power of the virtual wall is on, at this point of
time, this is the front/sidewise position, and the control radius of the virtual wall is 4 m.
Instructions for the virtual wall
Before use, remove the underside plate of the battery compartment of the virtual wall, and place
two D batteries according to the polarity indicated by the instructions into the compartment (Fig. 3).
Attention: Incorrect battery installation will render the virtual wall out of order or
damaged, and may lead to other accidents.
The discharging length of the battery depending on the emission direction, distance and time of
use. To make thrifty use of the battery, please select appropriate emission direction and distance to
reduce the transmission power; and when the virtual wall is not in use, please turn off the power.
Typically, place the virtual wall at staircase or doorway, or at a place
where you do not want the Robot to enter.
When using the virtual wall, make sure the virtual
wall and the vacuum cleaner are placed on the same
plane, and that there is no obstruction in front of the
virtual wall, so as not to affect the barrier effect (Fig. 4).
In actual use, the emission distance of the virtual wall
will depend on environment, the movement
of the Robot and the battery level.
When installing it, keep the virtual wall 50cm or
more from the cleaner, or there will be interference.
Do not point the infrared emission at someone's eyes!


