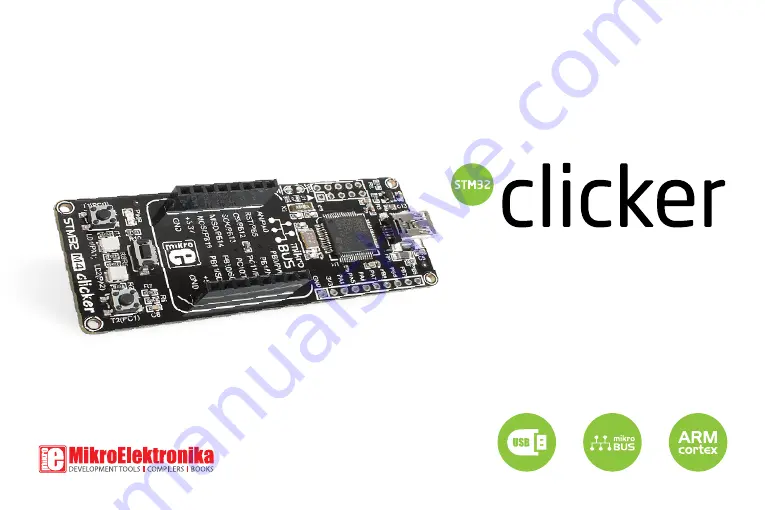
A compact starter kit with your favorite microcontroller and a socket for click
™
add-on
boards. New ideas are just a click away.
Page 1: ...A compact starter kit with your favorite microcontroller and a socket for click add on boards New ideas are just a click away...
Page 2: ...of our company is to design and produce high quality electronic products and to constantly improve the performance thereof in order to better suit your needs The PIC and Windows logos and product name...
Page 3: ...10 step 1 Connecting STM32 M4 clicker 10 step 2 Browsing for HEX file 11 step 3 Selecting HEX file 11 step 4 Uploading HEX file 12 step 5 Finish upload 13 Programming with mikroProg programmer 14 mik...
Page 4: ...rter development kit which brings the innovative mikroBUS socket to your favorite microcontroller It features STM32F415RG a 32 bit ARM Cortex M4 microcontroller two indication LEDs two general purpose...
Page 5: ...C9 100nF C10 100nF C11 100nF C14 100nF C15 100nF C16 2 2uF VCC 3 3 R6 10K C8 100nF R7 1K RST T3 RST VCC 3 3 VCC 3 3 TCK SWC TMS SWD TDI TDO VCC 5V FP1 FERRITE C5 100nF 1 2 3 4 5 GND ID D D VBUS CN1 US...
Page 6: ...indication LED will be automatically turned on The USB connection can provide up to 500mA of current which is more than enough for the operation of all on board and additional modules Figure 2 1 Conn...
Page 7: ...ic VCC 5V FP1 FERRITE C5 100nF 1 2 3 4 5 GND ID D D VBUS CN1 USB MINIB 3 3V VOLTAGE REGULATOR R10 470 PWR VCC 3 3 VCC 3 3 C12 2 2uF R5 39K R3 287K 1 2 3 IN GND OUT 5 4 EN ADJ U2 AP7331 ADJ C13 10uF VC...
Page 8: ...SPI 2 x USART 3 x TIMER 16 bit 2 x TIM PWM 16 bit SDIO MMC 2 x CAN 3 x I2C 2 x SPI 2 x UART 2 x USART 5 x TIMER 16 bit 2 x TIMER 32 bit A P B 1 4 2 M H z 2 x DAC 2 x TIMER 16 bit WWDG RTC IWDG SRAM 1...
Page 9: ...01 02 Using USB HID mikroBootloader Using external mikroProg for STM32 programmer Figure 4 1 STM32F415RG microcontroller The microcontroller can be programmed in two ways 4 Programming the microcontr...
Page 10: ...USB HID mikroBootloader window step 1 Connecting STM32 M4 clicker 01 01 To start connect the USB cable or if already connected press the Reset button on your STM32 M4 clicker Click the Connect button...
Page 11: ...le Figure 4 3 Browse for HEX Figure 4 4 Selecting HEX 01 01 02 01 01 02 Click the Browse for HEX button and from a pop up window Figure 3 4 choose the HEX file which will be uploaded to MCU memory Sel...
Page 12: ...step 4 Uploading HEX file Figure 4 5 Begin uploading Figure 4 6 Progress bar 01 01 01 01 To start HEX file bootloading click the Begin uploading button Progress bar enables you to monitor HEX file up...
Page 13: ...4 7 Restarting MCU Figure 4 8 mikroBootloader ready for next job 01 01 02 Click OK button after the uploading process is finished Press Reset button on STM32 M4 clicker board and wait for 5 seconds Y...
Page 14: ...he development system via 2x5 JTAG connector soldered on the CN2 connector pads Figure 4 9 mikroProg is a fast USB 2 0 programmer with hardware debugger support It supports STM32 M3 and M4 devices fro...
Page 15: ...ractthepackageanddoubleclicktheexecutablesetupfile tostartinstallation Figure 4 10 mikroProg Suite for ARM window Quick guide Click the Detect MCU button in order to recognize the device ID Click the...
Page 16: ...e 4 12 Connecting ST LINK V2 programmer Figure 4 11 mikroProg to ST LINK V2 adaper Page 16 In order to adjust the ST LINK V2 programmer to be connected to the development system it is necessary to pro...
Page 17: ...AP2 PB4 PC12 PC11 PC10 PA15 PA14 PB9 PB8 BOOT0 PB7 PB6 PB5 VSS VDD PC15 PC14 VBAT PC13 PH0 PH1 NRST PC0 PC2 PC1 PA2 PA1 PA0 VDDA VSSA PB0 PC5 PC4 PA7 PB11 PB10 VDD VCAP1 VSS PA3 VDD PA4 PA5 PA6 STM32F...
Page 18: ...Reset button is used to manually reset the microcontroller Pressing the reset button will generate a low voltage level on microcontroller s reset pin LEDs can be used for visual indication of the log...
Page 19: ...PA13 PA12 PA11 PA10 PA9 PA8 PC9 PB14 PB12 PB13 PB15 PC7 PC6 VDD VCAP2 PB4 PC12 PC11 PC10 PA15 PA14 PB9 PB8 BOOT0 PB7 PB6 PB5 VSS VDD PC15 PC14 VBAT PC13 PH0 PH1 NRST PC0 PC2 PC1 PA2 PA1 PA0 VDDA VSSA...
Page 20: ...keep track of time while primary source of power is OFF or unavailable In order to use this option it is necessary to connect solder external battery type CR2032 voltage range from 1 65 to 3 6 V and u...
Page 21: ...40 41 42 48 31 51 26 25 PC3 PC8 PB1 PD2 PB3 PB2 PA13 PA12 PA11 PA10 PA9 PA8 PC9 PB14 PB12 PB13 PB15 PC7 PC6 VDD VCAP2 PB4 PC12 PC11 PC10 PA15 PA14 PB9 PB8 BOOT0 PB7 PB6 PB5 VSS VDD PC15 PC14 VBAT PC1...
Page 22: ...h as many add on boards as possible so you will be able to expand your development board with additional functionality Each board comes with a set of working example code Please visit the click boards...
Page 23: ...Page 23 Relay click Gyro click LightHz click 7seg click Bluetooth2 click EEPROM click THERMO click RFid click Thunder click Pressure click 8x8 click FM click BarGraph click USB SPI click...
Page 24: ...Page 24 8 Dimensions 679 17 2 25 4 4 1000 159 2979 75 6 71 6 2 54 2819 100 1 6 63 8 315 Legend mm mils Mounting hole size 2 79...
Page 25: ...t even if MikroElektronika has been advised of the possibility of such damages MikroElektronika reserves the right to change information contained in this manual at any time without prior notice if ne...
Page 26: ...e experiencing some problems with any of our products or just need additional information please place your ticket at www mikroe com support If you have any questions comments or business proposals do...
Page 27: ...Mouser Electronics Authorized Distributor Click to View Pricing Inventory Delivery Lifecycle Information Mikroe MIKROE 1675...