background image

1.

2.

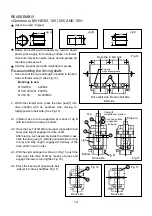
Models MVH-100(120) and MVH-150 are 

different  with  respect  to  bearing(2), 
pendulum(18), hex socket head bolt(19), 
pendulum  pulley(35),  belt  cover  (lower) 
(45) and mounting socket head bolt(46).

For  MVH-150,  three  different  types  of 
pendulum  pulleys(35)  are  available 
according to engine model.

12

22

2324

21

2

5 30

5

3

6

2

36

18

19

19

18

31

8

9

12

5

2

41

42

43

1

20

35

44

7

10

18

19

18

4

19

40

42

43

34

32

33

27

2829

26

47

48

16

15

14

1317

11

2

5

9

25

46

45

37

3938

MVH-100(120) / 150

VIBRATOR

Summary of Contents for MVH-100

Page 1: ...FOR MORE INFORMATION CONTACT US ON 1300 353 986 OR VISIT flextool com au EXCLUSIVE TO SERVICE MANUAL Version 2 0 August 2022 MIKASA REVERSIBLE PLATE COMPACTOR MVH R60H...

Page 2: ...410 00801 MVH R60 100 120 150 SERVICE MANUAL REVERSIBLE SOIL COMPACTOR R...

Page 3: ...and Reassembly Hand Pump System Periodical Inspection and Maintenance Work 1 Tools 1 2 2 3 4 4 8 9 19 21 29 26 2 Inspection Procedure 3 Engine Oil and V belt 4 5 5 1 5 2 5 3 5 4 Operation System Basi...

Page 4: ...h 2 Hexagonal wrench 3 16inch 5mm 8mm 10mm 14mm 3 Plier 4 External snap ring plier Internal snap ring plier bent type can be also used 6 Metal and plastic hammers 7 Pulley puller 8 Sealing compound Lo...

Page 5: ...25 0 25 0 23 0 21 0 21 0 23 3200 3 2 0 35 0 9 1 0 RPF3340X1 0 25 0 25 Reverse Hydraulic oil 2 INSPECTION PROCEDURE 3 Engine Oil and V belt 1 External appearance check 2 Operating test 2 Installation...

Page 6: ...faces thoroughly For tightening bolts and nuts use the specified standard torque and bonding agent Loctite or the like For such bolts and nuts that are not specified see Table of Tightening Torque Bef...

Page 7: ...h its disassembly procedure reversed while observing below Whenever hydraulic hose has been disconnected apply blank plug to it for preven tion of any dust from entering Remove hydraulic hose clamp 27...

Page 8: ...57 61 60 54 57 58 57 62 63 5 1 2 3 4 Insert the slider 53 into throttle body 51 with its groove coming in the back Photo D Install the outer governor wire 64 Photo E In case the end of inner governor...

Page 9: ...lever to throttle gear a b Push in the governor wire inner and shift the slider 53 all the way to the back Photo J Install with triangle mark of the throttle gear coming on top Photo K Plain washers s...

Page 10: ...handle 1 from the base For installing the handle assembly 1 to the base first lightly tighten the nut and bolt which have been tightening the guard hook side of the machine and adjust the resistance o...

Page 11: ...1 lift the base assembly upward The vibrating plate assembly will be separated Coat the bolts and nuts for mounting the shock adsorber with Loctite 242 All the mounting bolts for the basic machine sho...

Page 12: ...sion stop ring 17 from inside of the piston Use a bent nose type stop ring plier for this purpose See Fig 2 Withdraw the piston With the contraction stop ring 14 removed take off bearing 13 and expans...

Page 13: ...MVH R60 VIBRATOR 24 25 26 23 2 5 7 5 3 6 38 2 21 19 2 52 53 51 46 1 22 27 37 39 40 44 43 21 20 21 4 8 9 5 9 5 2 12 11 16 15 14 13 17 35 32 31 30 34 33 29 47 10...
Page 14: ...seal cap 25 Remove pendulums 18 from each pendulum shaft See Fig 8 With the driven shaft assembly pushed out to the side opposite to pulley and the bearing 2 taken out remove the driven shaft assembly...

Page 15: ...r lower 45 and mounting socket head bolt 46 For MVH 150 three different types of pendulum pulleys 35 are available according to engine model 12 22 2324 21 2 5 30 5 3 6 2 36 18 19 19 18 31 8 9 12 5 2 4...

Page 16: ...ring See Fig 12 As shown in Fig 13 remove upper stop ring 5 and engage supports between the drive gear 30 and inner surface of vibrator case Press the drive shaft from top and remove drive gear within...

Page 17: ...cking thoroughly from mating surface of vibrator case and compaction plate Clean and de grease all the other parts as well Coat the press fit area with molybdenum grease Have both of the two bearings...

Page 18: ...21 After inserting driven shaft gear 31 to cam ring 7 lock it with four hex socket head bolts 6x20 44 Driven shaft gear 31 and cam ring should be aligned with punch marks as shown in Fig 23 Bolts shou...

Page 19: ...e to align the punch mark of gear with pendu lum installing position of pendulum shaft before placing the knock pin in the spiral groove Installing with the phase displaced by 180 o will cause operati...

Page 20: ...rcially available bearing use molybdenum extreme pressure type grease to pack Apply grease to the area of piston rod where bearing is inserted Make certain that piston has no scar or scratch Use care...

Page 21: ...e Bond 1215 or equivalent to the thickness of about 0 5mm on the plate side After the liquid packing has hardened in about 15 to 16 hours feed oil to the vibrator Coat the cylinder mounting bolt with...

Page 22: ...pring pin 6x25 20 13 removed take off control shaft 8 7 and cam A Remove bush 9 8 With stop plug 19 18 removed from the bottom of pump body 1 take off the piston 4 from the pump body 1 In case of MVH...

Page 23: ...the cylinder on vibrator side With breather bolt at the cylinder top loosened remove cover 2 and fill the hose and cylinder with oil 46 Hydraulic oil Tighten the bolts after venting air With the handl...

Page 24: ...Vibrator oil Replacement Hydraulic oil Check Hydraulic oil Replacement V belt Clutch Inspection Oil and or fuel leakage Tightness of fasteners Engine oil Check and replenishment Engine oil Replacement...

Page 25: ...n the belt is pressed with our finger at midway between the pulleys When the belt is slackened transmission of engine rotation will be deficient resulting in poor compac tion and accelerated wear of t...

Page 26: ...nch to see oil is up to the port In every 300 hours of operation change the vibra tor oil Drain oil through level check plug hole with the machine inclined by inserting a sleeper or the like under the...

Page 27: ...y after making sure that hydraulic oil in the pump is up to OIL LEVEL Hydraulic oil to use Shell Tellus Oil 46 or its equivalent Change the oil at first 200 hours and in every 1 000 hours of operation...

Page 28: ...l and connect terminal lastly Take out the battery from the machine Checking and cleaning the battery Check vibration isolating mattress as well and replace as necessary Check the battery for crack or...

Page 29: ...plug deficient Cooling fin dirty or damaged Governor adjustment inappropriate Governor spring deficient Fuel circulation deficient Air entering through suction system Rotator clogged with dust Spiral...

Page 30: ...n ring worn Cylinder worm Mating surface between cylinder and cylinder head deficient Nozzle seat loose Air breather hole in tank cap clogged Fuel strainer passage clogged or strainer clogged Fuel str...

Page 31: ...ent neglected Air cleaner element broken or its cleaning neglected Piston and rod seizure and damage Injection pump plunger barrel worn Excessive oil Governor improperly assembled Injection pump rack...

Page 32: ...Continuity not available Continuity available Continuity available Continuity available If battery connection should be reversed in terms of and diode will be burnt immediately NOTE For checking use a...

Page 33: ......

Page 34: ...ed by us is provided without liability or responsibility PROVIDED THAT the foregoing shall not exclude limit restrict or modify the right entitlements and remedies conferred upon any person or the lia...

Reviews: