


12
Hold the tool firmly, and place the socket
over the bolt or nut. Turn the tool on, and
fasten the bolt or nut to the proper torque.
The torque that is required to loosen a
fastener averages 75% to 80% of the
tightening torque, depending on the
condition of the contacting surfaces.
However, if rust or corrosion causes seizing,
more torque may be required.
After fastening, always check the torque
with a torque wrench. The fastening torque
is affected by a wide variety of factors,
including the following:
•
Socket
Failure to use the correct size socket will
cause a reduction in the fastening torque.
A worn socket (wear on the hex end or
square end) will cause a reduction in the
fastening torque.
•
Bolt
Although the torque coefficient and the
class of bolt may be the same, the proper
fastening torque will differ according to the
diameter of the bolt.
OPERATION
Even if the diameters of bolts are the same,
the proper fastening torque will differ
according to the torque coefficient, the
class of bolt and the bolt length.
•
Accessories
The use of a universal joint or an extension
bar (both available separately) will reduce
the fastening force of the Impact Wrench
somewhat. Compensate by fastening for a
longer period of time.
•
Technique
The manner of holding the tool or the
material to be fastened will affect the torque.
WARNING:
Always wear safety
goggles or safety glasses with side
shields during power tool operations, or
when blowing dust. If operation is dusty,
also wear a dust mask.
WARNING:
Do not at any time let
brake fluids, gasoline, petroleum-based
products, penetrating oils, etc. come in
contact with plastic parts. Chemicals can
damage, weaken or destroy plastic, which
may result in serious personal injury.
OPERATION
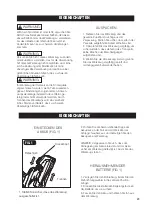
1.BATTERY
CHARGING
The
battery is supplied partially charged. To
ensure full capacity of the battery, completely
charge the battery in the battery charger before
A fully discharged battery pack will charge
in 50 minutes for DB18
5
0 in a surrounding
temperature between 32° F (0° C) and 104° F
(40°
C).
1. Charge the Lithium-Ion battery pack with the
correct charger.
2. Connect the charger to a power supply.
3. Align the raised ribs of the battery pack with
the slot in the charger.
4. Slide the battery pack onto the charger .
5. The charger will communicate with the
battery pack to evaluate the condition of the
battery pack.
6. The POWER BAR LED lights will cycle from
right to left during charging. This is part of the
normal charging operation.
7. After charging is complete, the green LED on
the charger will come on and the POWER BAR
LED lights will go displayed when the POWER
BAR button is pressed while the battery pack is
on the charger.
8. The battery pack will fully charge if left on the
charger, but it will not overcharge.
NOTE:
For your convenience, the charger can
operate with most generators and inverters
rated at 300 watts or higher.
14
14


