background image

Brief instructions

The headings numbered (

A

,

B

,

C

...)

show the operating sequence and can
be used as a brief guide to using your
dryer.

A

Sort the laundry

To ensure an even drying result
separate out the washed laundry and
sort it according to:
. . . the drying level required
. . . the type of fibre or weave
. . . size
. . . the moisture content after spinning.

,

Make sure that objects e.g.

detergent dispensing balls have
been removed from the laundry.
They could melt, and cause damage
to the dryer or the laundry.

– Check seams and stitching to ensure

that padding and linings are intact.

– Fasten duvet covers and pillow cases

to prevent small items from being
trapped inside them.

– Fasten hooks and eyes etc.

– Tie fabric belts and apron strings.

– Sew in or remove underwiring from

bras.

B

Turn on the tumble dryer

^

Switch the dryer on by pressing the

I-On/0-Off

button in.

The tumble dryer may be switched on
after loading, saving energy as the light
will not come on.

C

Load the tumble dryer

^

Press the

Door

button to open the

door.

^

Load the laundry loosely into the
drum.

Do not overload the drum. See the
"Programme chart" for recommended
loads for each programme.
Overloading can cause unnecessary
wear and tear to the laundry and
give a disappointing drying result.

^

Before closing the door make sure
the fluff filter is correctly positioned.

Check the laundry is right inside the
drum so that it cannot get trapped or
damaged when the door is shut.

^

Shut the door either with a gentle
swing, or lean against it and push it
shut.

How to dry correctly

11

Summary of Contents for T 294 C

Page 1: ...uctions for condenser tumble dryer T 294 C To avoid the risk of accidents or damage to the appliance it is essential to read these instructions before it is installed and used for the first time M Nr 06 985 870 en GB ...

Page 2: ...of your appliance with your household waste Please dispose of it at your local community waste collection recycling centre or contact your Dealer for advice Ensure that it presents no danger to children while being stored for disposal Energy saving tips To avoid unnecessarily long drying times and high consumption of energy Make sure that your laundry is thoroughly spun before drying The higher th...

Page 3: ...ing the laundry 13 Adding or removing laundry after a programme has started 13 Programme chart 14 Cleaning and care 16 Emptying the condensed water container 16 Cleaning the fluff filters 17 Cleaning them whilst dry 17 Cleaning them with water 18 Cleaning the tumble dryer 19 Cleaning the condenser unit 20 Removing the condenser unit 20 Checking the condenser unit 21 Cleaning the condenser unit 21 ...

Page 4: ...External drainage via a sink or gully 33 Installation conditions requiring a non return valve 33 Electrical connection 35 Electrical connection U K 35 Consumption data 36 Technical data 37 Programmable functions 40 Altering the residual moisture level in the Cottons programmes 40 Altering the residual moisture level in the Minimum iron programmes 41 Activating and deactivating the buzzer 42 Extend...

Page 5: ... a tumble dryer are increasingly available on the market If using do so at your own risk and follow the instructions provided on the packaging Any other applications may be dangerous Miele cannot be held liable for damage resulting from incorrect or improper use or operation This appliance is not intended for use by persons including children with reduced physical sensory or mental capabilities or...

Page 6: ...ele approved service technician Ensure current is not supplied to the tumble dryer until after maintenance or repair work has been carried out Faulty components must only be replaced by genuine Miele original spare parts Only when these parts are fitted can the safety standards of the tumble dryer be guaranteed If the connection cable is faulty it must only be replaced by a Miele approved service ...

Page 7: ...re the following must not be dried in this tumble dryer fabrics which contain a large proportion of rubber foam rubber or rubber like materials For example products made from latex foam rubber shower caps waterproof textiles rubberised articles and items of clothing and pillows with foam rubber filling items which contain padding or fillings e g pillows jackets If these were damaged the filling co...

Page 8: ...sure the drain hose is securely attached if you hang it in a sink or basin to avoid the hose slipping and the water causing damage Condensed water is not drinking water It can cause health problems in both people and animals Always keep the area around the tumble dryer free of dust and fluff Dust drawn into the tumble dryer can cause blockages in the condenser unit over time Do not let anyone sit ...

Page 9: ...as started dI On 0 Off button To switch the appliance on or off to interrupt a programme The Finish Anti crease lamp will light up as confirmation that the tumble dryer has been switched on eDoor Button To open the door to cancel a programme Pressing this button will open the door even when the appliance is switched off at the mains If the appliance is switched on at the mains and the door is open...

Page 10: ... to shrink depending on the quality of the item They can be partially dried using the Smoothing programme Pure linen should only be machine dried if specified as suitable by the manufacturer on the care label as the surface of the fabric may otherwise become rough They can be partially dried using the Smoothing programme Loopknit garments e g T shirts and underwear tend to shrink depending on thei...

Page 11: ...en hooks and eyes etc Tie fabric belts and apron strings Sew in or remove underwiring from bras B Turn on the tumble dryer Switch the dryer on by pressing the I On 0 Off button in The tumble dryer may be switched on after loading saving energy as the light will not come on C Load the tumble dryer Press the Door button to open the door Load the laundry loosely into the drum Do not overload the drum...

Page 12: ... control panel Before the end of a programme The cooling down phase takes place before the end of a programme so that the garments are not too hot to handle the Cool air indicator lamp will come on The programme is not finished until the cooling down phase is complete The Woollens handcare and Smoothing programmes do not include a cooling down phase At the end of a programme The Finish Anti crease...

Page 13: ...f you try and change a programme the Finish Anti crease light will start flashing You will need to cancel the current programme before you can select a new one Cancelling a programme once it has started and then selecting a different programme Turn the programme selector to Finish When the Anti crease Finish indicator light comes on Select another programme and start it Cancelling a programme once...

Page 14: ...r ironing Minimum iron Max load 3 kg Normal Low temperature Hand iron Fabric type Minimum iron items made of cotton synthetic or blended fabrics e g shirts blouses skirts and table cloths Notes Select Low temperature for fabrics with the r symbol e g acrylic garments Laundry is dried at a lower temperature Select Hand iron for delicate fabrics and to reduce creasing even more reduce the load to 1 ...

Page 15: ...brics Notes To refresh and fluff up woollen garments quickly Woollen fabrics are not dried completely by this programme Remove garments as soon as the programme has finished and leave to finish drying at room temperature Smoothing Max load 3 kg Fabric type Cottons and linen fabrics Minimum iron mixed fibre cotton or synthetic items e g trousers jackets shirts Notes Smooths out creasing caused duri...

Page 16: ...ut slightly towards the right hand side Hold the container with both hands and carry it in a horizontal position Open the shutter and empty out the water To replace the container hold it at a slight angle as when removing it and push it in gently until you feel it click into position Before starting a new programme first switch the tumble dryer off and then on again The Empty out container indicat...

Page 17: ... fingers to remove the fluff from the surface of the filter Remove any fluff from the hollow part of the door holder A cleaning brush is available as an optional extra from your Miele dealer or the Miele Spare Parts Department or use a vacuum cleaner Once clean push the filter back into the door holder until it clicks into position Ensure it is facing the correct way Also clean the door seal 2 wit...

Page 18: ...e same on the other side Rinse all the filters under hot running water Then shake the filters until no more water droplets are visible Dry the filters thoroughly with care Clean the area underneath these filters e g with a vacuum cleaner Do not replace them if they are damp or wet Damp or wet filters could cause operational faults Push the large filter back into the door holder until it clicks int...

Page 19: ...e housing and control panel with a slightly damp cloth and a mild detergent or soapy water The drum and other stainless steel parts can be cleaned with a suitable propietary stainless steel cleaner following the manufacturer s instructions Do not use solvents abrasive cleaners glass cleaners or all purpose cleaners These could damage plastic sufaces and other parts The tumble dryer must never be h...

Page 20: ...he dryer is used frequently then clean the condenser unit after approx 100 drying cycles Removing the condenser unit Open the service panel The hooks at the side will prevent the panel from falling off Now remove the panel by pulling it diagonally upwards Then place it to one side Turn the lever on the inner cover downwards to the vertical position Pull the cover forwards Then remove it by pulling...

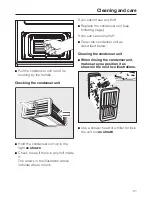
Page 21: ...the illustration above indicate where to look If you cannot see any fluff Replace the condenser unit see following page If you can see some fluff Clean the condenser unit as described below Cleaning the condenser unit When rinsing the condenser unit make sure you position it as shown in the next two illustrations Use a shower head or similar to rinse the unit out as shown Cleaning and care 21 ...

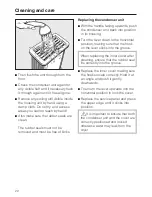
Page 22: ...it back into position in its housing Turn the lever down to the horizontal position making sure that the hook on the lever clicks into the groove When replacing the inner cover after cleaning ensure that the rubber seal fits correctly into the groove Replace the inner cover making sure the hooks locate correctly Hold it at an angle and push it gently downwards Then turn the lever upwards into the ...

Page 23: ...d liable for unauthorised work General problems Problem Possible cause Remedy The tumble dryer fails to start when switched on No obvious cause Have you followed the switch on procedure correctly see How to dry correctly Is the plug correctly inserted in the socket and switched on Is the door closed properly Has the fuse or circuit breaker tripped Items made of synthetic fibres are charged with st...

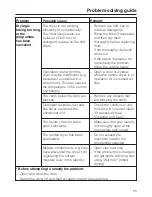
Page 24: ...ing programme next time see Programme chart Water leaks from the tumble dryer after the condenser unit has been cleaned The inner cover of the condenser unit has not been locked properly and or the condenser unit has not been positioned correctly Fluff has collected in the condenser unit housing Ensure that the condenser unit is positioned correctly and lock the inner cover Check the rubber seals ...

Page 25: ...le dryer is in operation for increased air flow The vents below the door are blocked Remove any objects that are blocking the vents Detergent residues hair and fine fibres can block the condenser unit Check the condenser unit from time to time and clean it if necessary see Cleaning and Care The laundry has not been spun sufficiently Make sure that your laundry is thoroughly spun at the appropriate...

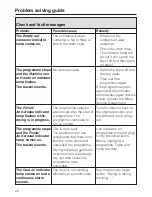
Page 26: ...lamp flashes while drying is in progress The programme selector was moved after the start of a programme The programme continues to run as normal Turn the selector back to the original position and the indicator lamp will go out The programme stops and the Finish Anti crease indicator lamp comes on The buzzer sounds This is not a fault The electronic unit has recognised that there is no laundry in...

Page 27: ...rist in the direction of the arrow to open the cover The cover will open downwards The temperature resistant lamp should only be ordered from your Miele Dealer or the Miele Spare Parts Department The lamp specification and maximum wattage is stated on the data plate and on the lamp cover Replace the lamp To close the cover push it upwards and press it on the left and right until you hear it click ...

Page 28: ...re shown on the data plate situated on the right hand side below the drum aperture Future updates PC The indicator or check light marked PC on the fascia panel is the interface used by the Miele service technicians during service work for testing purposes and for updating the appliance s programme data Appliance guarantee Please see the guarantee card supplied with your appliance Optional accessor...

Page 29: ...ection cable bCondensed water container cControl panel dDoor eService panel for condenser unit fFour height adjustable screw feet gExternal drainage options e g via wash basin wash basin drain outlet or gully Installation 29 ...

Page 30: ...er kit with a coverplate to replace the appliance lid is required It must be fitted by a suitably qualified person to ensure electrical safety N B If you wish to push your appliance under a worktop and there is space to do this without removing the lid the building under kit is not necessary Otherwise the building under kit is essential The building under kit is supplied with its own installation ...

Page 31: ... dryer is located in a small room Otherwise running times and energy consumption could be increased Washer dryer stack The tumble dryer can also be combined with a Miele washing machine in a washer dryer stack The appropriate WTV stacking kit available to order to match your dryer is required Stacking kits must only be installed by a suitably qualified fitter Before moving the tumble dryer again e...

Page 32: ...on conditions requiring a non return valve The following optional accessories are available an extension hose a non return valve kit for connection to an external condensed water outlet includes an extension hose Maximum delivery head with non return valve fitted 1 00 m Arranging the drain hose Do not pull on the drain hose and do not stretch it or allow it to become kinked as it could get damaged...

Page 33: ...the fitting of a non return valve available as an optional accessory A non return valve will prevent the risk of back flow out of the dryer which could cause damage A non return valve is required If the tumble dryer is connected to a sink drain outlet see the following section If the tumble dryer is connected to a drainage system already in use by another appliance e g a dishwasher or washing mach...

Page 34: ... hose 4 to adapter 1 Use a screwdriver to tighten hose clip 3 up close to the nut Non return valve 5 has to be fitted with the arrow pointing in the direction of flow i e towards the sink Otherwise water will not drain out of the appliance Fit non return valve 5 to the tumble dryer drain hose 6 make sure it is fitted in the correct direction see arrow on non return valve Secure the non return valv...

Page 35: ... install a suitable residual current device RCD Contact a qualified electrician for advice Do not connect via an extension lead Extension leads do not guarantee the required safety of the appliance e g danger of overheating Non rewireable plugs BS 1363 The fuse cover must be refitted when changing the fuse and if the fuse cover is lost the plug must not be used until a suitable replacement is obta...

Page 36: ...0 1 00 32 Automatic 3 5 800 2 10 85 Woollens handcare 2 0 1000 0 15 4 Smoothing 3 0 1000 0 30 8 Weight of dry laundry EN 61121 2005 test programme All data without a star against it was calculated using EN 61121 2005 Before testing in accordance with EN 61121 dry a 3 kg load of cotton laundry with 70 residual moisture as per the above standard using the Cottons Normal programme Consumption data ca...

Page 37: ...imum capacity 6 kg dry weight Capacity of condensed water container approx 3 5 litres Drain hose length 1 5 m Maximum delivery head 1 5 m Maximum drain hose length 4 m Length of connection cable 2 m Voltage see data plate Connected load see data plate Fuse rating see data plate plug Lamp wattage see data plate Energy consumption see Consumption data Test certificates awarded see data plate Technic...

Page 38: ...38 ...

Page 39: ...ammable functions for changing default settings The programmable functions are used to alter the tumble dryer s electronics to suit changing requirements Programmable functions can be altered at any time 39 ...

Page 40: ...p constantly D and then release the Start button ETurn the programme selector to the Cottons Normal position FPressing the Start button switches between activating and deactivating the drier setting If the Drying indicator lamp is flashing the drier setting is activated If the Drying indicator lamp is not flashing the drier setting is not activated and the residual moisture level is on the standar...

Page 41: ...constantly D and then release the Start button ETurn the programme selector to the Cottons Low temperature position FPressing the Start button switches between activating and deactivating the drier setting If the Drying indicator lamp is flashing the drier setting is activated If the Drying indicator lamp is not flashing the drier setting is not activated and the residual moisture level is on the ...

Page 42: ...icator lamp lights up constantly D and then release the Start button ETurn the programme selector to the Cottons Hand iron position FPressing the Start button switches between activating and deactivating the buzzer If the Drying indicator lamp is not flashing the buzzer is deactivated If the Drying indicator lamp is flashing the buzzer is activated Whilst doing this the Cool air indicator lamp wil...

Page 43: ...dicator lamp lights up constantly D and then release the Start button ETurn the programme selector to the Cottons Machine iron position FPressing the Start button alters the cooling down time If the Drying indicator lamp flashes once The cooling down time will be five minutes longer If the Drying indicator lamp flashes twice The cooling down time will be ten minutes longer If the Drying indicator ...

Page 44: ...e Start indicator lamp lights up constantly D and then release the Start button ETurn the programme selector to the Minimum iron Low temperature position FPressing the Start button switches between activating and deactivating this setting If the Drying indicator lamp is not flashing Anti crease is deactivated If the Drying indicator lamp is flashing Anti crease is activated Factory default setting...

Page 45: ... the I On 0 Off button CWait until the Start indicator lamp lights up constantly D and then release the Start button ETurn the programme selector to Minimum iron Normal FPressing the Start button alters the drying level If the Drying indicator lamp is flashing the standard drying level is Normal If the Drying indicator lamp is not flashing the increased drying level is not activated and the drying...

Page 46: ...rn the programme selector to the Automatic position F Pressing the Start button alters the drying level If the Drying indicator lamp flashes twice the standard drying level is Normal If the Drying indicator lamp is not flashing the standard drying level is Hand iron If the Drying indicator lamp flashes once the drying level has not been changed and will remain on the stan dard setting Normal Whils...

Page 47: ...47 ...

Page 48: ...Alteration rights reserved 2008 M Nr 06 985 870 03 ...

Reviews: