background image

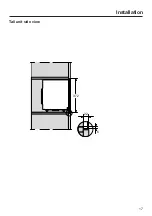
Installation

18

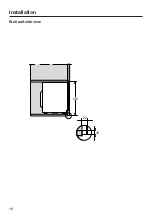
Wall unit side view

372

16

22

Summary of Contents for M 2230 SC

Page 1: ...ting instructions Microwave oven To avoid the risk of accidents or damage to the appliance it is essential to read these instructions before it is installed and used for the first time en GB M Nr 11 198 300 ...

Page 2: ...ainers for microwave ovens 32 Material and shape 32 Testing containers 34 A heat retaining cover 35 Before using for the first time 37 Setting the time 37 Altering the time of day 37 Operation 38 Opening the door 38 Placing the dish in the oven 38 Turntable 38 Closing the door 38 Starting a programme 38 door message 39 Interrupting or re starting a programme 39 Altering settings 39 Cancelling a pr...

Page 3: ...grammes 43 Automatic defrosting 43 Automatic cooking 43 Cooking food from frozen 43 Cooking fresh food 43 Using an automatic programme 43 Recipes for automatic programmes 45 Changing settings 47 Reheat 50 Cooking 52 Defrost 53 Examples of use 54 Note for test institutes 56 Cleaning and care 57 Problem solving guide 60 After sales service 63 Contact in case of malfunction 63 Warranty 63 ...

Page 4: ...tions and warnings Miele cannot be held liable for injury or damage caused by non compliance with these instructions Keep these instructions in a safe place and pass them on to any future owner Correct application This microwave oven is intended for private domestic use This appliance is not intended for outdoor use Do not use the appliance at altitudes of above 2000 m The microwave oven is intend...

Page 5: ...hting Replacement lamps may only be fitted by a Miele authorised technician or by the Miele Customer Service Department Safety with children Children under eight years of age must be kept away from the appliance unless they are constantly supervised Children aged eight and older may only use the microwave oven without supervision if they have been shown how to use it in a safe manner Children must...

Page 6: ...o appliance malfunctions Do not open the appliance housing under any circumstances Before connecting the appliance to the mains supply ensure that the connection data on the data plate voltage and frequency match the mains electricity supply This data must correspond in order to avoid the risk of damage to the appliance Compare this before connecting the appliance to the mains Consult a qualified ...

Page 7: ... off at the wall socket and the plug withdrawn Pull by the plug and not by the mains connection cable to disconnect your appliance from the mains electricity supply the mains circuit breaker is switched off the mains screw out fuse is removed in countries where this is applicable Miele can only guarantee the safety of the appliance when genuine original Miele replacement parts are used Faulty comp...

Page 8: ...Warning and Safety instructions 8 Reliable and safe operation of this microwave oven can only be assured if it has been connected to the mains electricity supply ...

Page 9: ...nding time see charts which should be added to the time needed for reheating defrosting or cooking During the standing time the temperature is distributed evenly in the food Always remember that times for cooking reheating and defrosting in a microwave oven are usually considerably shorter than with traditional methods of cooking food Excessively long cooking times can lead to food drying out and ...

Page 10: ...ff Be careful when removing dishes from the appliance Although heat is not normally produced in the container itself by the microwaves apart from stoneware heat transfer from the food to the container may be considerable making the container itself hot The dish is only warmed by the heat of the food Before serving always check the temperature of the actual food itself after taking it out of the mi...

Page 11: ... be placed in the container To avoid fuelling any flames do not open the oven door if smoke occurs inside the appliance Interrupt the process by switching the appliance off and disconnect it from the mains electricity supply Do not open the door until the smoke has dispersed Oils and fats can ignite if allowed to overheat Never leave the microwave oven unattended when cooking with oil or fats Do n...

Page 12: ...rowave oven in certain circumstances and could even be dangerous Fire hazard Please refer to the relevant instructions in Cleaning and care Fire hazard Plastic containers which are not suitable for use in microwave ovens can be badly damaged and cause damage to the appliance if used Do not use any containers or cutlery made from or containing metal aluminium foil lead crystal glassware temperature...

Page 13: ... Food with a thick skin or peel such as tomatoes sausage potatoes and aubergines can burst when heated Pierce or score the skin of these types of food several times to allow steam to escape Dishes with hollow knobs or handles are not suitable for use with microwave power Moisture which has gathered in the hollow recesses can cause pressure to build up and the item can explode If the hollow recess ...

Page 14: ...Warning and Safety instructions 14 Accessories Only use original Miele accessories If other parts are used warranty performance and product liability claims will be invalidated ...

Page 15: ...l away from children Remove all the packaging materials from the appliance Do not remove the cover from the microwave outlet inside the oven compartment or the film on the inside of the door Check the appliance for any damage Health risk caused by a faulty appliance Operating a damaged appliance can result in microwave leakage and present a hazard to the user Do not use the microwave oven if the a...

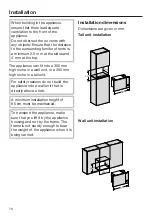
Page 16: ...a wall unit or a 360 mm high niche in a tall unit For safety reasons do not build the appliance into a wall unit that is directly above a hob A minimum installation height of 85 cm must be maintained To transport the appliance make sure that you lift it by the appliance housing and not by the frame The frame is not sturdy enough to bear the weight of the appliance when it is being carried Installa...

Page 17: ...Installation 17 Tall unit side view 372 6 22 ...

Page 18: ...Installation 18 Wall unit side view 372 16 22 ...

Page 19: ...Installation 19 Tall unit connection 3 15 62 1 2 372 595 a Front view b Mains connection cable Length 1600 mm c No connections permitted in this area ...

Page 20: ...Installation 20 Wall unit connection 15 2 3 62 595 372 1 a Front view b Mains connection cable Length 1600 mm c No connections permitted in this area ...

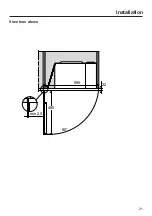
Page 21: ...Installation 21 View from above 90 22 480 595 min 2 5 ...

Page 22: ...ries include an adapter which helps to position the hook strip There are 2 arrows on this adapter which allow the right wall thickness of the niche to be selected The standard wall thicknesses are 16 mm or 19 mm Observe the two wall thickness measurements which can be found in the frame on the back of the appliance Insert the adapter so that the arrow points to the number that corresponds to the w...

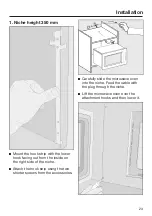
Page 23: ...out from the inside on the right side of the niche Attach the hook strip using the two shorter screws from the accessories Carefully slide the microwave oven into the niche Feed the cable with the plug through the niche Lift the microwave oven over the attachment hooks and then lower it ...

Page 24: ...e height 360 mm When delivered 4 appliance feet are mounted for a niche height of 350 mm For a niche height of 360 mm the feet need to be raised Remove all the accessories including the turntable and the roller ring from the microwave oven compartment Place the microwave oven on is right hand side so that the front frame overhangs the front of the table or the work surface Unscrew the 4 appliance ...

Page 25: ...ount the hook strip with the upper hook facing out from the inside on the right side of the niche Attach the hook strip using the two shorter screws from the accessories Now proceed as described in 1 Niche height 350 mm ...

Page 26: ...VDE 0100 requirements and local regulations e g BS 7671 in the UK If the connection cable is damaged it must only be replaced with a specific connection cable of the same type available from the Miele Customer Service Department For safety reasons such replacement may only be carried out by a qualified technician or the Miele Customer Service Department The necessary connection data can be found o...

Page 27: ...lso contain specific materials compounds and components which were essential for their correct function and safety These could be hazardous to human health and to the environment if disposed of with your domestic waste or if handled incorrectly Please do not therefore dispose of your old appliance with your household waste Please dispose of it at your local community waste collection recycling cen...

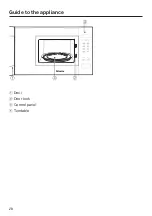
Page 28: ...Guide to the appliance 28 a Door b Door lock c Control panel d Turntable ...

Page 29: ...ng through lists and changing values c OK button for confirming values selecting functions and saving settings d Various power levels of the microwave oven e Automatic programmes f Minute minder g button for selecting appliance settings h Start Add a minute Quick microwave button i Stop Cancel button j Door release ...

Page 30: ...through a suitable container and find their way directly into the food All food contains moisture molecules which when subjected to microwave energy start to oscillate at a rate of 2 5 billion times a second This vibration creates heat It first starts developing around the outside of the food and then slowly penetrates towards the centre The more water a food contains the faster it is reheated or ...

Page 31: ...tter dissolving gelatine preparing cake glazes and bottling small amounts of fruit and vegetables Functions Microwave Solo mode Suitable for defrosting reheating and cooking Automatic programmes You can choose from the following automatic programmes 5 defrosting programmes A 1 to A 5 3 cooking programmes for frozen food A 6 to A 8 3 cooking programmes for fresh food A 9 to A 11 These programmes ar...

Page 32: ... lid knobs When using containers with hollow parts moisture can get inside and pressure can build up causing the container to crack or shatter Do not use containers with hollow handle elements or lid knobs unless the hollow parts are sufficiently ventilated Metal Metal containers aluminium foil metal cutlery and crockery with metallic decoration such as gold rims or cobalt blue must not be used in...

Page 33: ...istant glass or ceramic dishes are ideal for use with microwave power Crystal glass is unsuitable as it contains lead which could cause the glass to crack in the microwave It is therefore not suitable Porcelain Porcelain is a suitable material However do not use porcelain with gold or silver edging or items with hollow knobs or handles as insufficient ventilation may cause pressure Stoneware Decor...

Page 34: ...flammable materials can ignite Do not leave the appliance unattended when reheating or cooking food in single use containers made of plastic paper or other inflammable materials To protect the environment we do not recommend the use of single use containers Testing containers If in doubt as to whether glass earthenware or porcelain plates or dishes are suitable for use in a microwave oven a simple...

Page 35: ...he food Damage due to heat sensitive plastic The material of the cover can generally withstand temperatures of up to 110 C see manufacturer information At higher temperatures the plastic can distort and fuse with the food The cover may therefore only be used in microwave ovens and only in Microwave Solo mode Damage due to covered openings If the cover is used with a container with a small diameter...

Page 36: ...e can build up during reheating in sealed containers or bottles causing them to explode Sealed glass containers such as jars of baby food must be opened before they are heated in the microwave oven Do not attempt to heat them up unopened With baby bottles the screw top and teat must be taken off ...

Page 37: ... hours Confirm with OK Use the arrow buttons and to set the minutes Confirm with OK The set time is now adopted You can switch between the 24 hour and 12 hour format 1 p m see the Changing appliance settings chapter The time of day display can be set to switch itself off from 11 p m to 5 a m see the Changing appliance settings chapter Altering the time of day Press the button The display shows P1 ...

Page 38: ...n again to resume an interrupted cooking programme The appliance will not start again if the door has not been closed properly Starting a programme Select a microwave power level by pressing the corresponding sensor control Touch the sensor control for the power level you want and the microwave power level will light up in the display Use the arrow buttons to set the cooking duration you want minu...

Page 39: ...e appliance If the Start button is pressed without the door having first been opened the word door appears in the display It is possible that there is no food in the appliance because the door has not been opened for a long time approx 20 minutes You cannot start a process until the door is opened Interrupting or re starting a programme At any time you can interrupt a programme Press the Stop C bu...

Page 40: ...ess cancels the function The keeping warm function cannot be set separately You can deactivate this function see Changing settings Quick microwave Pressing the Start button is sufficient to set the appliance operating on maximum power for one minute Press the Start button The appliance runs at maximum power for a cooking duration of 1 minute if the button is not pressed again The cooking duration ...

Page 41: ...il a buzzer sounds and the key symbol appears in the display The key symbol will go out after a short time All appliance functions are now locked Only the minute minder can be used when the system lock is activated see Minute minder chapter After an interruption to the power supply the system lock will need to reactivated Cancelling the system lock To cancel the system lock press the OK button aga...

Page 42: ...entry Press the button The current minute minder time is stopped Use the arrow buttons to change the minute minder and confirm with OK The minute minder will continue running Deleting the minute minder duration Press the Stop C button The current minute minder time is stopped Using the minute minder plus a cooking programme The minute minder can be used at the same time as a cooking programme and ...

Page 43: ...Chicken A 4 Cake A 5 Bread This programme is particularly suitable for defrosting frozen sliced bread If possible place single slices in the appliance or separate the slices when the buzzer sounds halfway through the defrosting time Automatic cooking There are 3 programmes each for frozen and fresh food The standing time for each of these programmes is approx 2 minutes Cooking food from frozen A 6...

Page 44: ...pt the programme to turn or stir the food and then continue the programme The programmed duration can if necessary be extended by a few minutes during operation by touching Start repeatedly until the time required shows in the display In all programmes it is only possible to extend the time by a few minutes An audible tone will sound when the cooking programme is complete The interior lighting goe...

Page 45: ...le and cook About halfway through the cooking duration a buzzer will sound to prompt you to turn or stir the food When cooking vegetables in a sauce the weight entered must include the sauce Do not exceed the maximum weight guidelines Carrots in a chervil cream sauce serves 2 Total time required 25 35 minutes Ingredients 350 g carrots cleaned 5 g butter 50 ml vegetable stock instant 75 ml crème fr...

Page 46: ... Fish Fish curry serves 4 Total time required 35 45 minutes Ingredients 300 g pineapple chunks 1 red pepper 1 small banana 500 g firm white fish 3 tbsp lemon juice 30 g butter 100 ml white wine 100 ml pineapple juice Salt sugar and chilli powder 2 tbsp cornflour Method Dice the fish and place in a suitable container Drizzle with lemon juice Quarter the peppers remove the seeds and pith and cut int...

Page 47: ...s the button The display shows P 1 Select the appliance setting you want to change using the arrow buttons Confirm your selection with OK Depending on the appliance setting you can now enter values or select setting options using the arrow buttons Press the OK button if you have not changed a setting and want to switch to another Press the Stop C button if you do not want to change any other appli...

Page 48: ...ime switch off is deactivated Night time switch off is activated The time of day display is switched off between the hours of 11 p m and 5 a m Unit of weight Food weight is displayed in grams g Food weight is displayed in pounds lb Automatic keeping warm function The automatic keeping warm function is deactivated The automatic keeping warm function is activated Quick microwave Power The maximum po...

Page 49: ...ated When demo mode is deactivated _ _ _ _ appears briefly in the display Demo mode is activated When a button or selector is operated appears briefly in the display The appliance cannot be operated Factory defaults Factory default settings have been changed Factory default settings have been restored or have not been changed ...

Page 50: ...g point of the liquid may be reached without the production of typical bubbles The liquid does not boil evenly throughout This so called boiling delay can cause a sudden build up of bubbles when the container is removed from the microwave or shaken which can lead to the liquid boiling over suddenly and explosively The formation of bubbles can be so strong that the pressure forces the appliance doo...

Page 51: ...iner It may be hot Although the container is not normally heated by the microwaves apart from stoneware heat may transfer from the food to the container Allow food to stand for a few minutes at room temperature at the end of a reheating process This enables the heat to spread evenly throughout the food Risk of burning due to hot food The food can be very hot after reheating After reheating food es...

Page 52: ... an appropriate length of time Food with a thick skin or peel such as tomatoes sausages jacket potatoes and aubergines should be pierced or the skin scored in several places before cooking to allow steam to escape and to prevent the food from bursting Risk of injury due to eggs with shells Eggs heated in their shells can burst even after they have been taken out of the oven compartment Eggs can on...

Page 53: ...lla It is particularly important to observe food hygiene rules when defrosting poultry Do not use the liquid produced during defrosting Meat poultry and fish does not need to be fully defrosted before cooking Defrost until the food has started to thaw The surface will then be sufficiently thawed to absorb herbs and seasoning Defrosting and cooking Deep frozen food can be defrosted and immediately ...

Page 54: ...leave to prove Making popcorn 1 tbsp 20 g popcorn 800 3 4 Place popcorn in a 1 litre container cover and cook sprinkle with sugar or salt after cooking Chocolate coated marshmallows 20 g 600 0 10 0 20 Place on a plate do not cover Steeping oil for salad dressing 125 ml 150 1 2 Heat uncovered on a gentle heat Tempering citrus fruits 150 g 150 1 2 Place on a plate do not cover Cooking bacon 100 g 80...

Page 55: ...ntity MW power level W Duration in minutes Notes Strawberry jam 300 g strawberries 300 g jam sugar 800 7 9 Mix the fruit and sugar in a deep container cover and cook The information given in this chart is intended only as a guide ...

Page 56: ...meter at the upper rim 220 mm cook uncovered Minced meat 900 g 600 450 6 11 5 Container see Standard dimensions at the upper rim 250 mm x 124 mm cook uncovered Defrost meat minced meat 500 g 150 12 5 10 Container see standard do not cover turn halfway through defrosting Raspberries 250 g 150 7 3 Container see Standard cook uncovered Allow the food to stand at room temperature for the standing time...

Page 57: ...lt and in extreme cases impossible The oven compartment and the inside of the door can be wiped using a mild detergent or a little washing up liquid and water Wipe dry with a soft cloth For heavier soiling heat a glass of water inside the oven compartment for 2 or 3 minutes until the water begins to boil The steam will collect on the walls and soften the soiling The oven interior can now be wiped ...

Page 58: ...turntable and wash in the dishwasher or by hand Always keep the roller ring underneath it clean as well as the oven floor Otherwise the turntable will not turn smoothly Clean the surfaces between the turntable and the roller ring Do not turn the turntable and or locator manually as this could damage the drive motor Appliance front Do not let water or any object find its way into or block the air v...

Page 59: ...o avoid damaging the surfaces of the appliance do not use detergents containing soda ammonia acids or chlorides cleaning agents containing descaling agents abrasive cleaning agents e g scouring powder scouring liquid or pumice stones cleaning agents containing solvents stainless steel cleaning agents dishwasher cleaner oven sprays glass cleaning agents hard abrasive sponges and brushes e g pot sco...

Page 60: ...e the household electricity supply or another appliance disconnect the appliance from the electricity supply and contact a qualified electrician or the Miele Customer Service Department see Customer service chapter A noise can be heard after a cooking programme This is not a fault The cooling fan will continue to run for a while after the oven has been switched off to prevent any humidity building...

Page 61: ... with aluminium foil Remove the aluminium foil Sparks are being created by the use of crockery with a metallic finish Please observe the information on suitable containers The time of day in the display is not accurate If there has been a power cut the time automatically switches back to 12 00 The time of day needs to be reset Set the correct time of day Food cools down too quickly In the microwav...

Page 62: ...or defrosting programme There may be insufficient air circulation Check whether the air inlet or outlet is blocked Remove any obstruction The appliance switches off automatically in cases of overheating Cooking can be continued after a cooling down period The appliance switches itself off again Contact Miele Service ...

Page 63: ...roblem could have been resolved as described in these instructions When contacting your Dealer or Miele please quote the model and serial number of your appliance This information can be found on the data plate located on the front of the oven interior Warranty The appliance warranty is valid for 2 years from date of purchase In the UK you must activate your cover by calling 0330 160 6640 or regis...

Page 64: ......

Page 65: ......

Page 66: ......

Page 67: ...ara Sapura Kencana Petroleum Solaris Dutamas No 1 Jalan Dutamas 1 50480 Kuala Lumpur Malaysia Phone 603 6209 0288 Fax 603 6205 3768 Miele New Zealand Limited IRD 98 463 631 Level 2 10 College Hill Freemans Bay Auckland 1011 New Zealand Tel 0800 464 353 Internet www miele co nz New Zealand Miele Pte Ltd 163 Penang Road 04 03 Winsland House II Singapore 238463 Tel 65 6735 1191 Fax 65 6735 1161 E Mai...

Page 68: ...M Nr 11 198 300 01 en GB M 2230 SC ...

Reviews: