background image

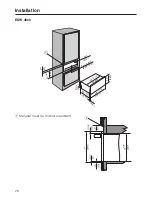
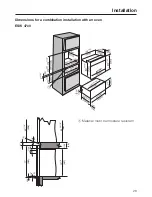
Dimensions for a combination installation with an oven

ESW 47x0

a

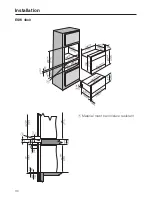
Material must be moisture resistant

Installation

29

(25)

(596)

23

7/16"

(580)

(280)

11"

(5)

3/8"

(10)

1"

(2,8)

(43)

22

(257)

a

13/16"

11/16"

1

11/16"

1/8"

3/16"

(18)

10

1/8"

Summary of Contents for ESW 4700 FB

Page 1: ... ESW 47xx ESW 48xx en_CA Installation repair and maintenance work should be performed by a Miele authorized service technician in accordance with national and local safety regulations and the provided installation instructions ...

Page 2: ...the appliance to the power supply make sure that the voltage and frequency listed on the data plate correspond with the household electrical supply This data must correspond to prevent machine damage Consult an electrician if in doubt Only operate the warming drawer after it has been installed into the countertop Installer Please leave these instructions with the consumer Power supply This applian...

Page 3: ...he drawer from sliding open or closing on its own The drawer cannot be leveled after it has been installed If necessary install a shelf within the cabinetry to support the drawer Steam from the vents can damage the cabinetry surrounding the warming drawer Solo Installation A minimum gap of 2 5 cm must be present between the upper edge of the warming drawer and the cabinetry Installation in combina...

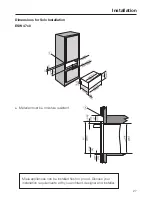
Page 4: ...or Solo Installation ESW 47x0 a Material must be moisture resistant Installation 27 Miele appliances can be installed flush or proud Discuss your installation requirements with you architect designer and installer ...

Page 5: ...ESW 48x0 a Material must be moisture resistant Installation 28 26 757 248 582 280 659 257 29 10 1 8 11 13 16 15 16 25 15 16 22 1 9 3 4 51 610 2 660 724 1 2 26 28 24 a ...

Page 6: ...nsions for a combination installation with an oven ESW 47x0 a Material must be moisture resistant Installation 29 25 596 23 7 16 580 280 11 5 3 8 10 1 2 8 43 22 257 a 13 16 11 16 1 11 16 1 8 3 16 18 10 1 8 ...

Page 7: ...ESW 48x0 a Material must be moisture resistant Installation 30 ...

Page 8: ...tely out and loosen the nuts Carefully lift the drawer and pull it slowly out Set the drawer down on a flat stable surface Push the casing in the cabinetry Secure the casing in the cabinetry with the six screws Inserting the drawer Pull out the telescopic skis from the casing Set the drawer on the telescopic skis and secure with the two nuts Installation 31 ...

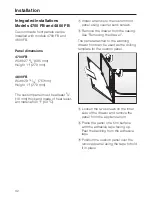
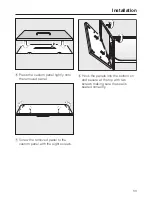
Page 9: ...l a handle to the custom front panel using counter sunk screws b Remove the drawer from the casing See Removing the drawer The panel attached to the warming drawer front can be used as the drilling template for the custom panel c Loosen the two screws on the inner side of the drawer and remove the panel from the appliance front d Place the panel on a firm surface with the adhesive tape facing up P...

Page 10: ...ghtly onto the removed panel g Screw the removed panel to the custom panel with the eight screws h Hook the panels into the bottom on and secure at the top with two screws making sure the seal is seated correctly Installation 33 ...

Page 11: ...Alteration rights reserved 3206 M Nr 06 543 320 06 en US ...

Reviews: