background image

IMPORTANT SAFETY INSTRUCTIONS

4

Children

 

As with any appliance, close supervision is necessary when used

by children.

 

Please supervise children in the vicinity of the hood and do not let

them play with it.

 

Danger of suffocation! Ensure that any plastic wrappings, bags,

etc. are disposed of safely and kept out of the reach of children.

Technical safety

 

WARNING: TO REDUCE THE RISK OF FIRE, ELECTRIC SHOCK,

OR INJURY TO PERSONS, OBSERVE THE FOLLOWING:

– Use this appliance only in the manner intended by the

manufacturer. If you have questions, contact Miele.

– Before servicing or cleaning the appliance, switch power off at

the service panel and lock the service disconnecting means to

prevent power from being switched on accidentally. If the service

disconnecting means cannot be locked, securely fasten a

prominent warning device, such as a tag, to the service panel.

 

Installation, repair and maintenance work should be performed by

a Miele authorized service technician in accordance with national

and local safety regulations and the provided installation

instructions. Contact Miele’s Technical Service Department for

examination, repair or adjustment. Repairs and other work by

unauthorized persons could be dangerous and may void the

warranty.

 

A damaged ventilation hood oven can be dangerous. Always

check for visible signs of damage. Never use a damaged ventilation

hood.

Summary of Contents for 09 968 280

Page 1: ...nd Installation Instructions Ventilation Hood To prevent accidents and damage to the appliance you must read these instructions before installing the appliance and using it for the first time en US M Nr 09 968 280 ...

Page 2: ...surfaces 19 Grease filter 19 OdorFree Charcoal Filter 21 Disposing of the OdorFree Charcoal Filter 21 Changing a light bulb 22 Installation 23 Before installation 23 Removing the protective film 23 Installation Instructions 23 Disassembly 23 Installation parts 24 Appliance dimensions 26 Distance between cooktop and ventilation hood S 28 Installation recommendations 29 Drilling diagram for wall mou...

Page 3: ...ON For General Ventilating Use Only Do Not Use To Exhaust Hazardous Or Explosive Materials And Vapors This appliance is intended for residential use only Use only as described in these operating instructions This ventilation hood is not intended for outdoor use It must only be used to extract and clean vapors produced during cooking Any other use occurs at the owner s own risk This appliance is su...

Page 4: ... appliance switch power off at the service panel and lock the service disconnecting means to prevent power from being switched on accidentally If the service disconnecting means cannot be locked securely fasten a prominent warning device such as a tag to the service panel Installation repair and maintenance work should be performed by a Miele authorized service technician in accordance with nation...

Page 5: ...upply before connecting the appliance When in doubt consult a qualified electrician Do not use a power bar or extension cord to connect the ventilation hood to electricity These are a fire hazard and do not guarantee the required level of appliance safety To ensure safe operation only use the ventilation hood after it has been properly installed This ventilation hood may not be used in non station...

Page 6: ...el have been removed The power cable if present has been unplugged from the socket pull the plug not the cord Proper use WARNING TO REDUCE THE RISK OF A COOKTOP GREASE FIRE a Never leave surface units unattended at high settings Boilovers cause smoking and greasy spillovers may ignite Heat oils slowly on low or medium settings b Always turn the hood on when cooking at a high heat c Clean the venti...

Page 7: ...it 2 The fire is small and contained in the area where it started 3 The fire department is being called 4 You can fight the fire with your back to an exit Based on Kitchen Firesafety Tips published by NFPA The ventilation hood may become damaged if exposed to excessive heat from a gas cooktop When using the ventilation hood over a gas cooktop ensure that any burners in use are always covered by co...

Page 8: ...r functioning of the ventilation hood To ensure that cooking vapors are properly cleaned never use the ventilation hood without the grease filters in place A filter containing too much grease is a fire hazard The filters should be cleaned or replaced at regular intervals Please note that the heat rising from the stovetop during cooking can cause the ventilation hood to become very hot Do not touch...

Page 9: ...ll or ceiling do not damage electrical wiring and other hidden utilities d Ducted hoods must always be vented to the outdoors e Do not use this hood with any solid state speed control device To determine whether a ventilation hood may be operated above your cooking appliance please refer to the information provided by the appliance s manufacturer Safety regulations prohibit the installation of a v...

Page 10: ...ined from your Miele dealer or from Miele Technical Service Exhaust air should not be vented into a chimney or vent flue which is otherwise in use and should not be channeled into ducting which ventilates rooms with fuel burning installations If exhaust air is to be extracted into a chimney or vent flue no longer used for other purposes be sure to comply with all applicable regulations WARNING TO ...

Page 11: ...use a steam cleaner to clean the ventilation hood The steam can reach the electrical components and cause a short circuit Accessories Use only genuine original Miele parts If parts or accessories from other manufacturers are used the warranty will become void ...

Page 12: ... reach of children Danger of suffocation Disposal of your old appliance Do not dispose of this appliance with your household waste Old appliances may contain materials that can be recycled Please contact your local recycling authority about the possibility of recycling these materials Before discarding an old appliance ensure that it presents no danger to children while being stored for disposal U...

Page 13: ...d off When the ventilation hood is turned on the non return flap opens so that the exhaust air can be transported outside without any obstruction A non return flap has been provided with the hood in case your ducting does not have one It is inserted into the outlet duct collar of the fan Recirculation mode Recirculation mode hoods require a Recirculation kit an OdorFree Charcoal Filter available a...

Page 14: ...Guide to the appliance 14 ...

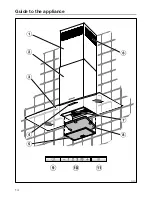
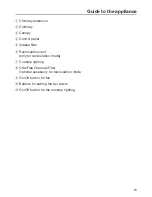
Page 15: ... Control panel e Grease filter f Recirculation vent only for recirculation mode g Cooktop lighting h OdorFree Charcoal Filter Optional accessory for recirculation mode i On Off button for fan j Buttons for setting the fan power k On Off button for the cooktop lighting ...

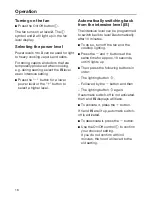
Page 16: ...intensive level IS The intensive level can be programmed to switch back to level 3 automatically after 10 minutes To do so turn off the fan and the cooktop lighting Press the and buttons at the same time for approx 10 seconds until 1 lights up Then press the following buttons in order The lighting button Followed by the button and then The lighting button again If automatic switch off is not activ...

Page 17: ...ktop lighting can be turned on and off separately from the fan To do so press the button The symbol is lit when the cooktop lighting is turned on Automatic safety shut down Should the hood be left on the fan will switch off automatically after 10 hours The lighting will remain on Pressing the On Off button will switch the fan back on again ...

Page 18: ...soda acid or chloride or cleaners containing solvents Abrasive cleaners such as scouring powder scouring liquid abrasive sponges such as pot scourers or used sponges that still contain residues from abrasive cleaners Special instructions for stainless steel surfaces does not apply to control buttons Stainless steel surfaces can also be cleaned using a non abrasive stainless steel cleaner available...

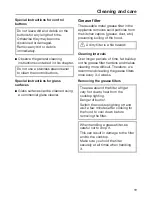
Page 19: ...icles from the kitchen vapors grease dust etc preventing soiling of the hood A dirty filter is a fire hazard Cleaning intervals Over longer periods of time fat buildup on the grease filter hardens and makes cleaning more difficult Therefore we recommend cleaning the grease filters once every 3 4 weeks Removing the grease filters The area around the filter will get very hot due to heat from the coo...

Page 20: ...ssible in the lower basket Ensure that the spray arm is not obstructed Use a common household dishwasher detergent Select a program with a wash temperature between 122 F 50 C and 149 F 65 C Depending on the cleaning agent used cleaning the grease filter in a dishwasher can cause permanent discoloration to the surface However this will not affect the functioning of the filter in any way After clean...

Page 21: ... the OdorFree Charcoal Filter To install or replace the OdorFree Charcoal Filter the grease filters must first be removed as described above Remove the charcoal filter from its packaging Insert the charcoal filter into the front of the frame then push up into the frame at the back Replace the grease filter When to change the OdorFree Charcoal Filter Always replace the OdorFree Charcoal Filter when...

Page 22: ...ghts see IMPORTANT SAFETY INSTRUCITONS Remove the grease filter Remove the charcoal filter if the hood is being used in recirculation mode Push the button above the lamp down a little Turn the halogen light counter clockwise and pull it out Replace it with a new lamp of the same type GU GZ 10 120 V 50W Screw the lamp into the socket and push it upwards Please the follow manufacturer s instructions...

Page 23: ...installing the housing components It can be peeled off easily without any additional tools Installation Instructions Please refer to the accompanying installation sheet for instructions on how to install the appliance Disassembly If the device ever needs to be disassembled follow the installation sheet instructions in reverse order A lever is provided to assist with the removal of the chimney Unsc...

Page 24: ...Installation 24 Installation parts ...

Page 25: ...irculation kit for recirculation mode contains diverter aluminum hose and hose clamps not contained in scope of delivery available as optional accessory see Technical Data 8 screws 3 16 x 2 3 8 5 x 60 mm and 8 plugs 5 16 x 2 8 x 50 mm for attaching to the wall not for use in USA CDN The screws and plugs are designed for use in solid walls only Use different fasteners for other wall construction ty...

Page 26: ...Installation 26 Appliance dimensions The drawing is not to scale ...

Page 27: ...itting the connection socket and on EXT models for feeding the connection cable through to the external motor Recirculation mode range hoods only require an electrical connection socket Existing tiling or a back panel behind the hood can make it difficult to remove the grease filter If this is the case turn the filter by 180 and fit it before the range hood is installed Exhaust connector 6 150 mm ...

Page 28: ...Miele appliance Electric Induction cooktop 24 610 mm Electric grill deep fat fryer electric 26 660 mm Multi burner gas cooktop 43 000 BTU hr 12 6 W no burner 15 000 BTU hr 4 5 kW 26 660 mm 30 760 mm Multi burner gas cooktop 73 800 BTU hr 21 6 W no burner 16 500 BTU hr 4 8 kW 30 760 mm Multi burner gas cooktop 73 800 BTU hr 21 6 W or one of the burners 16 500 BTU hr 4 8 kW Not possible Single burne...

Page 29: ...r the cooktop not to the side or rear The cooktop should be no wider than the hood Preferably it should be narrower The mounting area must be easily accessible The ventilation hood should be easy to reach and disassemble in case a service call is necessary This should be taken into consideration when planning the position of cupboards shelves ceilings or decorative elements in the vicinity of the ...

Page 30: ... smaller than that of the exhaust connector The exhaust duct should be as short and straight as possible If elbows are needed make sure they have a large radius The exhaust duct itself must not be kinked or compressed Make sure that all connections are secure and airtight Remember that any constriction of the airflow will reduce extraction performance and increase operating noise If the exhaust du...

Page 31: ...sitioned vertically and if possible directly above the hood outlet duct collar The arrow on the housing indicates the direction of airflow Reducing Collar optional accessory If you would like to reduce the environmental impact of your ventilation system by limiting the CFM output the Reducing Collar can be installed It reduces the air flow to less than 400 CFM Check local building codes for max CF...

Page 32: ...ult a licensed electrician or call Miele s Technical Service Department WARNING THIS APPLIANCE MUST BE GROUNDED The hood comes equipped with a power cord with a NEMA 5 15 molded plug for connection to a 120 VAC 60 Hz 15 A power outlet Grounding Instructions WARNING Improper grounding can result in a risk of electric shock This appliance must be grounded In the event of an electrical short circuit ...

Page 33: ...Technical Service Department is listed at the back of these instructions When contacting Miele please state the model and serial number of your ventilation hood These can be found on the data plate Location of the data plate The data plate is visible once you have removed the grease filters Warranty For further information please refer to your warranty booklet ...

Page 34: ...oad 400 W Voltage Frequency 120 V AC 60 Hz Fuse rating 15 A Power cord length 2 5 ft 0 75 m Weight DA 5966 W 41 8 lbs 19 kg DA 5986 W 46 2 lbs 21 kg DA 5996 W 48 4 lbs 22 kg Optional accessories for recirculation mode Recirculation kit DUW 20 and OdorFree Charcoal Filter DKF 12 ...

Page 35: ...e Canada Importer Miele Limited Headquarters and Miele Centre 800 843 7231 609 419 9898 609 419 4298 Technical Service Support Nationwide Phone Fax TechnicalService mieleusa com 161 Four Valley Drive Vaughan ON L4K 4V8 www miele ca 800 999 1360 888 586 8056 Customer Care Centre Phone customercare miele ca 800 565 6435 905 532 2272 Germany Manufacturer Miele Cie KG Carl Miele Straße 29 33332 Güters...

Page 36: ...M Nr 09 968 280 01 en US DA 5966 W DA 5986 W DA 5996 W ...

Reviews: