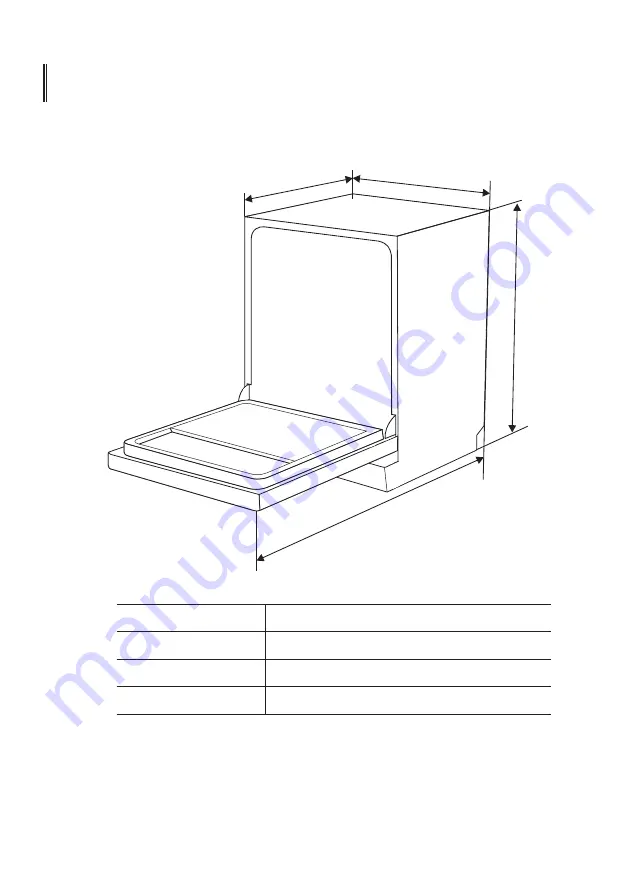
16
Height (H)
Width (W)
Depth (D1)
Depth (D2)
845mm
598mm
600mm (with the door closed)
1175mm (with the door opened 90
°
)
W
D1
H
D2
TECHNICAL INFORMATION
Page 1: ...PARTⅠ Generic Version MDW15SSS MDW15SWH MDW15SBS Please read this manual carefully before using the dishwasher and Keep this manual for future reference ...
Page 2: ...n for the integrated model TROUBLESHOOTING TIPS 24 28 LOADING THE BASKETS ACCORDING TO AS NZS 2007 1 19 NOTE Reviewing the section on troubleshooting Tips will help you solve some common problems by yourself If you cannot solve the problems by yourself please ask for help from a professional technician The manufacturer following a policy of constant development and updating of the product may make...
Page 3: ...ironments bed and breakfast type environments This appliance can be used by children aged from 8 years and above and persons with reduced physical sensory or mental capabilities or lack of experience and knowledge if they have been given supervision or instruction concerning use of the appliance in a safe way and understand the hazards involved Children shall not play with the appliance Cleaning a...
Page 4: ...loth moistened with mild soap and then use a dry cloth to wipe it again Earthing Instructions 4 This appliance must be earthed In the event of a malfunction or breakdown earthing will reduce the risk of an electric shock by providing a path of least resistance of electric current This appliance is equipped with an earthing conductor plug The plug must be plugged into an appropriate outlet that is ...
Page 5: ...eavy objects on or stand on the door when it is open The appliance could tip forward When loading items to be washed 1 Locate sharp items so that they are not likely to damage the door seal 2 Warning Knives and other utensils with sharp points must be loaded in the basket with their points facing down or placed in a horizontal position Some dishwasher detergents are strongly alkaline They can be e...
Page 6: ... open since this could increase the risk of tripping If the supply cord is damaged it must be replaced by the manufacturer or its service agent or a similarly qualified person in order to avoid a hazard During installation the power supply must not be excessively or dangerously bent or flattened Do not tamper with controls The appliance needs to be connected to the main water valve using new hose ...
Page 7: ...nsuring this product is disposed of correctly you will help prevent potential negative consequences for the environment and human health which could otherwise be caused by inappropriate waste handling of this product For more detailed information about recycling of this product please contact your local city office and your household waste disposal service DISPOSAL Do not dispose this product as u...
Page 8: ... instructions before using it for the first time Top spray arm Dispenser Filter assembly Lower spray arm Inner pipe IMPORTANT Pictures are only for reference different models may be different Please prevail in kind NOTE 8 Cutlery rack Lower basket Upper spray arm Upper basket Cup rack ...
Page 9: ...ill in detergent Please check the section 1 of PART Ⅱ Special Version 9 Adjusting the upper basket The height of the upper basket can be easily adjusted to accommodate taller dishes in either the upper or lower basket To adjust the height of the upper rack follow these steps Type 1 Basket Used Tips Before using your dishwasher Inside Outside 4 1 Pull out the upper basket 2 Remove the upper basket ...
Page 10: ...the lower basket are used for holding plates and a platter They can be lowered to make more room for large items raise upwards fold backwards 1 To raise the the upper basket at the center of each side until the basket locks into place in the upper position It is not necessary to lift the adjuster handle upper basket just lift 2 To lower the lift the adjust handles on each side to release the baske...
Page 11: ...on of water into the door lock and electrical components do not use a spray cleaner of any kind Never use abrasive cleaners or scouring pads on the outer surfaces because they may scratch the finish Some paper towels may also scratch or leave marks on the surface WARNING Internal Care Filtering system The filtering system in the base of the wash cabinet retains coarse debris from the washing cycle...
Page 12: ...g water For a more thorough clean use a soft cleaning brush Reassemble the filters in the reverse order of the disassembly replace the filter insert and rotate clockwise to the close arrow Do not over tighten the filters Put the filters back in sequence securely otherwise coarse debris could get into the system and cause a blockage Never use the dishwasher without filters in place Improper replace...
Page 13: ...ary to clean the spray arms regularly for hard water chemicals will clog the spray arm jets and bearings To clean the spray arms follow the instructions below 2 3 To remove the lower spray arm pull out the spray arm upward 13 1 To remove the upper spray arm hold the nut in the center still and rotate the spray arm counterclockwise to remove it ...
Page 14: ... socket No solvents or abrasive cleaning To clean the exterior and rubber parts of the dishwasher do not use solvents or abrasive cleaning products Only use a cloth with warm soapy water To remove spots or stains from the surface of the interior use a cloth dampened with water an a little vinegar or a cleaning product made specifically for dishwashers When not in use for a longtime It is recommend...
Page 15: ...nnection WARNING For personal safety Do not use an extension cord or an adapter plug with this appliance Do not under any circumstances cut or remove the earthing connection from the power cord The installation of the pipes and electrical equipments should be done by professionals Attention WARNING Electrical Shock Hazard Disconnect electrical power before installing dishwasher Failure to do so co...
Page 16: ...upply hose 1 Pull The safety supply hoses completely out from storage compartment located at rear of dishwasher 2 Tighter the screws of the safety supply hose to the faucet with thread 3 4 inch 3 Turn water fully on before starting the dishwasher WARNING A hose that attaches to a sink spray can burst if it is installed on the same water line as the dishwasher If your sink has one it is recommended...
Page 17: ...om the floor the excess water in hoses cannot be drained directly into the sink It will be necessary to drain excess water from hoses into a bowl or suitable container that is held outside and lower than the sink Connect the water drain hose The drain hose must be correctly fitted to avoid water leaks Ensure that the water drain hose is not kinked or squashed The waste connection must be at a heig...
Page 18: ...ht of the dishwasher may be altered via adjustment of the screwing level of the feet In any case the appliance should not be inclined more than 2 NOTE Only apply to the free standing dishwasher 18 Free Standing Installation Fitting between existing carbinets The height of the dishwasher 845 mm has been designed in order to allow the machine to be fitted between existing cabinets of the same height...
Page 19: ... Illustrations of cabinet dimensions and installation position of the dishwasher 1 Less than 5 mm between the top of dishwasher and cabinet and the outer door aligned to cabinet 90 90 580mm 580mm 820mm 820mm 100 100 Electrical drain and water supply line entrances Electrical drain and water supply line entrances Space between cabinet bottom and floor Space between cabinet bottom and floor 600 mm f...
Page 20: ... wooden panel could be processed according to the installation drawings The aesthetic wooden panel could be processed according to the installation drawings A Magical paster Magical paster Magical paster A and magical paster B be disjoinedon magical paster A on the aesthetic wooden panel and felted magical paster B of the outer door of dishwasher see figure A After positioning of the panel fix the...
Page 21: ...lax the steel cable 2 Door spring tension is correct when the door remains horizontal in the fully opened position yet rises to a close with the slight lift of a finger Install the hook on the aesthetic wooden panel and put the hook into the slot of the outer door of dishwasher see figure A After positioning of the panel fix the panel onto the outer door by screws and bolts See figure B B 2 Pin up...
Page 22: ...front feet until the dishwasher is level Step 5 to Step 6 7 Install the furniture door to the outer door of the dishwasher Step 7 to Step 10 8 Adjust the tension of the door springs by using an Allen key turning in a clockwise motion to tighten the left and right door springs Failure to do this could cause damage to your dishwasher Step 11 9 The dishwasher must be secured in place There are two wa...
Page 23: ...n and wash performance Place a spirit level on door and rack track inside the tub as shown to check that the dishwasher is level Level the dishwasher by adjusting the three levelling legs individually When level the dishwasher please pay attention not to let the dishwasher tip over 1 2 3 The maximum adjustment height of the feet is 50 mm NOTE 23 ...
Page 24: ...operly closed Make sure to close the door properly and latch it Water not pumped form dishwasher Twisted or trapped drain hose Filter clogged Kitchen sink clogged Check the drain hose Check coarse the filter Check the kitchen sink to make sure it is draining well If the problem is the kitchen sink that is not draining you may need a plumber rather than a serviceman for dishwashers Suds in the tub ...
Page 25: ... The items should be corrosion resistant Knocking noise in the dishwasher A spray arm is knocking against an item in a basket Interrupt the program and rearrange the items which are obstructing the spray arm Rattling noise in the dishwasher Items of crockery are loose in the dishwasher Interrupt the program and rearrange the items of crockery Knocking noise in the water pipes This may be caused by...
Page 26: ...to get them clean Problem Possible Causes What To Do The dishes are not clean Black or grey marks on dishes Aluminium utensils have rubbed against dishes Use a mild abrasive cleaner to eliminate those marks The dishes aren t drying Improper loading Load the dishwasher as suggested in the directions Dishes are removed too soon Do not empty your dishwasher immediately after washing Open the door sli...
Page 27: ...ng temperature is lower decreasing cleaning performance Choose a program with a long washing time Use of cutlery with a low quality coating Water drainage is more difficult with these items Cutlery or dishes of this type are not suitable for washing in the dishwasher Possible Causes What To Do 27 ...
Page 28: ...3 Glasses Saucers Cups Item Number 4 5 6 Dinner plates Soup plates Dessert dishes Item Number 28 LOADING THE BASKETS ACCORDING TO AS NZS 2007 1 1 1 1 1 1 1 1 1 1 1 1 1 1 1 1 1 1 1 3 3 3 3 2 2 2 2 2 2 2 2 2 2 6 6 5 5 4 4 4 4 6 6 6 6 5 5 ...
Page 29: ...s Position of the upper basket lower position Program ECO Rinse aid setting 5 Detergent Pre main 5g 28 7g Door is open at the end of the drying cycle for the drying performance test Door position Open 50 mm 2 5 1 4 4 4 3 1 2 3 4 5 Forks Soup spoons Dessert spoons Teaspoons Knives Item Number 3 1 5 2 5 4 4 5 2 1 5 3 ...
Page 30: ... lower position left basket is flat and right basket is sideling Lift the right basket up both left and right baskets are flat Move the right basket from right to left two basket are overlapping Remove the right basket from the tray only has the left basket 30 ...
Page 31: ...PARTⅡ Special Version MDW15SSS MDW15SWH MDW15SBS Please read this manual carefully before using the dishwasher and Keep this manual for future reference ...
Page 32: ...RROR CODES 15 NOTE PROGRAMMING THE DISHWASHER Wash Cycle Table Starting A Cycle Wash Changing The Program Mid cycle Forget To Add A Dish USING YOUR DISHWASHER 4 4 6 9 12 12 13 13 14 TECHNICAL INFORMATION 16 11 10 ...
Page 33: ...or detailed operating method 2 Removing the larger residue on the cutlery 3 Loading the baskets 4 Filling the dispenser Selecting a program and running the dishwasher Inside Outside 3 1 Install the dishwasher Please check the section 5 INSTALLATION INSTRUCTION of PART Ⅰ Generic Version ...
Page 34: ... pots pans casserole dishes and dishes that have been sitting with dried food on them for some time Heavy For heavily soiled loads such as pots plates glasses and lightly soiled pans ECO This is standard program it is suitable to clean normally soiled loads such as pots plates glasses and lightly soiled pans standard everyday cycle Auto Auto sensing wash lightly or heavily soiled crockery with or ...
Page 35: ...ton to select a function corresponding indicator will be lit Two functions cannot be selected at the same time To start the selected washing program or pause it when the dishwasher is working 4 Delay 5 Child lock Function 6 Start Pause 7 Operation Button 8 Screen To show the reminding time and delay time error codes etc Water Faucet Rinse Aid If the indicator is lit it means the dishwasher is low ...
Page 36: ...aluminum parts have a tendency to discolour during washing Glazed patterns may fade if machine washed frequently For washing the following cutlery dishes Are not suitable Are of limited suitability Items such as cups glasses pots pans etc are faced downwards Curved items or ones with recesses should be loaded aslant so that water can run off All utensils are stacked securely and can not tip over A...
Page 37: ...zard Long and or sharp items of cutlery such as carving knives must be positioned horizontally in the upper basket Please do not overload your dishwasher This is important for good results and for reasonable consumption of energy NOTE Very small items should not be washed in the dishwasher as they could easily fall out of the basket To prevent water dripping from the upper basket into the lower ba...
Page 38: ...n the side of the racks in order to avoid blocking the rotation of the top spray arm The maximum diameter advised for plates in front of the detergent dispenser is of 19 cm this not to hamper the opening of it WARNING Do not let any item extend through the bottom Always load sharp utensils with the sharp point down Loading the cutlery basket Cutlery should be placed in the cutlery rack separatelyf...
Page 39: ...that compose the detergent are necessary to remove crush and dispense all dirt out of the dishwasher Most of the commercial quality detergents are suitable for this purpose WARNING Proper Use of Detergent Use only detergent specifically made for dishwashers use Keep your detergent fresh and dry Don t put powdered detergent into the dispenser until you are ready to wash dishes Dishwasher detergent ...
Page 40: ...r Follow the below steps 1 2 Within 60 seconds after step 1 press the Start Pause button more than 5 seconds and then press the Delay Button to enter the set model the rinse aid indication blinks as 1Hz frequency 3 Press the Start Pause button to select the proper set according to your using habits the sets will change in the following sequence D1 D2 D3 D4 D5 D1 The higher the number the more rins...
Page 41: ...specially if you have very dirt items pour a small amount of detergent onto the door The additional detergent will activate during the pre wash phase 3 Close the flap by sliding it to the front and then pressing it down A A Sliding it to the right Press down 1 2 B B Filling The Detergent Dispenser NOTE Be aware that depending on the soiling of water setting may be different Please observe the manu...
Page 42: ...1 3 11 15 Or all in 1 5 7 28 5 7 28 g Or all in 1 Intensive Heavy Glass PROGRAMMING THE DISHWASHER Wash Cycle Table The table below shows which programs are best for the levels of food residue on them and how much detergent is needed It also show various information about the programs Means need to fill rinse into the Rinse Aid Dispenser Program Running Time min Energy Kwh Water L Description Of C...
Page 43: ...ng for a short time otherwise the detergent may have already been released and the dishwasher may have already drained the wash water If this is the case the dishwasher needs to be reset and the detergent dispenser must be refilled To reset the dishwasher follow the instructions below 1 Press the Start Pause button to pause the washing 2 Press Program button for more than 3 seconds the program wil...
Page 44: ...llow the instructions below 1 Press the Start Pause button to pause the washing 2 Wait 5 seconds then open the door 3 Add the forgotten dishes 4 Close the door 5 Press the Start Pause button after 10 seconds the dishwasher will start After 5 sec WARNING It is dangerous to open the door mid cycle as hot steam may scald you ...
Page 45: ...ened or water intake is restricted or water pressure is too low WARNING If overflow occurs turn off the main water supply before calling a service If there is water in the base pan because of an overfill or small leak the water should be removed before restarting the dishwasher E8 Open circuit or break of distributary valve Failure of orientation of distributary valve Ed Open circuit or break wiri...
Page 46: ...16 Height H Width W Depth D1 Depth D2 845mm 598mm 600mm with the door closed 1175mm with the door opened 90 W W D1 D1 H H D2 D2 TECHNICAL INFORMATION ...
Page 47: ...ning cycle Program duration of the standard cleaning cycle Noise level Mounting Power consumption Water pressure flow pressure Could be built in MIDEA MDW15SSS MDW15SWH MDW15SBS 15 0 74 kWh 12 48 liter 190 min 1760 2100W 49 dB A re 1 pW Free standing 0 04 1 0MPa 0 4 10 bar YES Water consumption class Standard cleaning cycle ECO 3 5 4 5 Rated voltage frequency AC 220 240V 50Hz 17 ...
Page 48: ...Web www midea net au Tel 1300 793 216 E mail info midea net au ...