


- 19 -
Using the Device
The table below describes the elements on a typical
Home
screen:
Element
Descriptions
Home Screen
•
Tap an item on this screen to launch that item.
•
To delete an icon or widget, tap and hold that item until the
remove symbol
X
appears on the top of the screen. Then move
the icon to the
X
symbol.
•
Tap and hold any empty spot on this screen to customize your
home screen.
Status Bar
The
Status Bar
displays the information such as the system time,
Wi-Fi signal strength, Ethernet connection status and Bluetooth
connection status.
You can access the
Quick Settings
panel by swiping up the
status bar.
Notification Area
The
Notifications Area
informs you of new messages, events,
alarms, and activities in progress. Applications you install on your
device may show their own icons or messages in the area.
You can access the notification panel to see more information by
swiping down the
Notification Area
.
Widget
The miniature of an application that functions directly on the
Home
screen.
App Launcher
Tap it to open the "
App Launcher
" where all applications installed
on the device can be viewed and launched.
App Dock
The dock is visible across the home screens. It shows the most
commonly used App icons for quick access. You can change the
icons as needed.
Back Button
Tap to go to the previous screen.
Home Button
Tap to return to Home scree.
Current Running
App Button
Tap to view show your current running Apps and touch an App to
open it. To remove an App from the list, swipe it left or right.
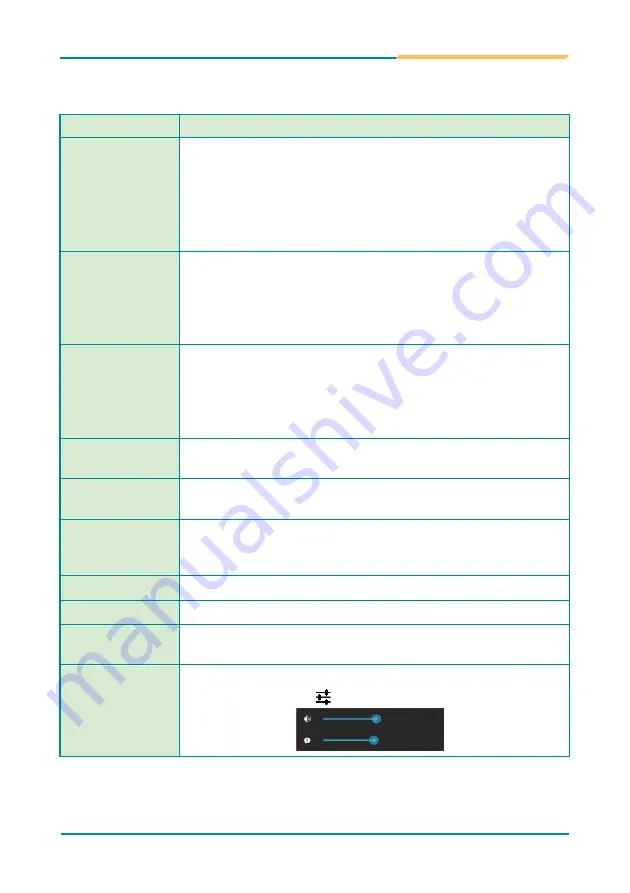
Volume Up/Down
Button
Tap to adjust the speaker volume. On the volume control panel
tap
the settings icon
to adjust the notifications volume.
Summary of Contents for MTA-3101
Page 1: ...I MTA 3101 10 Rugged Android Tablet Device User s Manual Version 1 1 2022 07...
Page 2: ...II This page is intentionally left blank...
Page 17: ...3 Chapter 1 Introduction Chapter1 1 Introduction...
Page 23: ...9 Chapter 2 Installation Installation Chapter2 2 Getting Started...
Page 27: ...13 Installation 3 Close the battery cap and lock it when the switching process is done...
Page 28: ...14 This page is intentionally left blank...
Page 29: ...15 Chapter 3 Using the Device Using the Device Chapter3 3 Using the Rugged Handheld Device...


