background image

!

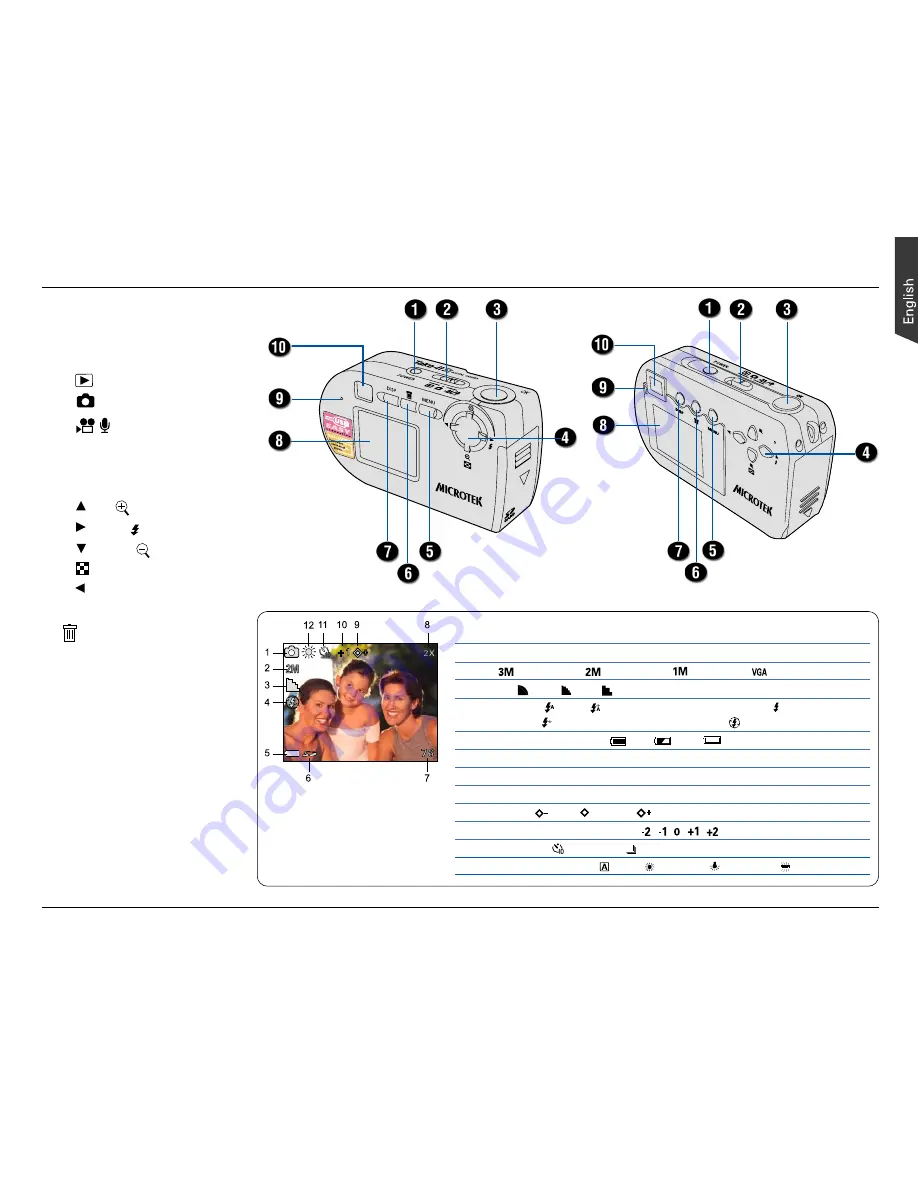
Rear View

1. POWER  button
2. Mode  switch

• 

 Playback mode

• 

  Photo  mode

• 

/   Movie/Audio  mode

3. Shutter/OK  button
4. Multifunction/4-way  arrow

buttons
•   Up/  Zoom In
•   Right/  Flash
•    Down/   Zoom  Out/
    Nine-image display
•   Left

5.  MENU  (Menu)  button
6.    (Delete)  button
7.  DISP  (Display)  button
8. LCD screen
9. READY/Flash charger LED
10.  Viewfinder

Photo  Mode  Display

1. Photo mode
2. Size:   2048x1536/

 1600x1200/  1280x960/

 640x480 pixels

3. Quality:   Best/  Fine/  Normal
4.  Flash  mode:    Auto/   Auto  with  Red-eye  Reduction/   Forced/
                       Forced with Red-eye Reduction/  Off
5.  Battery  status  indicator: 

  Ful l /

  Half/

  Low

6.  SecureDigital  (SD)  card  indicator
7.  Number  of  pictures  remaining
8.  Digital  zoom  level
9. Sharpness:   Low/  Normal/  High
10. Exposure Compensation (EV):  ,  ,  ,  , 
11.  Drive  Mode:    Self-timer/   Continuous
12.  White  Balance  (WB):    Auto/   Daylight/   Tungsten/   Fluorescent

Summary of Contents for Take-it D1

Page 1: ......

Page 2: ...put connector 3 USB connector 4 Tripod mount 5 Battery and SecureDigital SD card cover 6 Battery compartment 7 SD compartment 8 Strap ring Front View 1 Flash 2 Viewfinder 3 Speaker 4 Microphone 5 Lens 6 Self timer indicator Attach the Strap Attach the Strap ...

Page 3: ...r LED 10 Viewfinder Photo Mode Display 1 Photo mode 2 Size 2048x1536 1600x1200 1280x960 640x480 pixels 3 Quality Best Fine Normal 4 Flash mode Auto Auto with Red eye Reduction Forced Forced with Red eye Reduction Off 5 Battery status indicator Full Half Low 6 SecureDigital SD card indicator 7 Number of pictures remaining 8 Digital zoom level 9 Sharpness Low Normal High 10 Exposure Compensation EV ...

Page 4: ...mera is turned off then push the battery cover in the direction of the arrow to open it 2 Insert two AA sized batteries into the compartment Ensure that the plus and minus polarity of the batteries matches the polarity markings in the battery compartment USB cable Video cable Take it S1 D1 digital camera Strap Two AA sized Alkaline batteries Microtek CD ROM Includes bundled software and camera dri...

Page 5: ... the camera on When the camera is turned on the READY LED emits a steady green color When the camera is powered on the LCD screen becomes active The DISP button enables you to turn the LCD screen on or off Press the POWER button again to turn the camera off LCD screen POWER READY LED DISP 1 Ensure that the camera is turned off then open the SD card cover 2 Insert the SD card into the compartment u...

Page 6: ...ns In addition to navigation the buttons also provide other functions in Playback Photo and Movie Audio mode Refer to the following table Button Playback Photo Movie Audio Zoom In Zoom In Next Flash Zoom Out Zoom Out Nine image display Previous Using the Menus Press the MENU button to display a different menu for each operation mode The Setup menu appears in all modes To access the menu mode 1 Set...

Page 7: ... arrow buttons to enter Setup menu mode 4 Use the 4 way arrow buttons to select LANGUAGE then select the language you want to use 5 Press the MENU button to confirm the setting and exit the menu Before Shooting 3 Formatting the SD Card 1 Set the Mode switch to any operation mode 2 Press the MENU button 3 Use the arrow buttons to enter Setup menu mode 4 Use the arrow buttons to select FORMAT When s...

Page 8: ...ED starts blinking when the self timer starts The picture is taken 10 seconds after the Shutter button is pressed Continuous shooting mode and self timer mode switch off after the picture has been taken 1 Set the Mode switch to Photo Settings are automatically adjusted and displayed on the LCD screen 2 Frame the subject using the LCD screen 3 Press the Shutter button A still image is taken when a ...

Page 9: ...ng screen appears on the LCD screen 2 Press the MENU button 3 Use the 4 way arrow buttons to select DRIVE MODE then select 4 Press the MENU button again to confirm the setting and exit the menu The audio standby recording screen appears on the LCD screen 5 Press and release the Shutter OK button Audio recording begins with the elapsed time shown on the LCD screen 6 Press the Shutter OK button once...

Page 10: ... to play back 3 Press the Shutter OK button Playback of the movie or audio file begins with the elapsed time shown on the LCD screen Press the Shutter OK button once more to stop the movie or audio playback Nine image Display This feature lets you view images as a composite display of nine images 1 Set the Mode switch to Playback 2 Press the button Use the 4 way arrow buttons to select a different...

Page 11: ...ts you to confirm your decision to delete the selected image or audio 4 Use the arrow buttons to select OK then press the Shutter OK button The selected image or audio is removed from memory Select CANCEL to exit the menu without deleting Deleting All Images and Audio 1 Set the Mode switch to Playback 2 Press the MENU button 3 Use the 4 way arrow buttons to select ERASE ALL When selected the OK se...

Page 12: ...ils on how to use PC Web Cam refer to the Take it S1 D1 User Guide in the Microtek CD ROM C Connecting the Camera 1 Make sure your computer is turned on Only Window 98 98SE required 1 Turn on your computer and insert the supplied Microtek CD ROM in the CD ROM drive The Microtek Software Installer screen appears automatically 2 Click the Camera Driver button and follow the on screen instructions to...

Page 13: ... is inserted in the camera the system reads the contents of the SD card only When the SD card in not inserted the system reads the contents of the camera s internal memory 3 Drag and drop the files into any folder on your hard disk E Viewing Images Double click a file in the folder that contains the files downloaded from the camera The file opens with your system s default image audio or video app...

Page 14: ...ur TV set Connect the other end of the cable to the Video In jack of the TV set 3 Turn on the TV set and switch it to run off Video Input 4 Set the Mode switch to Playback The most recently recorded image appears on the TV monitor A Selecting a Video Output System 1 Set the Mode switch to any operation mode 2 Press the MENU button then enter Setup menu mode 3 Use the 4 way arrow buttons to select ...

Page 15: ...Descriptions BEEP ON OFF Sets a beep to signal camera operation DATE yyyy mm dd Sets the date TIME 00 00 00 hr min sec Sets the time VIDEO NTSC PAL Sets the video standard FORMAT OK Formats the SD card RESET OK Returns some camera settings to the factory default values COPY TO SD OK Copies images stored on the internal memory to the SD card FREQUENCY 50Hz 60Hz Sets the power frequency to accommoda...

Page 16: ...s Aperture F2 8 Focal Length f 7 5 mm 35 mm equivalent 38 mm Digital Zoom 4X Playback Zoom 4X Shutter Speed 1 8 1 4000 sec Viewfinder Optical Built in Flash Fixed Flash Range 3 28 6 56 ft 1 to 2 0 m Flash Modes Auto Auto with red eye reduction Forced Forced with red eye reduction Off Image Size 2048 x 1536 pixels interpolated 1600 x 1200 pixels 1280 x 960 pixels 640 x 480 pixels Quality Levels Bes...

Reviews: