background image

32

Adjusting the Sound

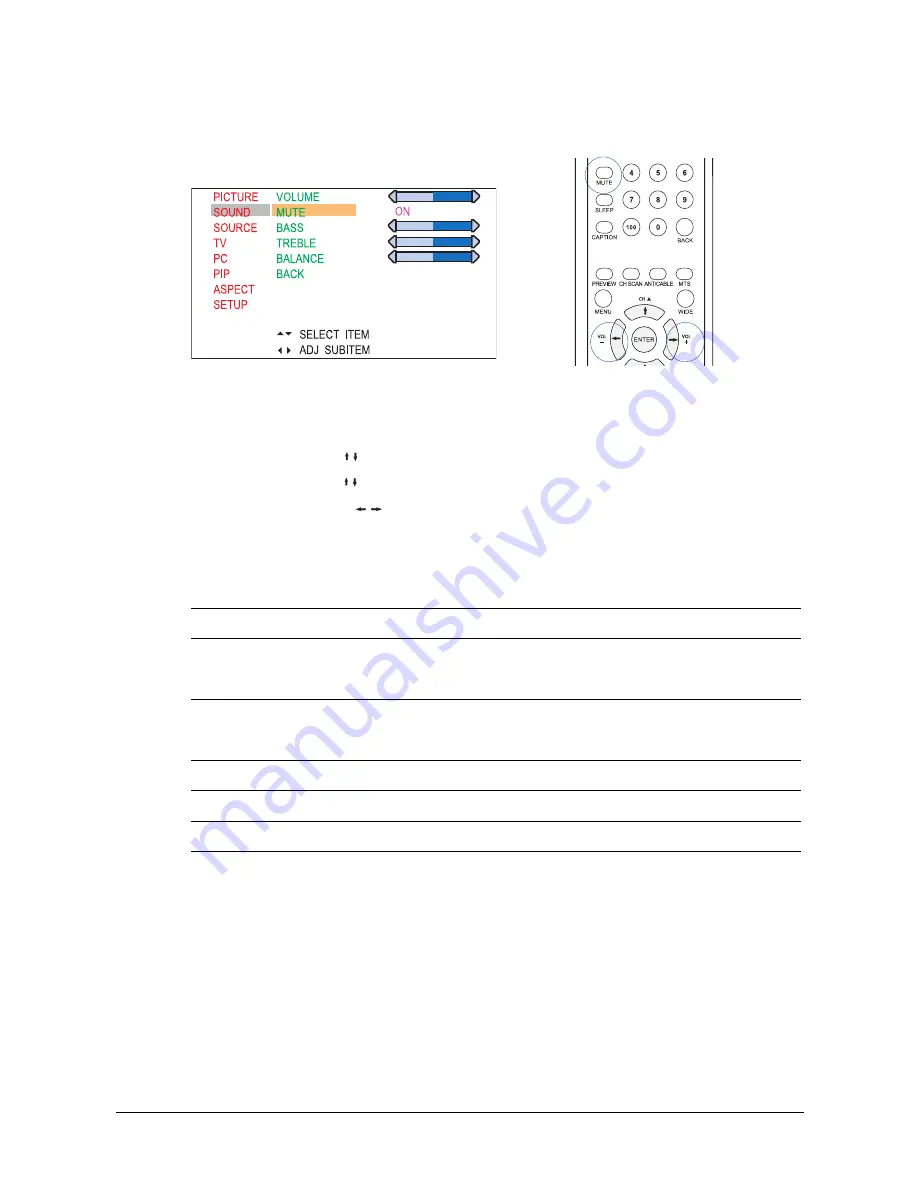
The Sound menu gives you access to sound settings.

To adjust sound settings:

1. Press the MENU button to view the main menu.

2

Press the UP/DOWN ( / ) button to select “Sound”, then press the ENTER button.

3. Press the UP/DOWN ( / ) button to select the item you would like to adjust.

4. Press the LEFT/RIGHT ( /

)

 button to toggle through option settings or adjust slider bars to

increase/decrease the value of the setting for a user setting, then press the MENU button twice to

exit the menu.

The following table describes each item in the Sound menu:

Item

Description

Volume

Adjusts the overall volume of the speakers.

This feature can also be adjusted by pressing the VOL+ or VOL- buttons on the

remote control or PDP unit.

Mute

On: The mute function is enabled.

Off: The mute function is disabled.

It can also be set by pressing the MUTE button on the remote control.

Bass

Adjusts the low frequency audio range.

Treble

Adjusts the high frequency audio range.

Balance

Balances the volume of the left and right speakers.

Summary of Contents for MHP1

Page 1: ...PLASMA DISPLAY USER MANUAL www microtek com www microtek com MHP1 HD...

Page 2: ...rmful interference in a residential installation This equipment generates uses and can radiate radio frequency energy and if not installed and used in accordance with the instructions may cause harmfu...

Page 3: ...allation such as a bookcase or rack unless proper ventilation is provided or the manufacturer s instructions have been adhered to 9 Never push objects of any kind into this product through its opening...

Page 4: ...n Like all phosphor based display devices and all other gas plasma displays plasma monitors can be susceptible to phosphor burn in under certain circumstances Certain operating conditions such as the...

Page 5: ...r PDP 18 Connecting to a VCR 19 Connecting to a DVD Player 20 Connecting to a Camcorder or Video Game Set 21 Connecting to a DTV Receiver Set Top Box 22 Connecting to a Second PDP or Monitor 23 Connec...

Page 6: ...Position Contrast Brightness 35 Viewing Picture in Picture PIP 36 Opening a PIP Window 37 Selecting PIP Input Source 37 Changing the Location of the PIP Window 38 Alternating the PIP and Main Screen...

Page 7: ...es of high quality and high resolution The picture remains bright and vibrant under all types of lighting conditions the image is smooth and even because there are no visible scan lines The PDP not on...

Page 8: ...nd attached Remote control Two AAA batteries for use with remote control User Manual Power cable Speakers 2 Speaker cables 2 Cable clamps 2 Accessories for PDP Speakers Speakers for the PDP are includ...

Page 9: ...SOURCE button Press this button to switch between source signals HDTV YPbPr S Video 1 Video 1 TV1 YCbCr S Video 2 Video 2 and TV2 optional MENU button Press this button to open the on screen menu VOL...

Page 10: ...s Video 1 and Video 2 Connects to the composite video outputs of devices such as a VCR or DVD player using a Standard composite AV cable Rear Connectors The following illustration show the connectors...

Page 11: ...SWAP Alternates main screen and PIP window input sources TV VIDEO Selects main source signals DISPLAY Displays the source and channel information MUTE Enables or disables audio SLEEP Sets a time inte...

Page 12: ...r installation or incorrect mounting steps could result in damage to the PDP or injury to the installer Ensure that the PDP has adequate ventilation Do not block the ventilation slots and do not place...

Page 13: ...screws for the speakers are already installed in the PDP Remove the four screws from the left and right edges of the rear panel as indicated in the diagram below 3 Two speaker brackets are provided f...

Page 14: ...ectly the sound will lack fidelity and have a weak bass Each speaker has a cable with two jacks at each end The connectors on the speakers and the rear of the PDP have tabs To insert cable jacks first...

Page 15: ...WER button on the remote control or on the PDP to turn on the PDP When the PDP is turned on the power indicator changes from red to green the PDP begins to detect the previously set input signal sourc...

Page 16: ...tton on the remote control or in the PDP Source on screen menu For more information see Adjusting the PDP Settings in Chapter 5 Connecting Cable for an Antenna or Cable TV Connect the coaxial cable fr...

Page 17: ...tenna cable from the cable TV box antenna output port to the TV antenna input port 2 Select channel 3 or channel 4 using the channel switching control on the cable TV box 3 Tune the TV channel to the...

Page 18: ...ay choose any of the connection types offered on a device based on the convenience or quality of the connection type Prior to making any connections to your PDP ensure that the power switch at the rea...

Page 19: ...Turn on your VCR then inset a video tape into the VCR Consult the user manual of the VCR if needed 3 Press the TV VIDEO button on the remote control or the SOURCE button on the PDP unit to view and se...

Page 20: ...ct the S Video cable to the S Video 1 or S Video 2 on the PDP S Video cable does not include audio The audio cable L R should be separately connected between the audio connectors on the DVD player and...

Page 21: ...game set to the PDP Connect the Standard composite AV cable video jack to the Video 1 or Video 2 connectors on the PDP Connect the audio jacks to the Audio R L connectors Standard composite AV cable...

Page 22: ...d green red and blue YPbPr cable does not include audio The audio cable L R should be separately connected between the audio connectors on the DTV receiver and the PDP Alternatively you can use compos...

Page 23: ...f the PDP to the video input of the secondary device using a composite video cable Connect the audio white and red to Audio Out L R connectors 2 Turn on the PDP and the second PDP or monitor 3 Set the...

Page 24: ...its settings to match those of the monitor Often the image needs no adjusting There may be some variations in the image due to different models or different versions of operating systems If there are...

Page 25: ...PDP may not display them properly For WXGA formats 1280 x 768 is the lone supported display resolution If your computer has vertical and horizontal frequency selection select 60 Hz vertical and 31 5...

Page 26: ...urce and channel selection as described in the following sections Selecting theTV Input Source You can set the PDP to directly receive air signals or to receive cable signals from the cable attached t...

Page 27: ...system is in use in your area You can set the TV input standard through the on screen menu 1 Press the MENU button on the remote control or on the PDP unit 2 Press the UP DOWN button on the remote co...

Page 28: ...on the PDP unit to see the channel that the PDP has memorized To enter a channel number 1 99 use the number buttons on the remote control To enter a channel number over 100 first press the 100 button...

Page 29: ...y depends on the program and on your service provider To select Stereo Mono or SAP audio channel press the MTS button on the remote control or use the on screen menu Pressing the MTS button cycles thr...

Page 30: ...ress the UP DOWN button on the remote control to move up and down in menus The selected individual menu item is highlighted in color 3 Press the ENTER button to confirm your selection and enter the su...

Page 31: ...ser setting then press the MENU button twice to exit the menu The following table describes each item in the Picture menu Item Description Brightness Adjusts the level of light on your screen Brightne...

Page 32: ...e of the setting for a user setting then press the MENU button twice to exit the menu The following table describes each item in the Sound menu Item Description Volume Adjusts the overall volume of th...

Page 33: ...NTER button to confirm your selection 4 Press the MENU button twice to exit the menu The following table describes each item in the Source menu Item Description HDTV YPbPr Selects component video YPbP...

Page 34: ...region Choose STD HRC or IRC for NTSC system BG DK DK I or SECAM for PAL system depending on the type of cable system you used for connection MTS The Multi Channel Sound MTS feature enables you to sw...

Page 35: ...The following table describes each item in the PC menu Item Description Auto Automatically adjusts image Clock Phase H Position V Position Contrast and Brightness settings Clock Adjusts the display s...

Page 36: ...setting then press the MENU button twice to exit the menu The following table describes each item in the PIP menu Item Description Source Sets the input source for the PIP window Available input sour...

Page 37: ...se the on screen menu The name of the available input sources appear on the screen Press UP DOWN button to move through available sources then ENTER to confirm your selection If the main screen detect...

Page 38: ...is set to Video 2 and the main window is set to Video 1 after swapping you can select other Group 1 sources for the PIP window such as S Video 1 or YCbCr Changing the PIP Channel If the PIP window is...

Page 39: ...ss the MENU button twice to exit the menu The aspect ratios can also be selected by pressing the WIDE button on the remote control See the Changing the Aspect Ratio in Chapter 4 Getting Started Four a...

Page 40: ...decoder Select closed captions CC1 CC2 CC3 CC4 or teletext T1 T2 T3 T4 You can also turn closed captions or teletext on or off by pressing the CAPTION button on the remote control This function is av...

Page 41: ...NOTE The closed caption function does not work with DVD or DTV signals No captions are displayed if the program or video does not have closed captions If teletext is not available an empty black box...

Page 42: ...on to select Setup then ENTER to confirm 3 Press the UP DOWN button to select V Chip You will be prompted to enter a 4 digit PIN 4 Enter the 4 digit PIN 1234 using the number buttons 0 9 on the remote...

Page 43: ...n the Turning the V Chip on section 2 Press the UP DOWN button to select USTV Chip then ENTER to confirm A TV rating system screen appears 3 Press the ENTER button to enable the TV ratings control 4 P...

Page 44: ...level may vary in some areas NC 17 No viewers under the age of 17 are permitted X An obsolete rating that has now been replaced by NC 17 To lock movie programs 1 Enable the V Chip function following...

Page 45: ...nect power and allow two hours for any condensation to dry Keep the PDP at a distance from appliances that create magnetic fields Do not block ventilation openings Do not place liquids near or on the...

Page 46: ...s set to the proper standard for your region 4 Picture is not clear or display has flurries Solution Ensure that cable signals are good and that cable connections are secure 5 Picture is too light or...

Page 47: ...8 x 1055 x 93 5 mm without speakers and stand 28 27 x 49 21 x 11 42 718 x 1250 x 290 mm with speakers and stand Net Weight 54 56 lbs 24 8 kg without speakers and stand 85 8 lbs 39 kg with speakers and...

Page 48: ...48...

Reviews: