background image

 3

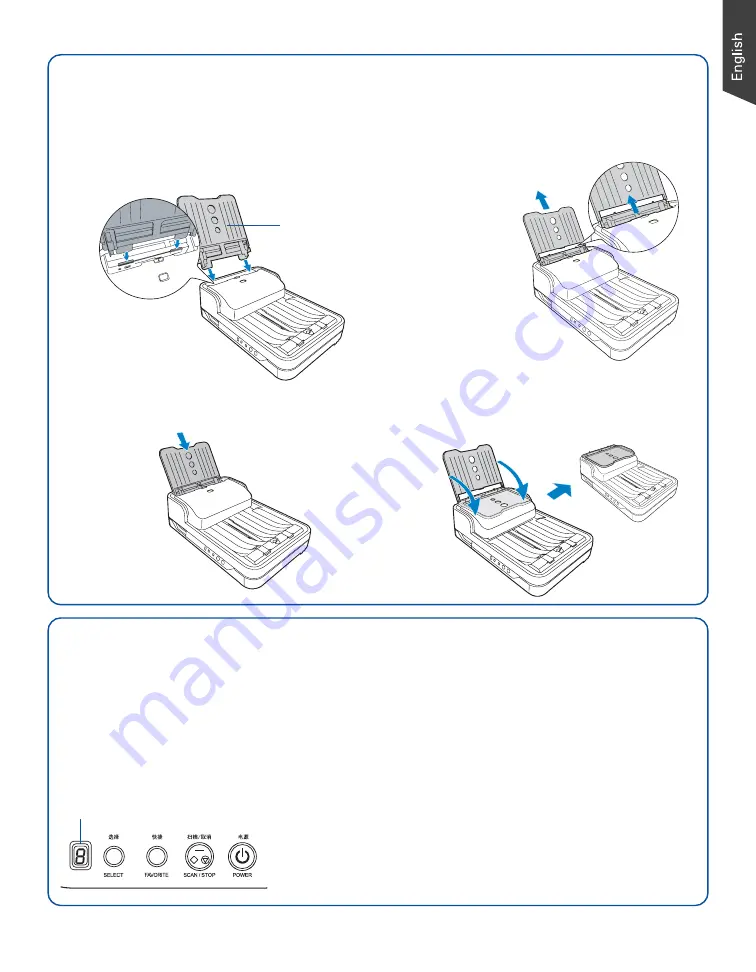
Install Document Feed Tray

A.

Insert the Document Feed Tray by sliding

the tabs into the slots at the back of the

scanner.

B.

Push the tray down until it locks in place,

and ensure that the tray sits tightly on the

scanner.

Install & Close Document Feed Tray

Document

Feed Tray

Customize the Function Button

Your scanner is equipped with one Select, one Scan/Stop and one Favorite buttons, plus a LED

display, used to automate a number of customized and predefined operations, such as scanning

to a file, sending an image to your printer, scanning for OCR, etc.  Customizing is done through

the 

Save Settings to Function Button

 command in the ScanWizard DI, refer to the scanner’s

User’s Manual for more details.

Select:

 Toggle through the numbers of predefined

function buttons (F1 to F5).

Scan/Stop:

 Start scan immediately or cancel a ongoing

scan job.

Favorite: 

Carry out the function defined to the Favorite

button directly.

LED display:

Display the selected function button

number.

A.

Along the tracks of the two sides of the

Document Feed Tray,

slide the feed

tray 

UP

 until it

reaches the

highest level

.

Close Document Feed Tray

B.

Tilt the Document Feed Tray forward in

the direction as the arrow shown in the

graph to close the tray.

Summary of Contents for ArtixScan DI 5230

Page 1: ...nstallation NOTE If the Microtek Software Installer screen does not come up automatically double click the following in succession My Computer the CD ROM or DVD ROM icon then cdsetup exe to start the installer program MAC A Place the Microtek Software CD DVD into a drive and double click the ScanPotter installer icon to install ScanPotter B Install the remaining software components then restart yo...

Page 2: ...e down when attempting to lock the unit Unlocked Locked Connect Scanner To the power adapter A Connect the power adapter to the back of the scanner B Plug one end of the power cord into the power adapter and plug the other end of the power cord into a wall outlet or other power source To the Hi Speed USB cable C Connect one end of the cable to your computer D Connect the other end of the cable to ...

Page 3: ... image to your printer scanning for OCR etc Customizing is done through the Save Settings to Function Button command in the ScanWizard DI refer to the scanner s User s Manual for more details Select Toggle through the numbers of predefined function buttons F1 to F5 Scan Stop Start scan immediately or cancel a ongoing scan job Favorite Carry out the function defined to the Favorite button directly ...

Page 4: ...er s Document Feed Tray with the side to be scanned facing down and the top edge facing toward the feeder Push the stack of papers into the tray until the paper s edge touches the bottom edge of the feeder WARNING The document feeder is not designed for scanning photos doing so may damage your originals Microtek accepts no responsibility for damage that may arise from misuse of equipment 3 Align t...

Page 5: ...he stopper touches the edge of the paper If done reload the papers to be scanned into the feed tray to start your scan NOTE The position of the Paper Stopper A on the tray must be equivalent to the length of the paper Incorrect positioning of the Paper Stopper A will result in disorders and mess for the after scanned outputs Close two Paper Stoppers B Open two Paper Stoppers B Be sure the stopper ...

Page 6: ... lift it up with your two hands 3 Place the document to be scanned face down on the scanner glass surface Position the top end of the paper towards the right of the scanner then lower the scanner lid on the scanner glass surface WARNING Due to the weight of the scanner lid ADF at the top of the scanner every time when you raise or lower the scanner lid please hold it with your hands tightly otherw...

Page 7: ...e image in grayscale Select Black White 1 bit to scan the image in black and white Select Auto Color Detection to scan the image c Select a dimension in the Paper Size drop down menu as your preview image size d Select a desired resolution in the Resolution drop down menu for your image output resolution e When scanning from ADF select a suitable paper thickness for the ultrasonic double feed dete...

Page 8: ...ge can be saved after the scan to a file or opened in an image editing program Alternatively click the Quick Scan button to scan your documents directly to a PDF NOTE For more details on other scanning scenarios applicable to your scanner refer to the scanner s User s Manual in the Microtek Software CD DVD Image correction settings Image type Scanning settings Scan frame enclosed by dotted lines a...

Page 9: ...ale to scan the image in grayscale Select Black White to scan the image in black and white b Select a desired resolution in the Resolution for your image output resolution c Select Automatic Detection or a desired dimension in the Scan Frame as your preview image size 5 If necessary click the Preview button to perform a preliminary scan of the image in the Preview window Then reload the document i...

Page 10: ...omposite display of image effects Filter column and additional image correction tools Additional Adjustment column for your scanned image Click the Scan Settings button to switch back to the default control panel of ScanPotter Preview window Scan frame enclosed by dotted lines ...

Page 11: ...med paper in an upward direction from the feeder 3 Push the ADF cover back down into place until you hear a click NOTE Do not pull out the jammed piece of paper by force from the feeder when the ADF cover closes If doing so it may damage the rollers and cause the ADF to work improperly ADF cover Release button ...

Page 12: ...Software CD DVD and see the Care and Cleaning section Cleaning the Scanner Glass Surfaces With the scanner lid ADF opened use a soft non abrasive and lint free cloth to gently wipe the glass surfaces of the flatbed and ADF of the scanner Cleaning the Sensors With the ADF cover opened find 4 sets of sensors Ultrasonic Double feed sensors I O sensors and Tray sensors and then clean the sensors with ...

Page 13: ...new one NOTE The recommended replacement point for the Separation Pad is approximate after 30 000 scans for Feed Roller Assembly is around 150 000 scans Please contact your local resellers for purchasing new pad and new feed roller For more details of replacement refer to the scanner s User s Manual in the Microtek Software CD DVD and see the Maintenance section a a b Replacing the Feed Roller Ass...

Page 14: ...an a blank screen appears Uninstall and reinstall the ScanWizard DI or ScanPotter software 4 When trying to scan an error message appears on your screen that reads Can t Find Scanners Make sure your scanner is connected to your computer and plugged in to a power source see Step 4 in the Initial Setup section Uninstall and reinstall the ScanWizard DI or ScanPotter software 5 When trying to scan an ...

Page 15: ...t run your product or your computer system properly later please go to the Microtek Download Service site at ww7 microtek com tw service php to download and install any updates you may require For additional information about Microtek products please visit our website at www microtek com Copyright 2013 Microtek Microtek ScanMaker ArtixScan ScanWizard and ColoRescue are trademarks or registered tra...

Page 16: ...16 ...

Reviews: