


MaxNAS Owner’s Manual
11
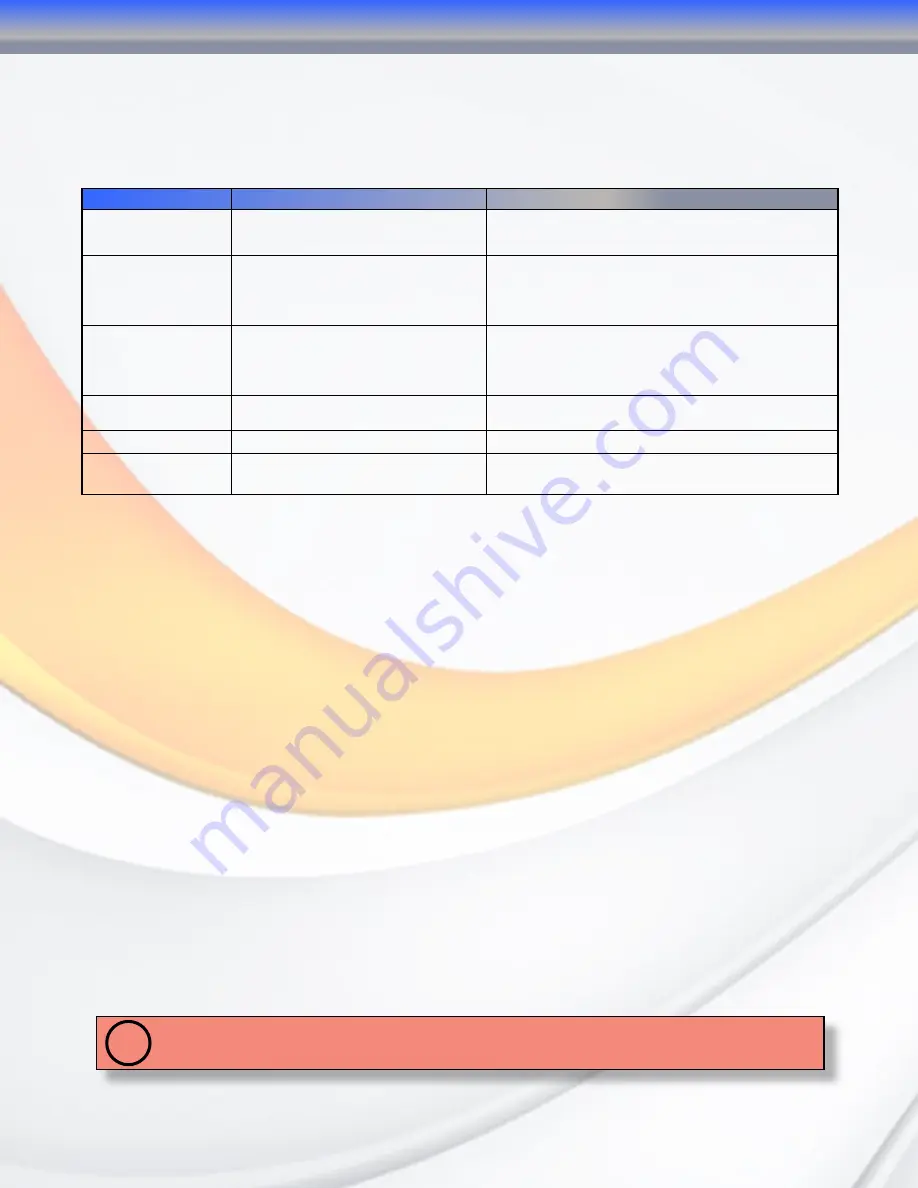
8. Visual and Audible Indicators
The MaxNAS R8 has an LCD panel, LEDs, and a buzzer to inform the user of the overall health
and function of the unit. The following chart describes the various conditions indicated:
Indicator
Normal Status
Problem Indication
System Error LED
Off
Glows red
to indicate system fault. Log into the
management GUI for further information
LAN1 LED
Blinks green
when there is network
activity on the LAN 1 port. A
steady
green
glow means there is a link but
no activity.
LED does not light up (no link)
LAN2 LED
Blinks green
when there is network
activity on the LAN 1 port. A
steady
green
glow means there is a link but
no activity
LED does not light up (no link)
Power Button LED
Glows blue
on Power Up
Blinks blue
on eSATA access
LED does not light up on power
Disk drive power LED
Glows blue
LED does not light up
Disk Activity/Fault
LED
Off/
blinks green
during hard drive
read and write activity
Blinks red
to indicate disk drive error
9. Hot plug Drive Replacement
In the event of a drive failure, the RAID subsystem supports the ability to hot-swap drives
without powering down the system. A disk can be disconnected, removed, or replaced with a
different disk without taking the system off-line. In a fault tolerant array, the RAID rebuilding
will proceed automatically in the background (see chapter 5, “Understanding RAID” for more
information.)
A drive failure will illuminate amber the Disk Activity/Fault LED on the affected drive canister.
To replace a drive, please follow these steps:
1. Make sure the disk canister locking mechanism (see page 9,
“The MaxNAS R8 Interface
components”
) is in the up-down position (use the included key to turn the mechanism.)
2. Click down on the disk canister release latch (see page 9,
“The MaxNAS R8 Interface
components”
) to release the drive tray.
3. Gently pull out the disk drive tray handle and slide out the drive tray.
4. To replace: Slide in the replacement drive tray with the tray handle open. When the tray is
slid all the way into the MaxNAS R8, push the tray handle closed.
IMPORTANT: NEVER remove a drive tray without replacing it. Operating the RAID with a drive tray
missing will disrupt airflow and may cause the MaxNAS R8 to fail.
!
1-Getting Started


