background image

15

2. The Big Picture

Chapter 1 - Unpacking Your System

Your Meridian 850 is designed to give you the speed and power of a
desktop system in a lightweight, portable package.

System Features

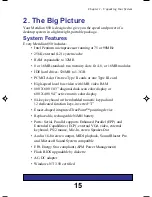
Every Meridian 850 includes:

• Intel Pentium microprocessor running at 75 or 90MHz

• 256K external (L2) system cache

• RAM expandable to 32MB

• 8 or 16MB standard; two memory slots fit 4, 8, or 16MB modules

• IDE hard drives: 528MB to 1.3GB

• PCMCIA slot fits two Type II cards or one Type III card

• High-speed local bus video with 1MB video RAM

• 800 X 600 10.3” diagonal dual-scan color display or

600 X 400 9.4” active matrix color display

• 84-key keyboard with embedded numeric keypad and

12 dedicated function keys, inverted “T”

• Eraser-shaped integrated TruePoint™ pointing device

• Replaceable, rechargeable NiMH battery

• Ports: Serial, Parallel supports Enhanced Parallel (EPP) and

Extended Capabilities (ECP), external VGA video, external
keyboard, PS/2 mouse, Mic-In, stereo Speaker-Out

• Audio: 16-bit stereo output, MIDI playback, Sound Blaster Pro

and Microsoft Sound System compatible

• EPA Energy Star compliant (APM Power Management)

• Flash BIOS upgradable by diskette

• AC-DC adapter

• Windows NT 3.50 certified

MERID850.PM5

7/17/95, 8:50 AM

15

Summary of Contents for MERIDIAN 850 NOTEBOOK MERIDIAN 850

Page 1: ...The ROADSIDE PORTABLE GUIDE TO MOBILE COMPUTING WITH YOUR MERIDIAN 850 NOTEBOOK User sGuide Meridian850 ...

Page 2: ...ny damages caused in whole or in part by customer or for any economic loss physical injury lost revenues lost profits lost savings or other indirect incidental special or consequential damages incurred by any person even if the vendor has been advised of the possibility of such damage for claims Some states do not allow the exclusion or limitation of incidental or consequential damages for consume...

Page 3: ...ng original shipping charges Returned products must be in as new condition in original packing complete with all warranty cards manuals cables and other materials as originally shipped not modified or damaged Any returned product must be shipped prepaid and insured Any return must carry a Return Merchandise Authorization RMA number obtained from us on the outside of each carton Returns without RMA...

Page 4: ...ustomer provided that the defective product or part is returned shipment prepaid to us All replaced products and parts become the property of the vendor Replacement parts shall be similar new or serviceable used parts This Limited Warranty does not extend to any products which have been damaged as a result of accident misuse abuse such as incorrect voltages power surges improper or insufficient ve...

Page 5: ...cular installation If this equipment does cause harmful interference to radio or television reception which can be determined by turning the equipment on and off the user is encouraged to try to correct the interference by one or more of the following measures Reorient or relocate the receiving antenna Increase the separation between the equipment and receiver Connect the equipment into an outlet ...

Page 6: ...6 This page intentionally left blank ...

Page 7: ...iew 16 Side Views 18 Back View 20 Using the Keyboard 24 Disk Drives 29 PCMCIA Card Slot 31 3 Battery and Power Management 32 Installing the Battery for the First Time 32 Turning On Your System 35 Battery Endurance Tips 35 Charging the Battery 38 Power Management 40 Battery Precautions 43 AC Adapter Precautions 44 4 Using Your Meridian 850 45 Opening the Lid 45 TruePoint Pointing Device 46 LCD Disp...

Page 8: ...P 54 Startup 55 Memory 59 Disks 60 Components 62 Power 64 Exit 66 6 How to Install Options 68 Installing More RAM 69 7 How to Maintain Your System 71 Travel Precautions 71 System Hardware Precautions 72 AC Adapter Precautions 73 Battery Power Pack Precautions 73 System Specifications 74 Handy Cheat Sheet 76 Glossary 78 Index 80 ...

Page 9: ...bout buttons connectors and LED indicators Chapter 3 Battery and Power management gives information about using your system for the first time and instructions for charging the battery pack and connecting the AC adapter Chapter 4 How to Use Your Meridian 850 shows how to turn on the system and begin working Chapter 5 Using SETUP explains how to use the built in SETUP features to configure your sys...

Page 10: ...cifications lists technical details about your system The Handy Cheat Sheet gives a short summary of some of the most needed or most forgotten commands The Glossary gives definitions of common computer terms Welcome ...

Page 11: ... It lists everything we shipped you As you unpack the box check the contents against the packing slip If an item is listed on your packing slip but isn t in the box it may be installed in your system or shipped inside one of the manuals or accessory bags If you re sure something is missing call Customer Service right away The Customer Service phone number is listed on an insert to this book Chapte...

Page 12: ...t running Your Windows for Workgroups and or your MS DOS User s Guide has introductory chapters to help you install and configure DOS and Windows Since we have already loaded and tested DOS and Windows on your hard drive you can probably skip those parts for now Those manuals will be useful if you need to reinstall DOS or Windows onto your computer For now this book should get you up and running C...

Page 13: ...de your case If it is hot or cold outside when you receive your system let the computer gradually adjust to room temperature before you plug it in When you first receive your computer you will certainly be eager to get it going and start putting it to work but be patient Take the time to let it grow accustomed to its new environment Keep the Box It s a good idea to keep your Meridian s box and pac...

Page 14: ...r easier access Beware Heat Cold Humidity and Glare Pick a spot for your computer that s not too not too hot and not too cold not too dark and not too bright glare can make it hard to read the screen Overheating can destroy computer components Allow plenty of room for air to circulate around the case Also be sure to use grounded electrical outlets Although your computer has its own electrical filt...

Page 15: ...local bus video with 1MB video RAM 800 X 600 10 3 diagonal dual scan color display or 600 X 400 9 4 active matrix color display 84 key keyboard with embedded numeric keypad and 12 dedicated function keys inverted T Eraser shaped integrated TruePoint pointing device Replaceable rechargeable NiMH battery Ports Serial Parallel supports Enhanced Parallel EPP and Extended Capabilities ECP external VGA ...

Page 16: ...nt pointing device works much like a joystick The onscreen cursor moves whichever way you tilt TruePoint s red button The harder you push the faster the cursor moves Suspend Resume Button The Suspend Resume button coffee cup symbol sets the system to the power saving mode when you need to take a break To use the Suspend Resume button you must check the Enable Power Saving option under SETUP s Powe...

Page 17: ...17 LED indicator lights Mouse Buttons TruePoint Pointing Device Reset Switch Power Switch Suspend Resume Button Display Latches Meridian 850 Front View Chapter 2 The Big Picture Security Cable Slot ...

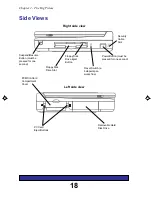
Page 18: ... must be pressed for one second Floppy Disk Drive Eject Button Reset Switch a ball point pen works fine Floppy Disk Drive Slot Right side view Removable Hard Disk Drive PCMCIA Card Compartment Cover PC Card Eject Buttons Left side view Chapter 2 The Big Picture Security Cable Slot ...

Page 19: ...lay panel is closed See Chapter 3 Battery and Power Management Reset Switch Warning When the system is rebooted all information in random access memory RAM is lost The reset switch to the right of the floppy drive reboots the system Insert the tip of a ball point pen into the opening to press the switch PCMCIA Card Eject Buttons These buttons let you insert or remove PCMCIA cards in the PCMCIA slo...

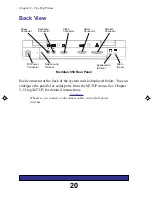
Page 20: ...enu See Chapter 5 Using SETUP for detailed instructions Caution Whenever you connect or disconnect cables turn off all power switches Mouse Connector Keyboard Connector Video Connector Serial Connector Parallel Connector DC Power Connector Field Ground Terminal Speaker Out Stereo Mic In mono Meridian 850 Rear Panel Chapter 2 The Big Picture ...

Page 21: ... pin connector for external VGA monitor The system will automatically detect an external monitor at boot Mouse 6 pin mini DIN connector used for connecting a PS 2 style mouse Auto detect at power up Keyboard 6 pin mini DIN connector used for connecting a 101 102 key external keyboard Auto detect at power up DC Power Connect the AC adapter cable here Speaker Out Mini pin jack for stereo speakers Mi...

Page 22: ...y with Windows but when installing DOS games or applications that use DOS Sound Blaster your software must use the following three hardware settings I O Address 220 IRQ 5 DMA 1 Indicator Lights Where they are Located just below your screen the indicator lights show the status of the power battery pack hard disk drive Caps Lock Num Lock and Scroll Lock Power Suspend Num Lock Indicator Lights Locati...

Page 23: ...e chapter 3 Battery and Power Management Fast blinking Battery power is nearly gone If enabled in SETUP the system beeps quickly warning you to connect the AC adapter CHARGE Orange Battery is charging Green Battery is fully charged HDD Green System is using the hard drive FDD Green System is using the floppy disk drive Caps Lock Green Caps Lock is enabled Num Lock Green Num Lock is enabled Scroll ...

Page 24: ... keys on a typewriter but computer keyboards have several specialty keys Most of today s software packages have several standard uses for the specialty keys For example in most software packages pressing the F1 key summons the online help feature The list on the next page explains the most important keys on the keyboard Alt Shift Ctrl Fn key Enter Function keys Chapter 2 The Big Picture ...

Page 25: ...pe a function without completing it Function Keys F1 through F12 the purpose of the function keys depends on the application you are using Insert toggles between insert and overtype mode In insert mode whatever you type pushes any existing characters to the right downstream In overtype mode new characters simply overwrite existing characters deleting them as you go Pause typically suspends the app...

Page 26: ...age Right Arrow moves the insertion point to the right one space Tab moves the insertion point to the next tab setting or field Typically Shift Tab moves the insertion point back one tab setting or field Up Arrow moves the insertion point up one line Num Lock Num Lk toggles the numeric keypad When the Num Lock light is on the keys on the right side of the keyboard work like a ten key calculator Wh...

Page 27: ...ric characters press the Num Lock button Keys with a number in the lower right corner will type numbers whenever Num Lock is enabled To return the keys to normal letters press Num Lock again If you install an external keyboard or keypad the keypad function is disabled Embedded Numeric Keypad gray keys Chapter 2 The Big Picture ...

Page 28: ...l Scan color displays only Setting the Speaker Volume Pushing FN F12 cycles through the four volume levels for the internal speaker When you set the volume level the system records and remembers the level you set for the Power On beep the Suspend Mode beep and the normal system beep This setting is retained in memory even when you turn the system off To lower the volume of the low battery alert cy...

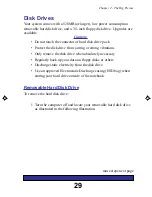
Page 29: ...Only remove the disk drive when absolutely necessary Regularly back up your data on floppy disks or others Discharge static electricity from the disk drive Use an approved Electrostatic Discharge casing ESD bag when storing your hard drive outside of the notebook Removable Hard Disk Drive To remove the hard disk drive 1 Turn the computer off and locate your removable hard disk drive as illustrated...

Page 30: ...th a Phillips screwdriver This frees the drive 3 Turn the computer over then place your fingers in the groove on the disk drive and pull the drive out of the socket continued from last page Removing the retaining screw Chapter 2 The Big Picture Removable Hard Disk Drive ...

Page 31: ...tor is toward the computer Care fully slide the card into the slot To remove a card push the PC Card Eject Button Your system comes with card and socket services that allow most PC cards be recognized Some third party cards may require their own client software Push the card into the slot until it is completely seated Note the bottom slot is socket 0 zero PC Card Ins and Outs Two Type II cards Rem...

Page 32: ...he system for the first time remove the battery pack from its package and install it Once the battery is installed allow it to fully charge before using your system without the AC adapter When the battery is fully charged the CHARGE indicator light See Chapter 2 The Big Picture Indicator Lights will glow green If the battery is not fully charged the light will be orange 3 Battery and Power Managem...

Page 33: ...ttery Pack To install the battery pack 1 Insert the battery pack into the battery compartment 2 Push the battery into the compartment until you hear a click Inserting the battery pack Chapter 3 Battery and Power Management ...

Page 34: ... the battery pack and battery pack release locks 2 Slide the battery pack release locks Releasing the battery pack locks The battery pack will pop up slightly 3 Pull the battery pack out of the compartment Battery Release Locks Chapter 3 Battery and Power Management ...

Page 35: ...ightness Uncheck L1 Cache Enable Uncheck L2 Cache Enable See Chapter 5 Using SETUP to learn how to set the power management features Turning On Your System After installing the battery pack allow it to charge fully before using your system for the first time Once the battery is fully charged go ahead and open your system and push the power button Hold the button down for one second to turn on the ...

Page 36: ...abled After the second warning the system could shut down at any moment erasing all your unsaved work Warning Systems containing more than the base amount of system memory might have a slightly shorter initial low battery warning Note If your low battery warning volumes are set to OFF the system speaker will not beep to alert you to a low battery problem If you receive a low battery warning you sh...

Page 37: ...urn off the system 4 Remove the battery pack and replace it with a fully charged battery pack If no AC adapter power outlet or extra charged battery is available 1 Save all necessary files 2 Exit the application 3 Turn off the system Low Battery Conditions continued Chapter 3 Battery and Power Management ...

Page 38: ... for an empty battery pack when the computer is off or in suspend mode The battery will not recharge while the computer is being used While the battery is charging the CHARGE LED is orange Once the battery is fully charged the CHARGE LED turns green Pre charging a Dead Battery If the battery has been completely discharged or placed in prolonged storage it may need a pre charge in addition to a nor...

Page 39: ...icator The orange CHARGE LED may flash when a faulty battery pack is installed If the CHARGE LED flashes orange rapidly remove the faulty battery pack immediately Warning Powering the system with the AC adapter and a faulty battery pack installed can damage the AC adapter Don t Unplug the AC Adapter with the Power On Never unplug the AC adapter when the system is turned on This may cause your comp...

Page 40: ...se to a modem ring Normal Mode Lets you operate at top speed without any interruptions You enable Normal mode by unchecking Enable Power Saving under SETUP s Power menu This setting is appropriate if you work non stop on your machine while it is plugged into the AC adapter Important Normal mode shortens the how long your battery will last when you disconnect from AC power Power Saving Mode Saves p...

Page 41: ... shuts down after a specified number of minutes without video activity Disk Timeout The hard disk spins down after a specified number of minutes without any hard disk accesses within that period Global Timeout Turns off all devices except memory Global Suspend if no activity is sensed for the specified number of minutes Monitor Video Activity Prevents power saving modes from engaging while there i...

Page 42: ... components Custom Power Settings also includes a Monitor Video Activity feature that resets the Timeout timer whenever something moves onscreen like a mouse pointer Suspend Controls These allow you to set automatic Suspend and automatic Resume commands Suspend Timeout specifies a Global Suspend mode all components turned off except memory after a specific time Low Battery Suspend tells Meridian t...

Page 43: ...battery into the system unit Do not drop it 6 Do not short circuit the battery electrodes 7 Do not be alarmed if the battery feels warm to the touch when installed in your system This is normal 8 If the CHARGE LED on the computer blinks green while charging remove the battery pack and allow it to return to normal operation temperature before recharging 9 After recharging if the battery power quick...

Page 44: ...st 5 seconds before attempting to reconnect it 8 Do not attempt to open the adapter which has no user serviceable parts Opening it can result in electrical shock or adapter malfunction 9 When the adapter is not being used unplug its AC power cord While attached to a wall outlet the adapter continues to supply DC voltage to the plug connector even when it is unplugged from the computer If the loose...

Page 45: ...ures Front view To open the display pull the latches at the both sides of the system backward and lift the display carefully as illustrated Examining the Interior Features The suspend resume button LED indicator lights embedded pointing device and mouse buttons are illustrated in the above picture Chapter 4 How to Use Your Meridian 850 ...

Page 46: ...mply put a finger on it and tilt it the direction you want the cursor on the screen to go The harder you tilt the faster it moves When you need to click on something use the rectangular mouse buttons on top of the wrist rest exactly as you would use the two buttons on a mouse Chapter 4 How to Use Your Meridian 850 ...

Page 47: ...ff before connecting a PS 2 style mouse Serial Mouse Before you can use any external mouse you must first install its device driver This software enables your mouse to communicate with the system See your mouse documentation to learn how to install the mouse and mouse driver To use a serial mouse run the SETUP program Ctrl Alt S system startup In SETUP pull down the Components menu then clear the ...

Page 48: ...ts the following external video resolutions and color depths Resolution Colors 640 x 480 256 32K 64K 800 x 600 256 1024 x 768 256 Tips on using Meridian s LCD display 1 To power up with the LCD panel closed you must have the AC adapter connected On battery power alone open the panel turn on power then close the panel 2 If you use the Meridian with the LCD panel closed we recommend that you run the...

Page 49: ...an use either high density 1 44MB storage capacity or double sided double density 720KB storage capacity floppy disks in this drive You can tell the disks apart by looking at the edge of the disk opposite the sliding metal panel 1 44MB disks have a write protected tab on one side and a sensing hole on the other side 720KB disks have only a write protect tab To write protect either kind of disk sli...

Page 50: ...of the disk s shiny surface or allow dust or moisture to collect on the disk Store disks at a temperature range between 50 120 degrees F 10 49C Keep disks away from magnetic fields Format a new disk before you use it for storing data Before you begin the format make sure the disk doesn t contain anything you want to save Formatting a disk will erase all data stored on it Write protect notch Sensin...

Page 51: ...ds stacked one atop the other or else a single Type III card To insert a PCMCIA card align the card label up with the connector toward the computer Carefully slide the card into the slot To remove a card push the card s eject button Your system comes with software that allows most PCMCIA cards to be recognized however some third party cards may require their own software Note Your system is instal...

Page 52: ...mputer with Flash Memory LAN Fax Modem External Cache Memory SCSI Sound system Type III PCMCIA cards can provide your computer with ATA Hard Drives Note Before you can use certain PCMCIA cards you will need to install a client driver first See your card s user manual for more details ...

Page 53: ...p Number lock on or off Boot Device Cache Serial and parallel port status Internal Mouse LCD Brightness System Password Power saving features Note SETUP configuration information resides in the battery powered CMOS RAM The battery usually lasts for about five years If the battery is low you may repeatedly get a SETUP error during system startup If this occurs call Customer Service immediately Do n...

Page 54: ... SETUP To run SETUP press Ctrl Alt S either while the system is booting up or at the DOS prompt The SETUP main screen has five menus Startup Memory Disks Components Power and Exit You should see a screen similar to the one above Note SETUP s bottom panel provides short summaries of the menus and options currently selected as well as the keys used for moving and changing values Chapter 5 Using SETU...

Page 55: ...sent values or make changes The right mouse button will let you cancel selections With your keyboard the Alt key highlights a menu then your keyboard s Left Arrow and Right Arrow keys change menus Up Arrow and Down Arrow keys select each menu s options and the Enter key or Spacebar activates choices Note SETUP s bottom panel provides short summaries of the menus and options currently selected as w...

Page 56: ...nger A check mark indicates Fast Boot is enabled Boot Device Specifies where the system boots from Available devices Diskette A Hard Disk C or PCMCIA Card PCMCIA SRAM only Video Select Selects the display type that will be used when the system boots up Avail able options from the Video Select menu include LCD Only CRT Only or Simulscan LCD Only specifies that a Liquid Crystal Display or equivalent...

Page 57: ...o 8 characters in the text box Each character is displayed by an asterisk Using the Tab key highlight Enable password for Boot up When you press the Spacebar an X appears Press Enter Next reenter the password to verify it then press Enter A message appears stating that the password has been verified then tells you to press any key to continue After the password dialog box closes an X appears next ...

Page 58: ...en tells you to press any key to continue After the password dialog box closes an X appears next to the SCU changes option Note If you enter the wrong verification password you ll have to start again To Remove the SCU changes password To disable the password press the Spacebar at Enable password for SCU changes When the X checkbox is cleared the password is disabled Configure SCU SETUP Color Schem...

Page 59: ...al cache When enabled system performance increases L1 Cache Writeback Sets cache to either writeback mode faster or write through mode L2 Cache Enable Enables or disables the onboard external L2 cache The computer is typi cally faster with L2 cache enabled Chapter 5 Using SETUP ...

Page 60: ...60 Disks Diskette Drive Configures the diskette drive Settings 1 44MB or Disabled Fast Diskette Reduces ISA bus wait states making the diskette drive quicker Chapter 5 Using SETUP ...

Page 61: ...e not in the standard list When selected you must manually enter the values for cylinders heads sectors per track SPT landing zone LZone and write precompensation Precomp for the drive to be recognized Auto ID Attempts to configure the hard drive parameters for any supported IDE drive Fast Hard Disk Enables or disables the turbo IDE interface When enabled your system can access the hard disk much ...

Page 62: ... Designates the port and the IRQ assignment for the LPT printer port Available I O addresses LPT1 378h LPT2 278h or Disabled Note When you enable an LPT Port it will use IRQ 7 LPT Type Specifies the type of LPT port Selections include Standard AT Centronics Bidirectional PS 2 En hanced Parallel EPP and Extended Capabilities ECP Chapter 5 Using SETUP ...

Page 63: ...ternal TruePoint pointing device When dis abled the external mouse port is activated Left Handed Mouse Switches the functions of the left and right mouse buttons Note If you switch mouse buttons you ll have to use the opposite buttons to return to normal Sound Chip Enables or disables the onboard sound chip Disable this chip if you use an external sound card Note This sound system works automatica...

Page 64: ...tery Only Enables power savings only while running on the battery When disabled power saving strategies will operate even while using AC power Low Power Saving Sets power savings to their lowest level Result maximum system perfor mance shortest battery life Medium Power Saving Sets power savings to a medium level Result moderate system perfor mance and moderate battery life Chapter 5 Using SETUP ...

Page 65: ... 16 minutes Disk Timeout Disabled 1 2 4 6 8 12 16 minutes Global Timeout Disabled 1 2 4 6 8 12 16 minutes Monitor Video Activity Disabled or Enabled Suspend Controls These determine when the system enters or awakens from Suspend Mode Suspend Timeout how long the system must be idle before it enters Suspend Mode settings Disabled 5 10 15 20 30 40 60 minutes Low Battery Suspend suspends the system w...

Page 66: ...s will not take effect until after the system is rebooted Save and Reboot Saves the new values and reboots the system so they can take effect Exit No Save Exits SETUP without saving any changes Default Settings Restores the default settings the original settings in ROM Chapter 5 Using SETUP ...

Page 67: ...67 Chapter 5 Using SETUP Restore Settings Restores the previous set of SETUP values Version Info Displays the current BIOS version information including version number and date ...

Page 68: ... of the most popular computer accessories Usually upgrading your system is as easy as opening the case and sliding in a new feature Caution Whenever you work inside the computer electrostatic discharge can permanently damage your equipment Always ground yourself by touching the metal portion of the rear panel before beginning these procedures We strongly recommend using an antistatic wrist strap a...

Page 69: ...al slots allow you to add memory with 4MB 8MB or 16MB RAM modules Before You Begin Select a clean well lighted work space Place your system unit on a stable work surface large enough to accommodate the components of the system unit you remove and replace Caution Whenever you work inside the computer electrostatic discharge can permanently damage your equipment Always ground yourself by touching th...

Page 70: ... using an antistatic wrist strap attached to the FG Terminal on the left side of the rear panel See illustration in Chapter 2 Back View 1 Turn off the power and remove all connecting cables 2 As you face the computer turn the system over so the bottom of the system is facing up 3 Use a screw driver to free the cover Take the cover off and set it aside 4 Hold the RAM board gently by its edges 5 Ins...

Page 71: ...e that the display is properly closed The latches on the side of the system must be secured 4 Disconnect the AC adapter and all peripherals 5 Hand carry the system Do not check it as luggage 6 Check with the airline if you plan to use the system in flight 7 When traveling in another country check that the local AC voltage and the AC adapter power cord specifications are compatible If not purchase ...

Page 72: ...stem with a damp soft cloth Do not place the system near sources of heat Do not expose the system to extreme temperatures Do not place objects on top of the system This can damage the screen Do not expose the system to direct sunlight Do not subject the system to strong vibration or shocks Be sure not to drop it Chapter 7 How to Maintain Your System ...

Page 73: ...o your outlet Do not set anything on the power cord Carefully route the power cord and cables Battery Power Pack Precautions Turn the power off before removing or replacing the battery pack Do not tamper with the battery pack Never attempt to open the case The pack can ignite if opened Corrosive chemicals in the battery can cause chemical burns Dispose of a used battery case promptly and properly ...

Page 74: ...75 or 90MHz Cache 256K external Memory ROM 128KB for system video RAM 8MB or 16MB standard expandable to 32MB Video 1MB Hard drive 2 5 inch low power consumption IDE hard drive 528MB or 1 3GB Display 10 3 inch diagonal dual scan color with 800 X 600 256 colors 9 4 diagonal active matrix color with 640 X 480 256 colors Keyboard 84 keys including cursor control arrow keys embedded numeric pad and 12...

Page 75: ...el metal hydride Voltage 7 2V DC Capacity 2600 mAh Ambient temperature 10 to 40C short term 10 to 30C long term Dimensions 10 87 w x 1 61 d x 0 81 h inch 276 w x 40 8 d x 20 5 h mm Weight 1 03 lbs 470g AC Adapter Specifications Input 90 to 240V AC 50 60Hz 0 6A maximum Output 11 5V DC 2 4A Dimensions 2 6 w X 5 4 d X 1 5 h inch 66 w X 137 d X 38 h mm Weight 79 lbs 360g DC Cable length 70 9 inch 1 80...

Page 76: ... certain drive and directory DEL filename deletes a file MD newdirectory makes a new directory RD directoryname removes and erases an empty old directory RENAME oldfilename newfilename renames a file CHKDSK drive displays a status report for a disk CD path changes to a different directory CLS clears the screen Common DOS file extensions BAK backup file BAT batch file COM command program file EXE e...

Page 77: ... or symbols in a file name The asterisk represents any number of other characters up to the DOS limit of eight For example BAK would represent any file with the extension BAK GONOW would represent all files named GONOW with any extension The question mark represents any single character For example GONOW XE would represent any file named GONOW with an extension ending in XE ONOW EX would represent...

Page 78: ...uration DIP Switches Small switches on a piece of hardware such as a CPU a printer or an option card DIP switch settings control various functions and provide a system with information about itself DIP stands for Dual In Line Package Directory A list of the files stored on a disk or a part of a disk Sometimes called a Folder Disk Drive The physical device which allows the computer to read from and...

Page 79: ...dem connected to a computer that depends on the computer for its operation Glossary Port A physical input output socket on a computer where you can connect a peripheral RAM Random Access Memory The part of memory that a computer can both read and write to The programs you use are temporarily stored in RAM All data stored in RAM is erased when you turn off the power Read To copy data from one area ...

Page 80: ...Power Button 19 Management Parameters 64 Saving 41 PS 2 Style Mouse 47 Index Index A AC Adapter Precautions 44 B Battery 32 Endurance 35 how to charge 38 how to install 33 how to remove 34 precautions 43 C Charging the Battery 38 Condensation 13 Connectors 21 D Disk Drives 29 DOS Commands 76 File Extensions 76 E Embedded Numeric Keypad 27 External Keyboard 48 External Monitor 48 I Indicator Lights...

Page 81: ...al Mouse 47 SETUP how to run 54 Power Management Parameters 64 SETUP Utility 53 Sound Chip 63 Sound Features 22 Speaker Volume 28 Suspend Resume Button 16 System how to maintain 71 how to open 45 System Specifications 74 T Travel Precautions 71 TruePoint Pointing Device 46 U Unpacking 11 W Where to set up 14 ...

Page 82: ...available in 1 3GB Now Windows NT certified p 22 Updated instructions for setting sound system parameters for games and applications p 46 Added an LCD Display section p 48 Added a table on external video resolutions p 63 Udated the Note on setting sound system parameters for DOS games and applications p 74 System Specifications now shows 75 and 90MHz CPU support Hard disk drives now available in 1...

Reviews: