background image

PICkit™ 2 User’s Guide

DS51553B-page 36

©

 2006 Microchip Technology Inc.

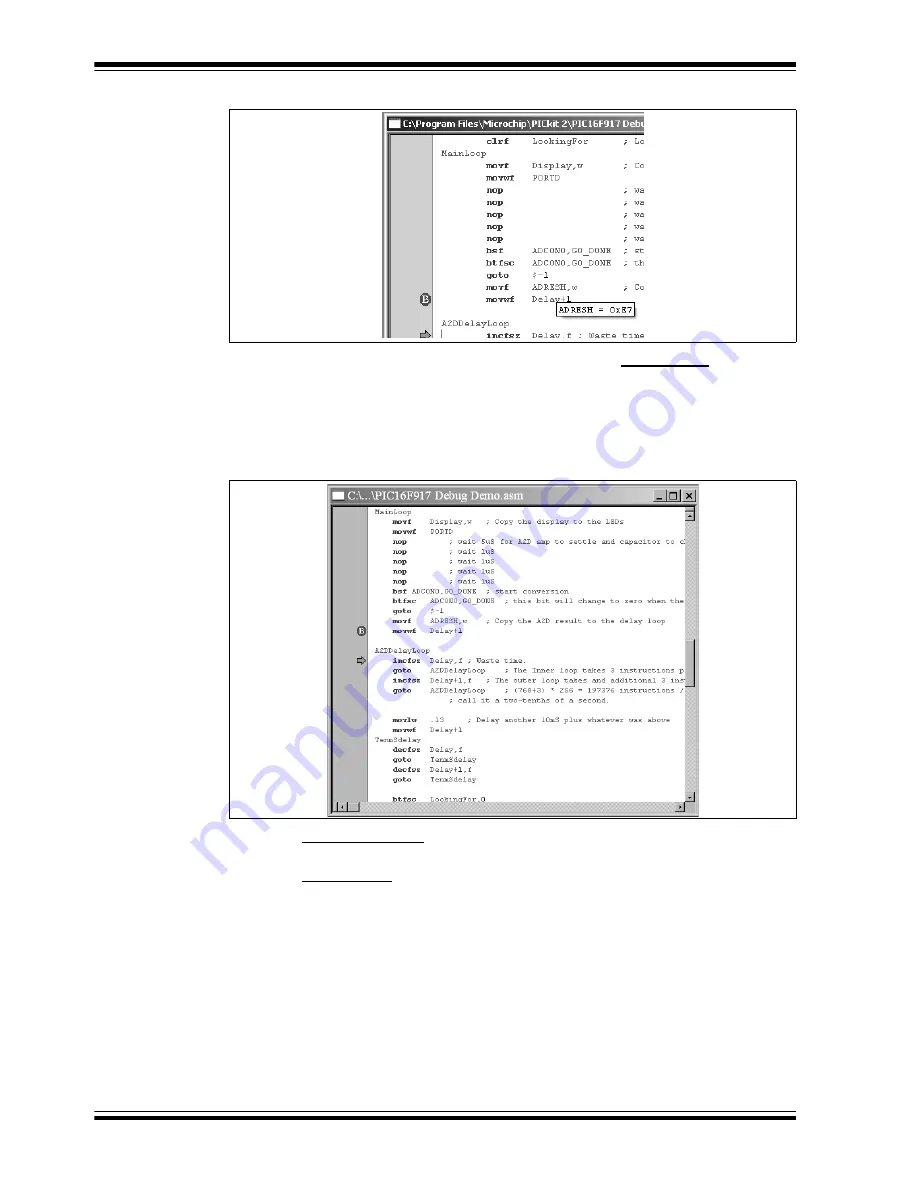
FIGURE 4-22:

ADRESH REGISTER VALUE

6.

Adjust the POT and continue the program by selecting Debug > Run. The 
program will run through the loop and halt. 

7.

Hover over “ADRESH” again, the A/D result has not changed. Thus it seems the 
A/D conversion is not working. The A/D conversion initialization and setup occurs 
at the beginning of the program.

FIGURE 4-23:

PROGRAM HALTED

8.

Select Debugger > Reset to reset the program. The first instruction should be 
indicated by a green arrow.

9.

Select View > Watch to open a new Watch window. This window allows the user 
to watch the A/D register value change as the program executes. The Watch 
dialog opens with the Watch_1 tab selected, as shown in Figure 4-24. 

Summary of Contents for PICkit 2

Page 1: ...EN This Datasheet is presented by the manufacturer Please visit our website for pricing and availability at www hest ore hu...

Page 2: ...2006 Microchip Technology Inc DS51553B PICkitTM 2 Microcontroller Programmer USER S GUIDE...

Page 3: ...is a service mark of Microchip Technology Incorporated in the U S A All other trademarks mentioned herein are property of their respective companies 2006 Microchip Technology Incorporated Printed in t...

Page 4: ...12 1 6 3 Status Bar 12 1 6 4 Progress Bar 12 1 6 5 Program Memory 12 1 6 6 Data EEPROM Memory 12 Chapter 2 Getting Started 2 1 Introduction 13 2 2 Installing the PICkit 2 Programming Software 13 2 3...

Page 5: ...er Debug Tool 25 4 2 3 Updating PICkit 2 Firmware Operating System 26 4 2 4 Running the Project Wizard 27 4 2 5 PIC16F917 Debug Demo Project 30 4 2 6 Creating a Hex File 31 4 2 7 Setting Debug Options...

Page 6: ...nd this manual is no exception Microchip tools and documentation are constantly evolving to meet customer needs so some actual dialogs and or tool descriptions may differ from those in this document P...

Page 7: ...roller Programmer to program Flash based PICmicro Microcontroller Units MCUs Chapter 3 PICkit 2 and ICSP Describes programming with the PICkit 2 Microcontroller Programmer using In Circuit Serial Prog...

Page 8: ...ialog button Click OK A tab Click the Power tab N Rnnnn A number in verilog format where N is the total number of digits R is the radix and n is a digit 4 b0010 2 hF1 Text in angle brackets A key on t...

Page 9: ...ures of the MPLAB Integrated Development Environment IDE software MPLAB IDE Quick Start Guide DS51281 Describes how to set up the MPLAB IDE software and use it to create projects and program devices M...

Page 10: ...ive e mail notification whenever there are changes updates revisions or errata related to a specified product family or development tool of interest To register access the Microchip web site at www mi...

Page 11: ...e Customers should contact their distributor representative or field application engineer FAE for support Local sales offices are also available to help customers A listing of sales offices and locati...

Page 12: ...NTRODUCING THE PICkit 2 MICROCONTROLLER PROGRAMMER The PICkit 2 Microcontroller Programmer is a low cost development programmer It is capable of programming most of Microchip s Flash microcontrollers...

Page 13: ...tus LEDs indicate the status of the PICkit 2 Microcontroller Programmer 1 Power green Power is applied to the PICkit 2 Microcontroller Programmer via the USB port 2 Target yellow The PICkit 2 Microcon...

Page 14: ...ontroller Programmer with In Circuit Serial Programming ICSP refer to Chapter 3 PICkit 2 and ICSP FIGURE 1 2 PICkit 2 CONNECTOR PINOUT 1 5 5 Lanyard Connection To help prevent possible loss of the The...

Page 15: ...ng Start Programs PICkit 2 Microcontroller Programmer PICkit 2 The programming interface appears as shown in Figure 1 3 For more information on how to us the PICkit 2 Programming Software see Chapter...

Page 16: ...Verifies program memory data EEPROM memory ID locations and Con figuration bits read from the target MCU against the code stored in the programming software Erase Performs a bulk erase of the target...

Page 17: ...f the code is displayed in the Source block The Program Memory window displays the program code in hexadecimal The code cannot be edited in the window The check box next to the Program Memory window c...

Page 18: ...stem refer to Chapter 5 Updating the PICkit 2 Operating System 2 2 INSTALLING THE PICkit 2 PROGRAMMING SOFTWARE Insert the PICkit 2 Starter Kit CD ROM into the CD ROM drive In a few moments the introd...

Page 19: ...ash device family is selected the PICkit 2 Microcontroller Programmer will automatically read the device ID word from the PICmicro MCU and display it in the Configuration window as shown in Figure 2 3...

Page 20: ...File Import HEX as shown in Figure 2 6 Browse for the hex file and click Open The code is displayed in the Program Memory and EE Data Memory windows The name of the hex file is displayed in the Sourc...

Page 21: ...is successful the status bar turns green and displays Write Successful as shown in Figure 2 7 FIGURE 2 7 WRITE SUCCESSFUL STATUS If the write fails the status bar turns red and displays Verify failed...

Page 22: ...e the status bar turns green and displays Device Verified If a discrepancy is found the status bar turns red and displays where the error is located Error in Program Memory Data EEPROM Memory or Confi...

Page 23: ...EPROM memory ID and Configuration bits However this function is not normally needed since the Write function performs an erase operation prior to programming the PICmicro MCU To erase the device click...

Page 24: ...owever the application circuit must be designed to allow all the programming signals to be connected to the PICmicro device without distorting the programming signals Figure 3 1 shows a typical circui...

Page 25: ...n ICSP Architectures DS00820 3 2 2 If the VPP pin is used as an I O port pin The application circuit that connects to the I O pin may not be able to handle the 12V voltage It is recommended to use a S...

Page 26: ...voltage isolation circuitry may be required so that the two voltage levels do not conflict 3 4 3 Bulk Erase is used Some PICmicro MCU devices use a bulk erase function to erase program memory data EEP...

Page 27: ...ER CONSIDERATIONS Minimize the distance the ICSP signals must travel by placing the ICSP connector as close to the application circuit PICmicro MCU as possible Minimize any cable length between the PI...

Page 28: ...ware interacts with the MPLAB IDE software to run stop and single step through programs One breakpoint can be set and the processor can be reset Once the processor is stopped the register s contents c...

Page 29: ...ment Mode From the MPLAB IDE menu bar select the PICmicro MCU device for this tutorial 1 Select Configure Select Device FIGURE 4 1 MPLAB IDE MENU BAR 2 Click on the Device drop down list and select th...

Page 30: ...The Output window displays communication status between the PICkit 2 Microcontroller Programmer and Target Board as shown in Figure 4 4 FIGURE 4 3 PICkit 2 DEBUG TOOL FIGURE 4 4 OUTPUT WINDOW 4 Selec...

Page 31: ...ICkit 2 Microcontroller Programmer and Target Board FIGURE 4 6 PICkit 2 MICROCONTROLLER PROGRAMMER CONNECT 4 2 3 Updating PICkit 2 Firmware Operating System Depending on the version of the MPLAB IDE s...

Page 32: ...he MPASM Assembler tool will be used 1 Select Project Project Wizard to setup the first project The Project Wizard Welcome menu will display 2 Click Next to continue to Step One FIGURE 4 8 PROJECT WIZ...

Page 33: ...he name and location of the project or click the Browse button to locate the project files Click Next to continue to Step Four FIGURE 4 11 STEP THREE Note Make sure the tools are set to the proper exe...

Page 34: ...to the project directory 3 Next add the linker script file Go to C Program File Microchip MPASM Suite LKR 16F917i lkr Make sure and select the file with the i Select and highlight the 16f917i lkr file...

Page 35: ...oject Window will display in the MPLAB IDE desktop window as shown in Figure 4 14 FIGURE 4 14 PROJECT WINDOW If needed additional files can be added to the project using the Project Window Right click...

Page 36: ...eating a Hex File Select Project Build All or right click on the project name in the Project Window and select Build All from the pop up menu The MPASM Assembler will create a hex file with the same n...

Page 37: ...umn and select the appropriate setting for the corresponding category The following Configuration bits should be set for this tutorial Oscillator INTOSC Watchdog Timer Off Power Up Timer On MCLR Pin F...

Page 38: ...programming is complete the dialog should look similar to Figure 4 20 FIGURE 4 20 OUTPUT WINDOW PICKIT 2 MICROCONTROLLER PROGRAMMER TAB Note The debug executive code is automatically programmed in th...

Page 39: ...Demo asm file from the Project Window or select File Open from the toolbar menu 2 Select Debugger Run or click the Run button 3 Turn the potentiometer RA0 located on the demo board and observe the LE...

Page 40: ...of the A D result to the high order Delay byte 1 Highlight the following line of code in the PIC16F917 Debug Demo asm file movwf Delay 1 as shown in Figure 4 21 At this breakpoint the program will sto...

Page 41: ...us it seems the A D conversion is not working The A D conversion initialization and setup occurs at the beginning of the program FIGURE 4 23 PROGRAM HALTED 8 Select Debugger Reset to reset the program...

Page 42: ...ADCON1 and ADRESH to the Watch window The selected SFRs should be visible in the Watch window as shown in Figure 4 25 FIGURE 4 25 ADD SFR 12 Select Debugger Run to the run the program in Real Time mo...

Page 43: ...am the PICkit 2 Microcontroller Program mer with the changes When the PICkit 2 Microcontroller Programmer dialog indicates Programming Succeeded the program is ready to run again 17 Right click on the...

Page 44: ...er as the programmer in Programmer Select Tool menu 3 Optional Set up the ID in Configure ID Memory FIGURE 4 28 CONFIGURE ID MEMORY FIGURE 4 29 USER ID MEMORY 4 Set up the parameters for programming o...

Page 45: ...PICkit 2 User s Guide DS51553B page 40 2006 Microchip Technology Inc NOTES...

Page 46: ...rochip com Step 2 From the menu select Tools Download PICKit 2 OS Firmware as shown in Figure 5 1 FIGURE 5 1 DOWNLOAD PICkit 2 OPERATING SYSTEM Step 3 Browse to the directory where the latest Operatin...

Page 47: ...PICkitTM 2 User s Guide DS51553B page 42 2006 Microchip Technology Inc NOTES...

Page 48: ...m the Microsoft Windows program Answer Check for shorts on the circuit board Microsoft Windows Driver Question After plugging the PICkit 2 Microcontroller Programmer into the USB port Windows 98 SE as...

Page 49: ...Guide DS51553B page 44 2006 Microchip Technology Inc Microsoft Windows 95 98 NT Question Can I run on Windows 95 98 NT Answer No These operating systems either do not support USB or have drivers that...

Page 50: ...T SDO 2 3 4 5 6 7 21 22 23 24 25 26 27 28 11 12 13 14 15 16 17 18 VDD OSC1 CLKI OSC2 CLKO RA6 VSS VSS MCLR VPP RE3 20 1 9 10 8 19 U1 1 2 3 4 5 6 NC J1 ICSP TM C1 0 1 F 5V_USB X1 C2 22 pF C3 22 pF 20 M...

Page 51: ...N Low turns on P R13 1 K C12 0 1 F C11 10 F 16V D4 ZHCS1000 R26 4 7 K MMBD4148 D1 V DD _TGT AUX ICSPCLK ICSPDAT 6 5 4 3 2 1 J3 ICSPTM AUX ICSPCLK ICSPDAT GND VDD_TGT VPP Q5 MMBT3906 10 R19 33 R20 Q3...

Page 52: ...2006 Microchip Technology Inc DS51553B page 47 PICkit 2 User s Guide NOTES...

Page 53: ...21 5407 5066 China Shenyang Tel 86 24 2334 2829 Fax 86 24 2334 2393 China Shenzhen Tel 86 755 8203 2660 Fax 86 755 8203 1760 China Shunde Tel 86 757 2839 5507 Fax 86 757 2839 5571 China Wuhan Tel 86 2...

Reviews: