10
EN
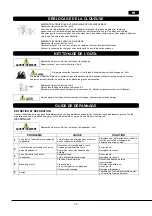
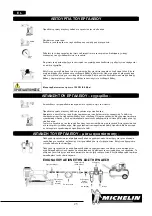
CLEARING A JAM FROM THE TOOL
FASTENER JAMMED IN FASTENER DISCHARGE AREA:
Disconnect air tool from air hose.
Open the nozzle part, grab jammed fastener with pliers and remove.
FASTENER JAM INSIDE MAGAZINE:
Disconnect air tool from air hose.
Pull back on the magazine cover.
Open the nozzle part and remove jammed fastener.
Push the magazine cover forward until the latch catches.
CLEANING THE TOOL
WARNING
Disconnect the air supply from the tool before cleaning and inspection. Ensure all parts are clean and re-
assembled properly before using the tool again.
DANGER
NEVER USE GASOLINE OR OTHER FLAMMABLE LIQUIDS TO CLEAN.
THE TOOL. VAPORS IN THE TOOL IGNITE BY A SPARK AND CAUSE THE TOOL TO EXPLODE AND RESULT IN
DEATH OR SERIOUS PERSONAL INJURY.
Disconnect the air supply from the tool.
Remove tap build-up with kerosene #2 fuel oil or fuel. Dry off tool completely before use.
NOTE
DO NOT SOAK tool with cleaning solutions, or damage may occur.
REPAIRING THE TOOL AND TROUBLE SHOOTING
SERVICE AND REPAIRS
All quality tools will eventually require servicing or replacement of parts due to wear from normal use. These operations should ONLY be
performed by a licensed professional technician. Never try to repair the tool by yourself.
TROUBLE SHOOTING
WARNING
Disconnect tool from air supply before performing any service procedure.
SYMPTOM PROBLEMS
SOLUTIONS
1
Air leak near top of tool or in trigger
area.
Loose screws.
Worm or damaged o-rings or seals.
Tighten screws. Install overhaul kit.
2
Tool does nothing or operates
sluggishly.
Inadequate air supply.
Inadequate lubrication.
Worn or damaged o-rings or seals.
Verify screws. Install overhaul kit.
3
Air leak nears bottom of tool.
Loose screws.
Worn or damaged o-rings or seals.
Tighten screws. Install overhaul kit.
4
Tool jam frequently.
Incorrect fasteners.
Damaged fasteners.
Magazine or nose screw loose. Magazine
is dirty.
Verify fasteners of correct size. Replace
w/undamaged fasteners. Tighten screws.
Clean screws.
5
Other.
Contact your local dealer for service.


