background image

CD-3706/P


Operator’s

Guide

Document Revision: 030501.1

Scribe EC Standalone Series

Operator’s Guide

Document Revision: 011804

Page 24


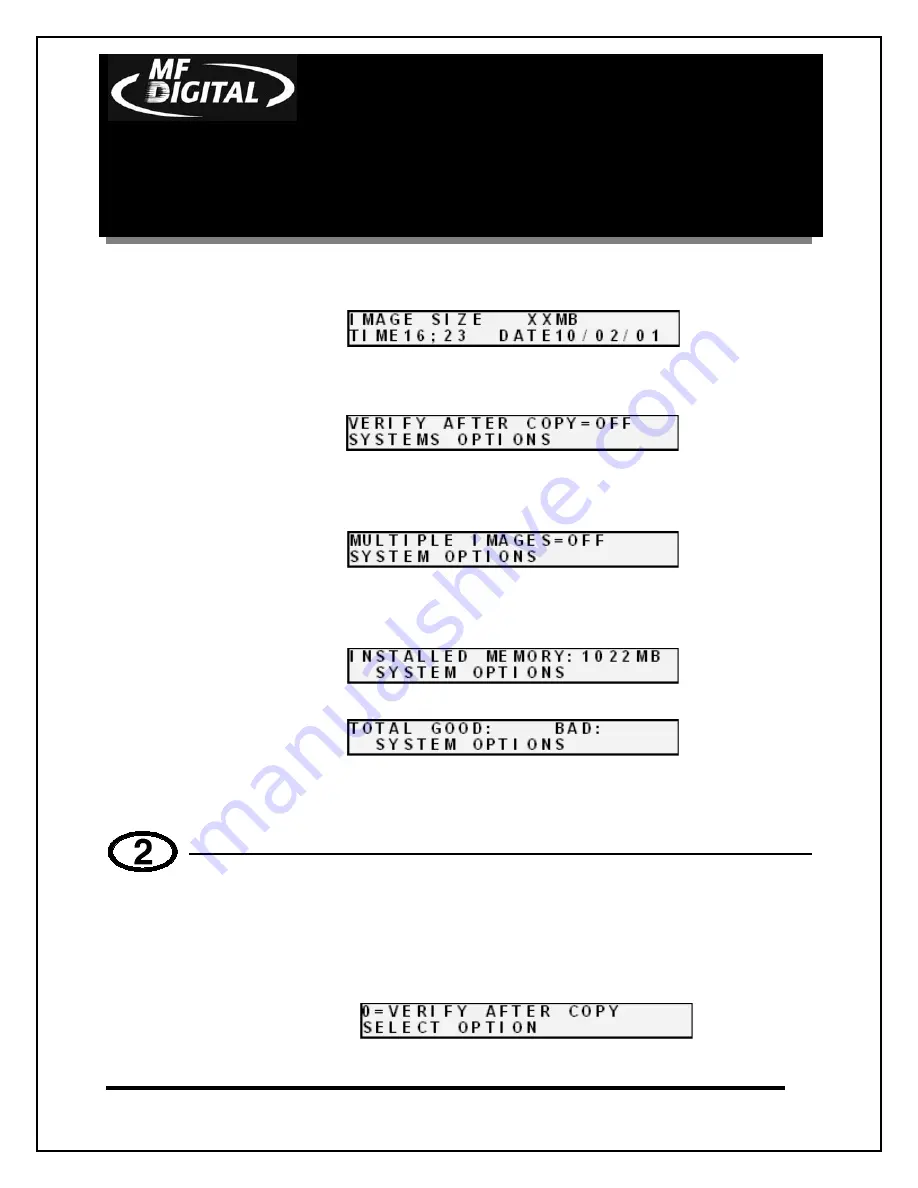
This is the version information of the firmware currently installed on
the Scribe EC Standalone.


This displays the image size on the internal hard disk, time and date.


This displays the 

Verify After


status of the Scribe EC Standalone.

The 

Verify After

 function will verify a copied disc against the master

disc immediately after it has been copied.


This displays the 

Multiple Images


status of the Scribe EC

Standalone. Multiple images allows the user to store up to 6 separate
master images on the internal Hard Drive.


This displays the 

Installed Memory


of the Scribe EC Standalone.


This displays the number of good and bad copies that were produced
to date on the system


Press the “2” key on the keypad. You will see several functions
scroll
across the screen. Select a function by pressing the corresponding
number on the keypad. Enable or disable the function by pressing
the “Start/Yes” or “Stop/No” key.

Summary of Contents for Scribe EC Standalone Series

Page 1: ...Scribe EC Standalone Series Operator s Guide...

Page 2: ...SAFETY PRECAUTIONS 13 LOCATION OF SCRIBE EC STANDALONE COMPONENTS 14 FRONT VIEW 14 REAR VIEW 14 LOCATION OF CD R RW AND DVD R RW RECORDER PARTS AND CONTROLS 15 LCD DISPLAY SCREEN AND KEYPAD 15 MF DIGI...

Page 3: ...AGE 62 MULTIPLE IMAGES DISABLED 62 MULTIPLE IMAGES ENABLED 64 ENABLING VERIFY AFTER 66 ERASING CD RW DVD RW DISCS 68 CREATING PRN FILES SPECTRUM2 PRINTER 69 CREATING PRN FILES PRISM PLUS PRINTER 70 CR...

Page 4: ...vidual CD R RW recorder manufacturers are responsible for the products they provide As a convenience MF DIGITAL will honor any service issue related to a defective recorder while under its respective...

Page 5: ...FROM AND ARE NOT BINDING ON MS Note on Java Support The SOFTWARE may contain support for programs written in Java Java technology is not fault tolerant and is not designed manufactured or intended fo...

Page 6: ...needs What To Expect From Your MF DIGITAL CD Duplicator Your MF DIGITAL Scribe EC Standalone duplicator is professionally designed and manufactured to give you years of trouble free operation To avoi...

Page 7: ...g Materials Please retain the original box and packaging in the event that the unit requires future servicing This will help to reduce the possibility of damage occurring in transit The Best Place To...

Page 8: ...OT try to defeat the third ground prong All computer peripherals must be properly grounded and the Scribe EC Standalone is no exception The use of a power conditioner such as an Uninterruptible Power...

Page 9: ...CD 3706 P Operator s Guide Document Revision 030501 1 Scribe EC Standalone Series Operator s Guide Document Revision 011804 Page 9 Location Of Scribe EC Standalone Components Front View Rear View...

Page 10: ...nd removed from this tray Pressing the eject button will open the tray when the power is switched on to the Scribe EC Standalone 2 Emergency eject pinhole In the event that the disc tray will not open...

Page 11: ...tton This button is used to manually open the disc tray 8 Emergency Eject Pinhole In the event that the disc tray will not open by pressing the eject button insert the tip of a large paper clip into t...

Page 12: ...011804 Page 12 Installing Firewire Cables Please install the firewire cables as illustrated below Plug one end firewire cable into the rear of the main fire wire controller card A and the other end of...

Page 13: ...1804 Page 13 Preparing the Spectrum2 Printer What s In The Box Spectrum2 Thermal Transfer Spectrum2 printer Power cord Parallel printer cable Printer user guide Spectrum2 Designer software and printer...

Page 14: ...804 Page 14 1 With a Phillips head screwdriver remove the rubber feet from the bottom of the printer fig 1 2 You will also want to remove the small plate from the bottom of the printer fig 1 3 Using t...

Page 15: ...lace the printer plate onto the drive bay fig 3 Note Picture of main body may vary 2 Use the dotted line at the rear of the drive bay to guide the positioning of the printer on the drive tower fig 4 3...

Page 16: ...cument Revision 030501 1 Scribe EC Standalone Series Operator s Guide Document Revision 011804 Page 16 fig 5 7 Once you are satisfied with the printer alignment tighten the thumb screws located on bot...

Page 17: ...evision 011804 Page 17 Preparing the Prism Plus Printer What s In The Box Prism Plus Prism Plus printer Power cord Parallel printer cable Printer user guide CD Designer software and printer driver CD...

Page 18: ...E Fig 3 Fig 5 shows placement of Spectrum 2 printer Placement for Prism Plus is similar 3 Place the printer plate onto the drive bay fig 3 4 Use the dotted line at the rear of the drive bay to guide t...

Page 19: ...The Box Signature IV or Signature PRO Inkjet Signature IV or Signature PRO printer Power adapter Printer software CD Color ink cartridge Spare ink cartridge holder Warranty statement and registration...

Page 20: ...3 4 Use the dotted line at the rear of the drive bay to guide the positioning of the printer on the drive tower 5 After placing the printer on the drive tower use the Printer Alignment function to al...

Page 21: ...is located between the two power receptacles The Scribe EC Standalone supports both 115 VAC and 230 VAC at 50 60 Hz Please confirm that the appropriate voltage 115 VAC for North America has been sele...

Page 22: ...one You must also power on the drive bay That switch is located at the front of the drive bay itself Once the proper voltage setting has been confirmed it is time to turn on the unit Wait a minute or...

Page 23: ...nctions When the main operating screen is displayed Press the 0 key on the keypad The screen will now read The factory setting for this function is Copy The Simulate mode is a diagnostic tool which is...

Page 24: ...isc against the master disc immediately after it has been copied This displays the Multiple Images status of the Scribe EC Standalone Multiple images allows the user to store up to 6 separate master i...

Page 25: ...ultiple Images feature allows up to six images to be stored on the hard disk drive at one time This setting will remain in effect until disabled even after restarting the Scribe EC Standalone 2 The fa...

Page 26: ...pressed the Stop No key for Loader Tester you will be prompted to align the printer Please see the Aligning the Printer section of this manual page 30 for further instructions Press the 5 key on the k...

Page 27: ...d The screen will now read Press the Start Yes key to clear the hard drive If the Stop No key is pressed you will be prompted to set the System Time Press the Start Yes key to set the system time If t...

Page 28: ...ge Network Settings Pressing Start Yes will allow you to set up the network client feature Please see Setting Up Network Client section p 51 for further details Pressing Stop No will bring you back to...

Page 29: ...s the 9 key on the keypad Something similar to the following will be displayed in sequence This displays the status of the last disc copied or compared in each of the Scribe EC Standalone s recorders...

Page 30: ...rt Yes key to enter Loader Test Mode The following screen will appear Place a CD in the 1st input area To align the drive tower first press the number with corresponds to the C command for calibrate T...

Page 31: ...Options Screen press the 5 to select the printer Select the appropriate printer that you have installed on the system Choose the number that corresponds with the printer that you have installed After...

Page 32: ...oint the automated arm will pick a disc up from the input area and place the CD so that it stops just above the printer tray Check the alignment of the printer and adjust the printer accordingly After...

Page 33: ...four master discs which are needed on a regular basis and access them to make copies as required Creating A Single Hard Disk Image Although the Scribe EC Standalone s internal hard disk can store up t...

Page 34: ...as an image on the hard disk Note If the master failed to copy to the hard drive properly the master disc will be placed in the reject area in front of the drives These discs should not be used Press...

Page 35: ...etting for this function is disabled To enable it and create multiple image files proceed as follows From the main operating screen depicted below Press the 2 key The screen will now read Press the 1...

Page 36: ...s Guide Document Revision 030501 1 Scribe EC Standalone Series Operator s Guide Document Revision 011804 Page 36 Select the number that will designate the location of your master The screen will then...

Page 37: ...ges feature disabled i e from a single hard disk image the steps are as follows From the main operating screen depicted below Load as many blank discs as are required into the CD R RW recorders Press...

Page 38: ...lows From the main operating screen depicted below Load as many blank discs as are required into the recorders Press the COPY key on the keypad The screen will now read Press the Start Yes key The scr...

Page 39: ...501 1 Scribe EC Standalone Series Operator s Guide Document Revision 011804 Page 39 Note If the master failed to copy to the hard drive properly the master disc will be placed in the reject area in fr...

Page 40: ...1 CD ROM Mode 2 CD ROM XA Mode 2 Form 1 and most CD formats can be compared Multiple Images Disabled To compare copied discs to a hard disk image that was previously created with the Multiple Images f...

Page 41: ...abled To compare copied discs to a hard disk image that was previously created with the Multiple Images feature enabled the steps are as follows From the main operating screen depicted below Load the...

Page 42: ...CD 3706 P Operator s Guide Document Revision 030501 1 Scribe EC Standalone Series Operator s Guide Document Revision 011804 Page 42...

Page 43: ...the master disc will be placed in the reject area in front of the drives These discs should not be used Enabling Verify After From the main operating screen depicted below Press the 2 key and the scre...

Page 44: ...operating screen depicted below Press the COPY key on the keypad You will then press the Stop No key until you reach the following screen Load the CD RW disc you would like to erase into the input bin...

Page 45: ...is not usable by the Scribe EC Standalone You will however want to save your label as a S2D for future editing fig A To create a prn you must use the Print feature after you have created your label Ma...

Page 46: ...le is saved in Rimage CD Designer it is given a BTW extension This format is not usable by the Scribe EC Standalone You will however want to save your label as a BTW for future editing fig A To create...

Page 47: ...sable by the Scribe EC Standalone You will however want to save your label as a std for future editing fig A To create a prn you must use the Print feature after you have created your label Select the...

Page 48: ...press the appropriate number that corresponds with the printer that you have set up on the Scribe EC Standalone system A sample of printer options is listed below Press the key corresponding to the pr...

Page 49: ...CD 3706 P Operator s Guide Document Revision 030501 1 Scribe EC Standalone Series Operator s Guide Document Revision 011804 Page 49...

Page 50: ...ing the prn file which you wish to use on top of the CD stack in the input bin From the main operating screen press the COPY key on the keypad You will be prompted to Press the Stop No key Press the S...

Page 51: ...CD 3706 P Operator s Guide Document Revision 030501 1 Scribe EC Standalone Series Operator s Guide Document Revision 011804 Page 51 The print job will now run the status will be shown as seen below...

Page 52: ...teps are as follows From the main operating screen depicted below Press the 6 key Something similar to the following will be displayed on the screen The device information is displayed for each of the...

Page 53: ...n copy CD RW discs written in most logical formats ISO 9660 audio etc but not those created using the Universal Disk Format UDF CD RW discs using UDF are produced by packet writing software such as Ad...

Page 54: ...r Eastern Standard Time observing daylight savings when applicable To set the internal clock the steps are as follows Press the 7 key on the keypad The screen will now read Press the Stop No and you w...

Page 55: ...order and most popular premastering programs such as Adaptec Easy CD Creator and Toast CeQuadrat WinOnCD Ahead Nero NTI CD Maker and others Refer to your premastering software documentation for detail...

Page 56: ...e 56 It is possible that the firmware on the CD R RW drives may be updated during this process If so you will notice all the drive lights come on and the screen will read Firmware Upgrade DO NOT TURN...

Page 57: ...alone Series to boot up you will see Press the 7 key you will see Press the START YES key you will see You must leave MF at the front of the name You should name it MF001 for example Press the START Y...

Page 58: ...of numbers of the subnet Pressing START YES after each set You will then see Press the START YES key and then Restart the system by turning it Off and back On again Configuring the Client Place the fi...

Page 59: ...age 59 Enter the name of the Scribe EC Standalone Series on the network Press OK A new tab will appear at the top of the screen called MF123 Click the MF123 tab and you will see Click Get image to pul...

Page 60: ...or s Guide Document Revision 030501 1 Scribe EC Standalone Series Operator s Guide Document Revision 011804 Page 60 Click Send image to send an image to the Scribe EC Standalone The image may be an im...

Page 61: ...501 1 Scribe EC Standalone Series Operator s Guide Document Revision 011804 Page 61 To burn from the client click Start job Click Browse to select an image to burn to the Scribe EC Standalone Select C...

Page 62: ...e that you cannot copy on your Scribe EC Standalone MF DIGITAL will do its best to promptly add support for this format Dealing with custom formats however may be subject to a development charge Keepi...

Page 63: ...Document Revision 011804 Page 63 Video CD Romeo Photo CD Joliet Picture CD Bootable CD CD G Karaoke CD High Speed CD RW is not supported to write Scribe EC Standalone Supported Formats CD ROM Mode 1...

Reviews: